HP Deskjet 840/842/843c HP DeskJet 840C Series - (English) Windows Connect Use - Page 50
Paper Type, Print Quality, Features, Mirror Image, Press the Resume
 |
View all HP Deskjet 840/842/843c manuals
Add to My Manuals
Save this manual to your list of manuals |
Page 50 highlights
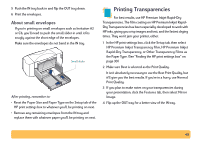
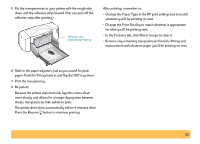
5 Put the transparencies in your printer with the rough side down and the adhesive strip forward. (You can peel off the adhesive strip after printing.) Adhesive strip forward; tape side up After printing, remember to: • Change the Paper Type in the HP print settings box to match whatever you'll be printing on next. • Change the Print Quality to match whatever is appropriate for what you'll be printing next. • In the Features tab, click Mirror Image to clear it. • Remove any remaining transparencies from the IN tray and replace them with whatever paper you'll be printing on next. 6 Slide in the paper adjusters, just as you would for plain paper. Push the IN tray back in and flip the OUT tray down. 7 Print the transparency. 8 Be patient. Because the printer uses more ink, lays the colors down more slowly, and allows for a longer drying time between sheets, transparencies take awhile to print. The printer dries them automatically before it releases them. Press the Resume button to continue printing. 50
-
 1
1 -
2
-
3
-
4
-
5
-
6
-
7
-
8
-
9
-
10
-
11
-
12
-
13
-
14
-
15
-
16
-
17
-
18
-
19
-
20
-
21
-
22
-
23
-
24
-
25
-
26
-
27
-
28
-
29
-
30
-
31
-
32
-
33
-
34
-
35
-
36
-
37
-
38
-
39
-
40
-
41
-
42
-
43
-
44
-
 45
45 -
 46
46 -
 47
47 -
 48
48 -
 49
49 -
 50
50 -
 51
51 -
 52
52 -
 53
53 -
 54
54 -
 55
55 -
56
-
57
-
58
-
59
-
60
-
61
-
62
-
63
-
64
-
65
-
66
-
67
-
68
-
69
-
70
-
71
-
72
-
73
-
74
 |
 |
