HP Deskjet D2500 Full User Guide - Page 19
Ink-backup mode, Printer Toolbox, Ink-backup, Installation, instructions, Ink-backup mode output - printers
 |
View all HP Deskjet D2500 manuals
Add to My Manuals
Save this manual to your list of manuals |
Page 19 highlights
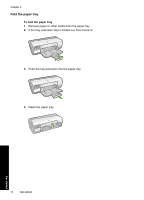
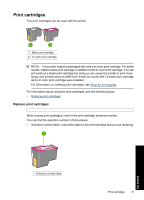
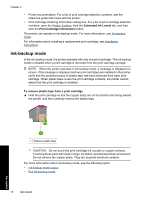
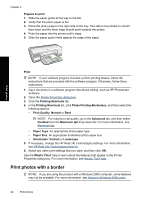
Chapter 3 • Printer documentation: For a list of print cartridge selection numbers, see the reference guide that came with the printer. • Print Cartridge Ordering Information dialog box: For a list of print cartridge selection numbers, open the Printer Toolbox, click the Estimated Ink Levels tab, and then click the Print Cartridge Information button. The printer can operate in ink-backup mode. For more information, see Ink-backup mode. For information about installing a replacement print cartridge, see Installation instructions. Ink-backup mode In the ink-backup mode, the printer operates with only one print cartridge. The ink-backup mode is initiated when a print cartridge is removed from the print cartridge carriage. NOTE: When the printer operates in ink-backup mode, a message is displayed on screen. If the message is displayed and two print cartridges are installed in the printer, verify that the protective piece of plastic tape has been removed from each print cartridge. When plastic tape covers the print cartridge contacts, the printer cannot detect that the print cartridge is installed. To remove plastic tape from a print cartridge ▲ Hold the print cartridge so that the copper strips are on the bottom and facing toward the printer, and then carefully remove the plastic tape. 1 Remove plastic tape CAUTION: Do not touch the print cartridge ink nozzles or copper contacts. Touching these parts will result in clogs, ink failure, and bad electrical connections. Do not remove the copper strips. They are required electrical contacts. For more information about ink-backup mode, see the following topics: • Ink-backup mode output • Exit ink-backup mode 16 Get started Get started
-
 1
1 -
2
-
3
-
4
-
5
-
6
-
7
-
8
-
9
-
10
-
11
-
12
-
13
-
 14
14 -
 15
15 -
 16
16 -
 17
17 -
 18
18 -
 19
19 -
 20
20 -
 21
21 -
 22
22 -
 23
23 -
 24
24 -
25
-
26
-
27
-
28
-
29
-
30
-
31
-
32
-
33
-
34
-
35
-
36
-
37
-
38
-
39
-
40
-
41
-
42
-
43
-
44
-
45
-
46
-
47
-
48
-
49
-
50
-
51
-
52
-
53
-
54
-
55
-
56
-
57
-
58
-
59
-
60
-
61
-
62
-
63
-
64
-
65
-
66
-
67
-
68
-
69
-
70
-
71
-
72
-
73
-
74
-
75
-
76
-
77
-
78
-
79
-
80
-
81
-
82
-
83
-
84
-
85
-
86
-
87
-
88
-
89
-
90
-
91
-
92
-
93
-
94
-
95
-
96
-
97
-
98
-
99
-
100
-
101
-
102
-
103
-
104
-
105
-
106
-
107
-
108
-
109
-
110
-
111
-
112
-
113
-
114
-
115
-
116
-
117
-
118
-
119
-
120
-
121
 |
 |
