HP Deskjet D2500 Full User Guide - Page 83
Solution 1: Remove and reinstall the print cartridges, Solution
 |
View all HP Deskjet D2500 manuals
Add to My Manuals
Save this manual to your list of manuals |
Page 83 highlights
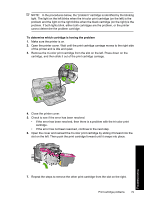
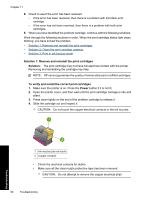
Chapter 11 8. Check to see if the error has been resolved. • If the error has been resolved, then there is a problem with the black print cartridge. • If the error has not been resolved, then there is a problem with both print cartridges. 9. When you have identified the problem cartridge, continue with the following solutions. Work through the following sections in order. When the print cartridge status light stops blinking, you have solved the problem. • Solution 1: Remove and reinstall the print cartridges • Solution 2: Clean the print cartridge contacts • Solution 3: Print in ink-backup mode Solution 1: Remove and reinstall the print cartridges Solution: The print cartridge may not have full electrical contact with the printer. Removing and reinstalling the cartridge may help. NOTE: HP cannot guarantee the quality of remanufactured or refilled cartridges. To verify and install the correct print cartridges 1. Make sure the printer is on. Press the Power button if it is not lit. 2. Open the printer cover, and then wait until the print cartridge carriage is idle and silent. 3. Press down lightly on the end of the problem cartridge to release it. 4. Slide the cartridge out and inspect it: CAUTION: Do not touch the copper electrical contacts or the ink nozzles. Troubleshooting 1 Ink nozzles (do not touch) 2 Copper contacts • Check the electrical contacts for debris. • Make sure all the clear nozzle protective tape has been removed. CAUTION: Do not attempt to remove the copper electrical strip! 80 Troubleshooting
-
 1
1 -
2
-
3
-
4
-
5
-
6
-
7
-
8
-
9
-
10
-
11
-
12
-
13
-
14
-
15
-
16
-
17
-
18
-
19
-
20
-
21
-
22
-
23
-
24
-
25
-
26
-
27
-
28
-
29
-
30
-
31
-
32
-
33
-
34
-
35
-
36
-
37
-
38
-
39
-
40
-
41
-
42
-
43
-
44
-
45
-
46
-
47
-
48
-
49
-
50
-
51
-
52
-
53
-
54
-
55
-
56
-
57
-
58
-
59
-
60
-
61
-
62
-
63
-
64
-
65
-
66
-
67
-
68
-
69
-
70
-
71
-
72
-
73
-
74
-
75
-
76
-
77
-
 78
78 -
 79
79 -
 80
80 -
 81
81 -
 82
82 -
 83
83 -
 84
84 -
 85
85 -
 86
86 -
 87
87 -
 88
88 -
89
-
90
-
91
-
92
-
93
-
94
-
95
-
96
-
97
-
98
-
99
-
100
-
101
-
102
-
103
-
104
-
105
-
106
-
107
-
108
-
109
-
110
-
111
-
112
-
113
-
114
-
115
-
116
-
117
-
118
-
119
-
120
-
121
 |
 |
