HP Digital Sender Flow 8500 User Guide
HP Digital Sender Flow 8500 Manual
 |
View all HP Digital Sender Flow 8500 manuals
Add to My Manuals
Save this manual to your list of manuals |
HP Digital Sender Flow 8500 manual content summary:
- HP Digital Sender Flow 8500 | User Guide - Page 1
HP ScanJet Enterprise 8500 fn1 User Guide - HP Digital Sender Flow 8500 | User Guide - Page 2
to change without notice. The only warranties for HP products and services are set forth in the express warranty statements accompanying such products and services. Nothing herein should be construed as constituting an additional warranty. HP shall not be liable for technical or editorial errors - HP Digital Sender Flow 8500 | User Guide - Page 3
Supported utilities for Windows ...18 HP Web Jetadmin ...18 Embedded Web Server ...18 HP Digital Sending Software (HP DSS 18 Supported network protocols ...19 Supported E-mail Setup Wizard 29 Manually configure IPv4 TCP/IP parameters from the control panel 29 Manually configure IPv6 TCP/IP - HP Digital Sender Flow 8500 | User Guide - Page 4
settings ...32 Set or change the administrator password 32 Configure e-mail options ...32 Save Server options ...39 Use HP Web Jetadmin software ...41 Controlling digital-sending security ...42 Network Erase ...44 Secure Disk Erase ...44 HP High-Performance Secure Hard Disks 44 Manage certificates - HP Digital Sender Flow 8500 | User Guide - Page 5
5 Load originals ...51 Use the automatic document feeder (ADF) ...52 Document loading tips ...52 Document loading tips for mixed-size documents 53 How to load documents ...53 Use the scanning glass ...55 6 Scan and send documents ...57 Sign in ...57 New scanner features ...58 Preview a scan ...59 - HP Digital Sender Flow 8500 | User Guide - Page 6
98 9 Troubleshooting ...101 Scan errors ...101 Basic troubleshooting tips ...103 Installation problems ...104 Initialization or hardware problems ...104 Check gateway address 111 Solve network problems ...112 Restore factory settings ...113 Contact HP Support ...113 10 Specifications and warranty - HP Digital Sender Flow 8500 | User Guide - Page 7
...120 Toner consumption ...120 Paper use ...120 Plastics ...120 HP LaserJet print supplies ...120 Paper ...121 Material restrictions ...121 Disposal Safety Data Sheet (MSDS 124 EPEAT ...124 For more information ...124 HP limited warranty statement ...125 UK, Ireland, and Malta ...126 Austria, - HP Digital Sender Flow 8500 | User Guide - Page 8
Romania ...132 Belgium and the Netherlands ...132 Finland ...132 Slovenia ...133 Croatia ...133 Latvia ...133 Lithuania ...134 Estonia ...134 Index ...135 viii ENWW - HP Digital Sender Flow 8500 | User Guide - Page 9
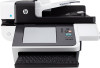
1 Product basics This User Guide covers what you need to know about using your product. ● Product features ● Front view ● Back view ● Sleep Mode ● Auto-shutdown feature ENWW 1 - HP Digital Sender Flow 8500 | User Guide - Page 10
it can be used. NOTE: USB-connected external hard drives are not supported. ● Optional HP Digital Sending Software (DSS). ● Hardware integration pocket. ● Sleep Timer Settings saves energy by causing the scanner to default to Sleep Mode after 15 minutes of inactivity. ● High content of recyclable - HP Digital Sender Flow 8500 | User Guide - Page 11
● Jetdirect Inside (JDI) ◦ IPsec ◦ Password protection ◦ SSL ◦ TLS ◦ SNMPv3 ◦ network servers ● IPsec security (hardware) ● HP High-Performance Secure Hard Disk Scanning and sending ◦ Address book for e-mail and fax ◦ Send to digital fax (Internet and LAN fax) ● Retrieve contacts from - HP Digital Sender Flow 8500 | User Guide - Page 12
4 Covered hardware integration pocket 5 Control panel 6 Paper stops 7 Automatic document feeder (ADF) 8 ADF output tray 9 ADF input tray 10 Document load/detect LED 11 Paper guides Back view 1 Power connector 2 Rear panel drawer assembly 4 Chapter 1 Product basics ENWW - HP Digital Sender Flow 8500 | User Guide - Page 13
3 EIO card slot 4 Formatter status LEDs (both are green; under normal conditions, the left LED is on steady and the right LED blinks) 5 Ethernet port 6 USB host port (under user-removable label) 7 Slot for a cable-type security lock ENWW Back view 5 - HP Digital Sender Flow 8500 | User Guide - Page 14
Sleep Mode The scanner will enter Sleep Mode after 15 minutes of inactivity. To exit Sleep Mode, do any one of the following: ● Press any button ● Touch the touch screen ● Lift the flatbed scanner lid ● Connect a USB device 6 Chapter 1 Product basics ENWW - HP Digital Sender Flow 8500 | User Guide - Page 15
Auto-shutdown feature This product is equipped with a safety feature that protects from overheating due to a blocked fan vent or a fan failure. ● Under some conditions, the touch screen will display a "pause" message for 12 minutes before initiating shutdown. ● If the product detects that the fan - HP Digital Sender Flow 8500 | User Guide - Page 16
8 Chapter 1 Product basics ENWW - HP Digital Sender Flow 8500 | User Guide - Page 17
2 Control panel ● Control-panel layout ● Interpret control panel status lights ● Control panel messages ● Home screen ● Buttons on the touch screen ● Control-panel help system ENWW 9 - HP Digital Sender Flow 8500 | User Guide - Page 18
3 Reset button Resets the job settings to factory or user-defined default values. 4 Ready LED The Ready LED indicates that the product is LED indicates that the product has a condition that requires intervention. Starts digital sending (e-mail and fax, for example), or continues a job that - HP Digital Sender Flow 8500 | User Guide - Page 19
Interpret control panel status lights The product has six LEDs on the control panel that indicate product status. The table below explains how to interpret these LEDs. LED behavior All LEDs are off. Sleep LED is on. Sleep LED is flashing. Sleep LED is off. Power LED is on. Power LED is blinking. - HP Digital Sender Flow 8500 | User Guide - Page 20
appears on the control panel, follow the on-screen instructions to resolve the issue. If the product displays an "Error" or "Attention" message, and no steps are shown to resolve the issue, turn the product off then on. Contact HP support if you continue to experience issues with the product. To - HP Digital Sender Flow 8500 | User Guide - Page 21
Folder ● Save to USB ● Quick Sets ● Workflow ● Administration ● Service 2 Product status line The status line provides information about the overall product After you sign out, the product restores all options to the default settings. 6 Network Address button Touch the Network Address button to - HP Digital Sender Flow 8500 | User Guide - Page 22
name of this button changes for each feature. For example, in the digital fax feature, the button is named Send Fax. Error button. This button The message also has instructions for solving the problem. Warning button. This button appears when the product has a problem but can continue functioning. - HP Digital Sender Flow 8500 | User Guide - Page 23
for that screen. If the product alerts you of an error or warning, touch the Error or Warning button to open a message that describes the problem. The message also contains instructions to help solve the problem. ENWW Control-panel help system 15 - HP Digital Sender Flow 8500 | User Guide - Page 24
16 Chapter 2 Control panel ENWW - HP Digital Sender Flow 8500 | User Guide - Page 25
destinations. The configuration settings are accessible from the Embedded Web Server, HP Web Jetadmin software, or the control panel. ● Supported utilities for Windows ● Supported network protocols ● Supported e-mail protocols ● Basic configuration using the Administration menu ● Basic configuration - HP Digital Sender Flow 8500 | User Guide - Page 26
. (To find the IP address, touch the Network Address button on the Home screen.) HP Digital Sending Software (HP DSS) You can install the optional HP Digital Sending Software. This software runs as a service on a network server and allows multiple products to send jobs through the server. It is - HP Digital Sender Flow 8500 | User Guide - Page 27
and standard MIB-II (Management Information Base) objects are supported. Specifies if the product responds to LLMNR requests over default settings, for Jetdirect Inside (JDI). Table 3-3 IP addressing Service name DHCP (Dynamic Host Configuration Protocol) BOOTP (Bootstrap Protocol) Auto IP Manual - HP Digital Sender Flow 8500 | User Guide - Page 28
Table 3-4 Security features Service name IPsec/Firewall SNMP v3 Access control list (ACL) SSL/TLS IPsec batch configuration Description Provides network-layer security on IPv4 and IPv6 networks. A firewall - HP Digital Sender Flow 8500 | User Guide - Page 29
are connecting through a DSL or cable connection, contact the internet service provider to obtain the SMTP server IP address. LDAP ● LDAP is characters, the list of matching e‑mail addresses becomes smaller. ● The product supports LDAP, but a connection to an LDAP server is not required in order - HP Digital Sender Flow 8500 | User Guide - Page 30
mail settings using the E-mail Setup Wizard ● Manually configure IPv4 TCP/IP parameters from the control panel ● Manually configure IPv6 TCP/IP parameters from the control , save-to-network-folder, save-to-USB-device, and digital-send-service options. Fax Settings Use this menu to set up fax-send - HP Digital Sender Flow 8500 | User Guide - Page 31
Jetdirect menu. Troubleshooting Use this menu to help resolve problems. Available options HP Jetdirect configuration page. The default host name is NPIxxxxxx, where xxxxxx is the last six digits Manual: Use the Manual Settings menu to configure TCP/ IPv4 parameters. Specify the IP address to default - HP Digital Sender Flow 8500 | User Guide - Page 32
item to enable or disable IPv6 operation on the server. On (default): IPv6 is enabled. Off: IPv6 is disabled. Type the server address, a 32 hexadecimal digit IPv6 node address that uses the colon hexadecimal syntax. Use this item to manually set IPv6 addresses on the server. Enable: Select this item - HP Digital Sender Flow 8500 | User Guide - Page 33
to contact your Independent Service Provider (ISP) for the proxy server address. Type the port number used by the proxy server for client support. The port number Jetdirect server will appear as a secure site. HTTPS Optional (default): Access using either HTTP or HTTPS is permitted. Specify the - HP Digital Sender Flow 8500 | User Guide - Page 34
settings on the Jetdirect server will be saved or reset to factory defaults. Yes: Security settings are reset to factory defaults. No (default): The current security settings are maintained. Yes: Run a LAN hardware test. No (default): Do not run a LAN hardware test. Yes: Run an HTTP test. No - HP Digital Sender Flow 8500 | User Guide - Page 35
Jetdirect server and network product might be lost. Auto (default): The Jetdirect server uses auto-negotiation to configure itself with detected link speed of the hub/switch port. (A 1000T half-duplex selection is not supported.) 10T Half: 10 Mbps, half-duplex operation. 10T Full: 10 Mbps, full- - HP Digital Sender Flow 8500 | User Guide - Page 36
Energy Settings screen. Assign IP address If the network uses dynamic host configuration protocol (DHCP), the IP address can be assigned automatically. Otherwise, you must manually assign an IP address. 28 Chapter 3 Administration - Configure the product ENWW - HP Digital Sender Flow 8500 | User Guide - Page 37
Touch Save. To manually assign an IP address Manual, and then touch Save. 3. On the IPv4 Settings screen, touch Manual the Scan/Digital Send Settings then follow the onscreen instructions; touch Next as 2. Follow the onscreen instructions to set up and complete, click OK. Manually configure IPv4 TCP/IP - HP Digital Sender Flow 8500 | User Guide - Page 38
IPv4 Settings screen, touch Manual Settings, and then touch the option you wish to manually set and follow the onscreen instructions to change the option setting . Disable network protocols (optional) By factory default, all supported network protocols are enabled. Disabling unused protocols has - HP Digital Sender Flow 8500 | User Guide - Page 39
Link speed and duplex settings The link speed and communication mode of the product must match the network. For most situations, leave the product in automatic mode. Incorrect changes to the link speed and duplex settings might prevent the product from communicating with other network devices. If - HP Digital Sender Flow 8500 | User Guide - Page 40
from the General Security option on the Security tab. When set, you must enter this password to change settings within the Embedded Web Server. Configure e-mail options 1. Open the Embedded Web Server. 2. Click the Scan/Digital Send tab. 32 Chapter 3 Administration - Configure the product ENWW - HP Digital Sender Flow 8500 | User Guide - Page 41
service provider (ISP). Save to Network Folder Setup Before configuring network folders, set up shared folders following the instructions for your network operating system. 1. Open the Embedded Web Server. 2. Click the Scan/Digital network folder. 5. Set the default settings you want for all folders - HP Digital Sender Flow 8500 | User Guide - Page 42
Embedded Web Server. 2. Click the Scan/Digital Send tab. 3. On the left navigation menu, the Enable Save to USB checkbox. 5. Set the default settings you want. 6. Click the Apply button. Click the Add button, and then follow the onscreen instructions in the Quick Set Wizard. 5. When you are - HP Digital Sender Flow 8500 | User Guide - Page 43
LDAP or Windows). c. Follow the onscreen instructions on the selected sign-in method setup Groups and Device Permissions, select the default permission set for each type of sign then click General Security. 3. Type a new password and then type the password again to verify. 4. Select Enable Host - HP Digital Sender Flow 8500 | User Guide - Page 44
available from the Embedded Web Server (EWS). For information about specific options, see the EWS Help. Table 3-7 Embedded Web Server configuration options EWS tab Scan/Digital Send Fax Networking Options Address Book, E-mail Setup, Save to Network Folder Setup, Save to USB Setup, OXPd: Workflow - HP Digital Sender Flow 8500 | User Guide - Page 45
maintain the product. ● Use information pages ● Use the Embedded Web Server ● Use HP Web Jetadmin software ● Controlling digital-sending security ● Security features ● Energy settings ● Upgrade the firmware ● Backup product data ● Restore product data Occasional cleaning of the product helps ensure - HP Digital Sender Flow 8500 | User Guide - Page 46
page option you want to see, and then touch View. ● Configuration/Status Pages ◦ Administration Menu Map ◦ Current Settings Page ◦ Configuration Page ◦ File Directory Page ◦ Web Services Status Page ◦ Usage Page ● Fax Reports ◦ Speed Dial List 38 Chapter 4 Administration - Manage the product ENWW - HP Digital Sender Flow 8500 | User Guide - Page 47
HP Scanjet Enterprise 8500 fn1 settings might require a password. You can use the Open the Embedded Web Server 1. In a supported Web browser on your computer, type the product General, Scan/Digital Send, Fax, Troubleshooting, Security, and can change when you upgrade firmware, so refer to the Embedded - HP Digital Sender Flow 8500 | User Guide - Page 48
the HP Digital Sending Software. The Fax tab allows you to set up and configure fax sending and speed dial options. The Troubleshooting tab allows you access device reports and logs, locate and install new firmware, and restore device settings to factory defaults. NOTE: Upgrading firmware requires - HP Digital Sender Flow 8500 | User Guide - Page 49
issues before users are affected. Download this free, enhanced-management software at www.hp.com/ go/webjetadmin. Plug-ins can be installed into HP Web Jetadmin to provide support for specific product features. The HP Web Jetadmin software can automatically notify you when new plug-ins are available - HP Digital Sender Flow 8500 | User Guide - Page 50
protect the security of the digital-sending process. Network authentication The , the product supports several authentication methods of third-party software vendors offer services for secure e-mail delivery. The can also set a local administrator password using the General Security option on the - HP Digital Sender Flow 8500 | User Guide - Page 51
● HP High-Performance Secure Hard Disks ● Manage certificates ● Authentication and authorization Secure the Embedded Web Server Assign a password for storage operations. This is the fastest mode. Non-Secure Fast Erase is the default erase mode. ● Secure Fast Erase. Access to the file is removed, and - HP Digital Sender Flow 8500 | User Guide - Page 52
flash-based product non-volatile RAM (NVRAM) that is used to store default settings, page counts, and similar data. This feature does not affect data the Escape key until the Boot menu displays. HP High-Performance Secure Hard Disks This product supports an encrypted hard disk that might be installed - HP Digital Sender Flow 8500 | User Guide - Page 53
Certificate Management page is unavailable, update the product firmware. 3. Under Install Certificate, click Browse... to the control panel menu by establishing passwords. These passwords can be created to be manage product permissions. By default, the product will support Guest, Administrator, and - HP Digital Sender Flow 8500 | User Guide - Page 54
● Relationships Between Network Users or Groups and Device Permissions. This section allows the administrator to select the default permission set for Windows and LDAP sign-in methods. ● Device User Accounts. This section allows the administrator to establish user access codes. 46 Chapter 4 - HP Digital Sender Flow 8500 | User Guide - Page 55
Click the General tab, and then select Energy Settings. 3. Under Sleep Schedule, click Add to open the Sleep Schedule window. a. Follow the onscreen instructions to define a weekly or holiday sleep schedule event. b. Click Apply to save the sleep schedule event. 4. Under Sleep Timer Settings on the - HP Digital Sender Flow 8500 | User Guide - Page 56
password to complete this task. 1. From the Home screen, touch the Administration button, touch the Reports button, and then touch the Configuration/Status Pages button. NOTE: Check the Configuration Page option; the report lists the current firmware revision number. 2. See www.hp.com/support - HP Digital Sender Flow 8500 | User Guide - Page 57
Backup product data HP recommends doing routine, scheduled backups as a best practice. To backup field under Authentication Settings. 4. Under Authentication Settings, enter the Windows domain, username, and password, and then click OK to create the backup file. A progress meter indicates the status - HP Digital Sender Flow 8500 | User Guide - Page 58
the encryption key in the Encryption Key field under Authentication Settings. 4. Under Authentication Settings, enter the Windows domain, username, and password, and then click OK to restore the backup file. A progress meter indicates the status of the restore operation. The product automatically - HP Digital Sender Flow 8500 | User Guide - Page 59
5 Load originals ● Use the automatic document feeder (ADF) ● Use the scanning glass ENWW 51 - HP Digital Sender Flow 8500 | User Guide - Page 60
maximum capacity is less. ● The automatic document feeder (ADF) supports the following paper types. Standard stock (single page) Standard stock in) in width, place the long edge of the page parallel to the paper guides. ● To scan fragile documents (such as photos or documents on wrinkled or very - HP Digital Sender Flow 8500 | User Guide - Page 61
job build must have documents of the same width and length. How to load documents 1. Adjust the paper guides to the width of the documents. Take care not to overtighten the guides, which can restrict paper feeding. When scanning small originals such as checks, it is especially important that the - HP Digital Sender Flow 8500 | User Guide - Page 62
loading selection matches the edge you are feeding first to ensure that the scan reflects the orientation of the original document. 5. Verify that the paper guides are aligned with the edges of the stack. 54 Chapter 5 Load originals ENWW - HP Digital Sender Flow 8500 | User Guide - Page 63
Use the scanning glass Place items that do not meet the specifications for the automatic document feeder (ADF) directly onto the scanning glass. Minimum size: Maximum size: No minimum size 216 x 356 mm (8.5 x 14 in) NOTE: Not all the length of the scanning glass is in the active imaging area, so - HP Digital Sender Flow 8500 | User Guide - Page 64
56 Chapter 5 Load originals ENWW - HP Digital Sender Flow 8500 | User Guide - Page 65
6 Scan and send documents ● Sign in ● New scanner features ● Preview a scan ● Send a scanned document to one or more e-mails ● Fax a scanned document ● Save to a network folder or USB storage device ● Save to a SharePoint site ● Send or save a document using Quick Sets ● Scan to a workflow - HP Digital Sender Flow 8500 | User Guide - Page 66
scanned image when pages are skewed during scanning. ● Automatic Tone ● Cropping Options: Use this feature to specify a method to automatically crop the scan for digital sending. ◦ Do not crop does not crop the scan. ◦ Crop to paper crops the scan to the edge of the document being scanned through - HP Digital Sender Flow 8500 | User Guide - Page 67
Preview a scan Use the touch screen to navigate through the options on the Image Preview screen. 1 Home button 2 Start button 3 Help button 4 Cancel Job button 5 Page control field 6 Zoom button 7 View button 8 Append Pages button 9 Move Pages button 10 Rotate Pages button 11 - HP Digital Sender Flow 8500 | User Guide - Page 68
3. To see a multi-page view of the scanned document and move, append, delete, or rotate pages, touch the View button. 4. When you are done making changes, touch the Start button to save your changes and send the scan or the Cancel Job button to cancel your changes and return to the previous screen. - HP Digital Sender Flow 8500 | User Guide - Page 69
Send a scanned document to one or more e-mails The e-mail feature offers the following benefits: ● Sends documents to multiple e-mail addresses, saving time and delivery costs. ● Delivers files in black-and-white or in color. Files can be sent in different file formats that the recipient can - HP Digital Sender Flow 8500 | User Guide - Page 70
Delete entries from the Personal Contacts address book You can delete entries that you no longer use. NOTE: To change an entry, highlight the text you want to change, and then type the new text. 1. Touch the entry that you want to delete from the Personal Contacts address book. 2. Touch the Remove - HP Digital Sender Flow 8500 | User Guide - Page 71
screen, touch the E-mail button. 3. If prompted, type your user name and password. 4. Complete the From: and To: fields. Scroll down and complete the cc :, bcc:, and Message: fields if appropriate. Your user name or other default information might appear in the From: field. If so, you might not be - HP Digital Sender Flow 8500 | User Guide - Page 72
Fax a scanned document Use the Send Fax screen Use the touch screen to navigate through the options on the Send Fax screen. 1 Home button 2 Send Fax button 3 Error/warning button 4 Help button 5 Preview button 6 Speed Dial Code field 7 Search button 8 Speed Dials button 9 Scroll - HP Digital Sender Flow 8500 | User Guide - Page 73
a fax 1. Place the document face up in the document feeder. 2. From the Home screen, touch the Fax button. 3. If prompted, type your user name and password. 4. Specify the fax numbers by using one or both of these methods: Use the Fax Number: field Use a speed dial Type the fax number. (Optional - HP Digital Sender Flow 8500 | User Guide - Page 74
administrator has made the feature available, the product can scan a file and save it to either a USB storage device or a network folder. Supported operating systems for folder destinations include Windows 2000, Windows XP, Windows Server 2003, and Windows Server 2008. 1. Place the document face up - HP Digital Sender Flow 8500 | User Guide - Page 75
the Quick Sets button on the Home screen, depending on how the save-to-SharePoint option was defined. 4. If prompted, type your user name and password. 5. If necessary, press the Start button on the control panel to start the scan. NOTE: It is possible to configure a scan-to-SharePoint quick set - HP Digital Sender Flow 8500 | User Guide - Page 76
Those Quick Sets buttons that have a small Start icon on them start scanning when you touch them. 3. If prompted, type your user name and password. 4. If a screen for sending the scanned document to e-mail, fax, or a network folder displays, complete the fields, and then touch the Start button. 68 - HP Digital Sender Flow 8500 | User Guide - Page 77
Scan to a workflow destination NOTE: This product feature is provided by the optional Digital Sending Software. If the system administrator has enabled the workflow functionality, you can scan a document and send it to a custom workflow destination. A workflow destination gives - HP Digital Sender Flow 8500 | User Guide - Page 78
70 Chapter 6 Scan and send documents ENWW - HP Digital Sender Flow 8500 | User Guide - Page 79
7 Maintain the product This section presents information about how to maintain the product. ● Order maintenance and scanning supplies ● Clean the touch screen ● Clean the scanning glass, scanning strip, and automatic document feeder (ADF) duplex background ● Clean the rollers ENWW 71 - HP Digital Sender Flow 8500 | User Guide - Page 80
Order maintenance and scanning supplies You can purchase maintenance parts for your product. 1. See the HP product parts Web site at www.hp.com/buy/parts. 2. Select your language, and then click the arrow. Clean the touch screen Clean the touch screen whenever it is necessary to remove - HP Digital Sender Flow 8500 | User Guide - Page 81
3. Clean the scanning glass and scanning strip with a soft, lint-free cloth that has been sprayed with a mild glass cleaner. CAUTION: Use only glass cleaner to clean the scanning glass and scanning strip. Avoid cleaners that contain abrasives, acetone, benzene, and carbon tetrachloride, all of which - HP Digital Sender Flow 8500 | User Guide - Page 82
5. Close the scanning lid, and then raise the scan input tray until it is perpendicular to the product. 6. Press in on the ADF duplex background tabs to release the ADF duplex background (1), and then pull forward to remove the ADF duplex background from its housing (2). 74 Chapter 7 Maintain the - HP Digital Sender Flow 8500 | User Guide - Page 83
7. Wipe the two scanning strips (one black, one white) on the ADF duplex background (1) and the strip inside the ADF duplex background enclosure (2) with a soft, lint-free cloth that has been moistened with warm water. 8. Dry the scanning strips with a dry, soft, lint-free cloth, and then slide the - HP Digital Sender Flow 8500 | User Guide - Page 84
Clean the rollers Clean the rollers under the following conditions: ● You experience repeated document jams. ● The product does not pull pages into the paper path. ● The scanned images are elongated. ● You frequently scan any of the following types of documents: coated paper, chemically treated - HP Digital Sender Flow 8500 | User Guide - Page 85
a. On the Home screen, touch the Device Maintenance button. b. Touch the Clean Rollers button. c. Scroll down through the online maintenance procedure and touch the Complete Maintenance Procedure button. d. Touch OK to record the maintenance activity and reset the counters to zero. ENWW Clean the - HP Digital Sender Flow 8500 | User Guide - Page 86
78 Chapter 7 Maintain the product ENWW - HP Digital Sender Flow 8500 | User Guide - Page 87
the hard drive ● Install a Jetdirect card ● Install an accessory into the hardware integration pocket Animations which guide you through several maintenance tasks are available on the web. For the latest parts information and animations, see www.hp.com/support, and search on your product. ENWW 79 - HP Digital Sender Flow 8500 | User Guide - Page 88
: An animation which guides you through removing and replacing the rollers is available on the web (see www.hp.com/support, and search on your kit, see www.hp.com/buy/parts. NOTE: The roller replacement kit is a consumable and is not covered under warranty or standard service agreements. To replace - HP Digital Sender Flow 8500 | User Guide - Page 89
3. Slide your fingertip behind the tab on the roller assembly door, and then pull gently forward and down to open the door. ENWW Replace the rollers 81 - HP Digital Sender Flow 8500 | User Guide - Page 90
4. Holding the roller assembly door down and out of the way, grasp the roller assembly and slide it to the left to release it from the enclosure. CAUTION: Do not touch the rollers with bare fingers, as oils from your fingers could impact performance. NOTE: You might feel a slight resistance when - HP Digital Sender Flow 8500 | User Guide - Page 91
the roller assembly door, pressing firmly against the door until you hear a click (the click indicates that the latch is seated correctly). NOTE: HP recommends that you replace the rollers and separation pad every 100,000 scans. Once the rollers are replaced, replace the separation pad and then log - HP Digital Sender Flow 8500 | User Guide - Page 92
when you replace the rollers. To order the roller replacement kit, see www.hp.com/buy/parts. TIP: An animation which guides you through removing and replacing the separation pad is available on the web (see www.hp.com/support, and search on your product). To replace the separation pad, follow these - HP Digital Sender Flow 8500 | User Guide - Page 93
4. Lift up on the separation pad component, release it from its housing, and set it aside. TIP: This is easier to do if you lower the input tray. CAUTION: Do not touch the pad itself with bare fingers, as oils from your fingers could impact performance. 5. Slide the rear edge of the new separation - HP Digital Sender Flow 8500 | User Guide - Page 94
6. Press down on the front portion of the separation pad component until you hear an audible click, indicating that the pad is seated firmly. TIP: Taking care not to touch the pad with bare fingers, press down on the pad and then release, ensuring that the pad springs back up. This indicates that - HP Digital Sender Flow 8500 | User Guide - Page 95
the online maintenance procedure and touch the Complete Maintenance Procedure button. d. Touch OK to record the maintenance activity and reset the counters to zero. NOTE: HP recommends that you replace the rollers and separation pad every 100,000 scans. ENWW Replace the separation pad 87 - HP Digital Sender Flow 8500 | User Guide - Page 96
Replace the front panel TIP: An animation which guides you through removing and replacing the front panel is available on the web (see www.hp.com/support, and search on your product). To replace the front panel, follow these steps: 1. Press the Power button to turn off the product, and then - HP Digital Sender Flow 8500 | User Guide - Page 97
5. While still holding the front panel in an inverted position, disconnect the front panel cable and set the front panel aside. 6. Connect the new front panel to the front panel cable. 7. Gently feed the ribbon cable through the cable restraint (1) and connect the ribbon cable (2). ENWW Replace - HP Digital Sender Flow 8500 | User Guide - Page 98
8. Invert the front panel so that it is touch screen side up, position the front panel to align with the bezel (1), and then press down on the front panel to seat it in place (2). 9. Close the scan lid, reconnect the power cable, and then turn on the product. 90 Chapter 8 Replace and install - HP Digital Sender Flow 8500 | User Guide - Page 99
Replace the keyboard You can order keyboards in several languages as accessories. To replace the keyboard, follow these steps: 1. Press the Power button to turn off the product, and then disconnect the power cable. 2. Remove the keyboard. a. Slide the four sliding tabs toward the front of the - HP Digital Sender Flow 8500 | User Guide - Page 100
b. Position the new keyboard over the keyboard frame so the fixed tabs on the keyboard align with the tab slots on the frame (1), gently push the keyboard against the keyboard frame (2), and then push the four sliding tabs in to secure the keyboard (3). 4. Reconnect the power supply to the product, - HP Digital Sender Flow 8500 | User Guide - Page 101
Replace the hard drive HP recommends doing routine, scheduled backups as a best practice. Doing routine backups will minimize data loss in the event of a hard drive failure. To replace the - HP Digital Sender Flow 8500 | User Guide - Page 102
3. Gently lift the drive rail lever on the left leading edge of the hard drive (1), slide the drive forward (2), and then disconnect the cable from the hard drive. 4. Lift the hard drive out of the drawer assembly and set the hard drive aside. 5. Remove the black plastic rails from the drive you - HP Digital Sender Flow 8500 | User Guide - Page 103
6. Slide the hard drive into the drive housing until it snaps into place (ensure that the pegs on the side of the drive rails fit into the slot on the drive housing), and then connect the drive cable to the drive. NOTE: Make sure to tuck the drive cable under the cable restraint. 7. Slide the rear - HP Digital Sender Flow 8500 | User Guide - Page 104
. 3. Remove the replacement Jetdirect card from its packaging and insert the card into the card slot ledgeside up, as shown. a. Align the card with the guide rails in the slot. b. Firmly press the card into the slot until the card is seated (2), and then secure the card with the card plate - HP Digital Sender Flow 8500 | User Guide - Page 105
4. Connect the Ethernet cable to the formatter (1), reconnect power (2), and then press the Power button to turn on the product (3). ENWW Install a Jetdirect card 97 - HP Digital Sender Flow 8500 | User Guide - Page 106
the hardware integration pocket You can install a separately-purchaseable HP accessory (for example, a proximity reader, fingerprint reader, might not apply to other HIP accessories. Always refer to the installation instructions that came with your accessory. To install an accessory into the HIP, - HP Digital Sender Flow 8500 | User Guide - Page 107
b. Connect the USB cable to the cable connector on the accessory (1), and then connect the grounding connector to the grounding strip on the accessory, if applicable (2). NOTE: The connectors shown are for a proximity card reader. The cable connector for your accessory might be slightly different, - HP Digital Sender Flow 8500 | User Guide - Page 108
c. Align the pegs on the underside of the accessory with the connectors in the HIP, insert the accessory into the HIP, and then press down gently to snap the accessory into place. 4. Connect the power cable, and then press the Power button to turn on the product. 100 Chapter 8 Replace and install - HP Digital Sender Flow 8500 | User Guide - Page 109
stopped working correctly ● Solve e-mail problems ● Solve network problems ● Restore factory settings ● Contact HP Support For additional troubleshooting, see the Help for the HP scanning program that you are using. Scan errors Follow the displayed instructions and, if applicable, video to resolve - HP Digital Sender Flow 8500 | User Guide - Page 110
Error Multi-pick Multi-pick sensor failed Paper jam Description The product has detected a multiple-page feed error. The product's multi-pick paper sensor has failed. The product has detected a document feeder paper jam. 102 Chapter 9 Troubleshooting ENWW - HP Digital Sender Flow 8500 | User Guide - Page 111
product is correctly configured to use the network. If you continue to have problems, it is possible that your firmware or associated drivers are out of date or have become corrupted. See www.hp.com/support to locate firmware and driver updates for your product. ENWW Basic troubleshooting tips 103 - HP Digital Sender Flow 8500 | User Guide - Page 112
jack, or Ethernet switch. For additional Ethernet troubleshooting information, see www.hp.com/support, select your country/ region, and then use the search tool to find Ethernet or network troubleshooting topics. Initialization or hardware problems ● Check the Ethernet connection ● Check that the - HP Digital Sender Flow 8500 | User Guide - Page 113
the power outlet or surge protector but the green LED is still not on, the power supply might be defective. Contact www.hp.com/support for assistance. If the problem persists after verifying the above items, follow these steps: 1. Press the Power button to turn off the product, and then disconnect - HP Digital Sender Flow 8500 | User Guide - Page 114
has detected that the hard drive is overheating because of a fan failure. To protect hard drive data, the product has shut itself down. 106 Chapter 9 Troubleshooting ENWW - HP Digital Sender Flow 8500 | User Guide - Page 115
not be placed correctly. Straighten the pages and adjust the paper guides to center the stack. ● The paper guides must be touching the sides of the paper stack to work then close it by pressing firmly. A problem with the product hardware might exist. Follow this procedure to test the product: - HP Digital Sender Flow 8500 | User Guide - Page 116
of the scanned image is cut off By default, the scanning software can scan media that is of the scanning glass. ● Clean the rollers manually. An item loaded in the document input tray original that must be removed. ● Make sure the paper guides touch the edges of the original. Clear jams from the - HP Digital Sender Flow 8500 | User Guide - Page 117
the paper path. TIP: Use the green thumb wheel on the left side of the open hatch to manually advance originals through the paper path. 3. Remove the ADF duplex background, remove any debris, and then slide repeated jams, ensure that the hatch door is fully closed. ENWW Paper feeding problems 109 - HP Digital Sender Flow 8500 | User Guide - Page 118
each step, start a scan to see if the product is working. If the problem persists, proceed with the next step. 1. A cable might be loose. Ensure LED is still not on, the power supply might be defective. See www.hp.com/support for assistance. 3. Press the Power button to turn off the product, wait - HP Digital Sender Flow 8500 | User Guide - Page 119
Solve e-mail problems If you are unable to send e-mails by using the digital-send feature, you might need to reconfigure the SMTP gateway address or the LDAP gateway address. View opens. 3. If the LDAP gateway address is not valid, contact the network administrator. ENWW Solve e-mail problems 111 - HP Digital Sender Flow 8500 | User Guide - Page 120
it is secure and in the right place. If the problem continues, try a different cable or ports on the hub or transceiver. 3. Are the link speed and duplex settings set correctly? HP recommends leaving this setting in automatic mode (the default setting). 4. Can you "ping" the product using its IP - HP Digital Sender Flow 8500 | User Guide - Page 121
button, and then touch the Restore Factory Settings button. 2. Touch the buttons associated with the subsystems you wish to reset to factory defaults, and then touch the Reset button. Contact HP Support For support contact information, see www.hp.com/support. ENWW Restore factory settings 113 - HP Digital Sender Flow 8500 | User Guide - Page 122
114 Chapter 9 Troubleshooting ENWW - HP Digital Sender Flow 8500 | User Guide - Page 123
regulatory information and product specifications for your product. ● Product specifications ● Document feeder specifications ● Environmental specifications ● Certificate of Volatility ● Regulatory model number ● Environmental product stewardship program ● HP limited warranty statement ENWW 115 - HP Digital Sender Flow 8500 | User Guide - Page 124
60Hz, 2600mA ● DC output for power supply: +32 Vdc, 5625mA, 180W For power consumption information, see www.hp.com/support. To view minimum and recommended system requirements, go to www.hp.com, select your country/ region, search on your product model, and then search on datasheet. Document feeder - HP Digital Sender Flow 8500 | User Guide - Page 125
A chemical information report for this product can be found at www.hp.com/go/reach. Certificate of Volatility This statement explains the volatility of scan data. To clear non-volatile memory and restore it to factory defaults, use the Embedded Web Server. TIP: You can also clear non-volatile - HP Digital Sender Flow 8500 | User Guide - Page 126
Model Number for your product is FCLSD-0901. This regulatory model number should not be confused with the marketing name (HP Scanjet Enterprise 8500 fn1) or product number (L2717A). Additional regulatory information about your product can be found on the regulatory_supplement.pdf file in the - HP Digital Sender Flow 8500 | User Guide - Page 127
has been measured according to a generally recognized method* and when these emissions data are applied to a "generic office model exposure scenario"**, HP is able to determine there is no appreciable amount of ozone generated during printing that exceeds any current indoor air quality standards or - HP Digital Sender Flow 8500 | User Guide - Page 128
cartridge. Paper use This product's duplex feature (manual or automatic) and N-up printing (multiple pages printed hp.com/recycle. Select your country/region for information on how to return HP printing supplies. Multi-lingual program information and instructions are also included in every new HP - HP Digital Sender Flow 8500 | User Guide - Page 129
in the HP LaserJet Printer Family Print Media Guide. This product HP product does not contain added mercury. If this HP product contains a battery, it may require special handling at end-of-life. HP ScanJet Enterprise 8500 fn1 service, or go to: www.hp.com/recycle. Electronic hardware recycling HP - HP Digital Sender Flow 8500 | User Guide - Page 130
(Regulation EC No 1907/2006 of the European Parliament and the Council). A chemical information report for this product can be found at: www.hp.com/go/ reach. Product Power Data per European Union Commission Regulation 1275/2008 For product power data, including the power consumption of the product - HP Digital Sender Flow 8500 | User Guide - Page 131
GB21521 kWh)。 CEL-37 GB21521 Restriction on Hazardous Substances statement (India) This product complies with the "India E-waste Rule 2011" and prohibits use of lead, mercury, hexavalent chromium, polybrominated biphenyls or polybrominated diphenyl ethers in concentrations exceeding 0.1 - HP Digital Sender Flow 8500 | User Guide - Page 132
Data Sheets (MSDS) for supplies containing chemical substances (for example, toner) can be obtained by accessing the HP Web site at www.hp.com/go/msds. EPEAT Many HP products are designed to meet EPEAT. EPEAT is a comprehensive environmental rating that helps identify greener electronics equipment - HP Digital Sender Flow 8500 | User Guide - Page 133
warranty is valid in any country/region or locality where HP has a support presence for this product and where HP has marketed this product. The level of warranty service you receive may vary according to local standards. HP will not alter form, fit or function of the product to make it operate - HP Digital Sender Flow 8500 | User Guide - Page 134
://ec.europa.eu/consumers/ solving_consumer_disputes/non-judicial_redress/ecc-net/index_en.htm). Consumers have the right to choose whether to claim service under the HP Limited Warranty or against the seller under two-year legal guarantee. Austria, Belgium, Germany, and Luxemburg Die beschränkte - HP Digital Sender Flow 8500 | User Guide - Page 135
choisir d'exercer leurs droits au titre de la garantie limitée HP, ou auprès du vendeur au titre des garanties légales applicables . Il répond également des défauts de conformité résultant de l'emballage, des instructions de montage ou de l'installation lorsque celle-ci a été mise à sa charge par - HP Digital Sender Flow 8500 | User Guide - Page 136
(http://ec.europa.eu/consumers/solving_consumer_disputes/non-judicial_redress/ecc-net/ index_en.htm). Les consommateurs ont le droit de choisir de réclamer un service sous la garantie limitée HP ou auprès du vendeur au cours d'une garantie légale de deux ans. Italy La Garanzia limitata - HP Digital Sender Flow 8500 | User Guide - Page 137
). Forbrugere har ret til at vælge, om de vil gøre krav på service i henhold til HP's begrænsede garanti eller hos sælger i henhold til en toårig juridisk garanti. Norway HPs garanti er en begrenset og kommersiell garanti som HP selv har valgt å tilby. Følgende lokale selskap innestår for garantien - HP Digital Sender Flow 8500 | User Guide - Page 138
o vendedor ao abrigo de uma garantia jurídica de dois anos. Greece and Cyprus HP HP oς: HP Printing and Personal Systems Hellas EPE, Tzavella 1-3, 15232 Chalandri, Attiki oς: HP Tzavella 1-3, 15232 Chalandri, Attiki HP HP web www.hp.com/go/eu-legal web http://ec.europa.eu/consumers - HP Digital Sender Flow 8500 | User Guide - Page 139
áte kliknutím na následující odkaz: Zákonná záruka spotřebitele (www.hp.com/go/eu-legal) případně můžete navštívit webové stránky Evropsk prípadných nárokov však môže závisieť od rôznych faktorov. Služby Obmedzenej záruky HP žiadnym spôsobom neobmedzujú ani neovplyvňujú zákonné práva zákazníka, ktorý - HP Digital Sender Flow 8500 | User Guide - Page 140
://ec.europa.eu/consumers/solving_consumer_disputes/nonjudicial_redress/ecc-net/index_en.htm). Consumatorii au dreptul să aleagă dacă să pretindă despăgubiri în cadrul Garanței limitate HP sau de la vânzător, în cadrul garanției legale de doi ani. Belgium and the Netherlands De Beperkte Garantie van - HP Digital Sender Flow 8500 | User Guide - Page 141
līgumam, tomēr šo tiesību saņemšanu var ietekmēt vairāki faktori. HP ierobežotā garantija nekādā veidā neierobežo un neietekmē patērētāju likumīgās tiesības. šāku informāciju, izmantojiet šo saiti: Patērētāju likumīgā garantija (www.hp.com/go/eu-legal) vai arī Eiropas Patērētāju tiesību aizsardzī - HP Digital Sender Flow 8500 | User Guide - Page 142
ši teisė bus suteikiama, gali priklausyti nuo įvairių aplinkybių. HP ribotoji garantija niekaip neapriboja ir neįtakoja įstatymais nustatytų vartotojo teisi asjaolusid, mille puhul teie jaoks need õigused ei pruugi kehtida. HP piiratud garantii ei piira ega mõjuta mingil moel tarbija seadusjärgseid - HP Digital Sender Flow 8500 | User Guide - Page 143
locating 4 CRL 45 customer support 113 cut-off images troubleshoot 108 D Data light locating 10 default gateway, setting 29 device discovery 19 digital sending about 61 address books 121 Embedded Web Server 18 assigning a password 43 features 39 General tab 39 Information tab 39 ENWW Index 135 - HP Digital Sender Flow 8500 | User Guide - Page 144
39 install a Jetdirect card 96 install components 79 installation troubleshoot 104 interface ports included 2 Internet Explorer, versions supported Embedded Web Server 39 IP address 29, 30 IP addressing 19 J jams troubleshoot 108 Jetadmin, HP Web 18, 41 Jetdirect card, install 96 Jetdirect server - HP Digital Sender Flow 8500 | User Guide - Page 145
bin locating 4 P paper jams 108 misfeeds 107 not feeding 107 troubleshoot 107 paper feeding problems 107 paper-handling 2 parts order 80, 91 password 32 passwords 42 ports included 2 power switch, locating 4 preview scan 59 problem-solving Error button, control panel touch screen 14 e‑mail 111 - HP Digital Sender Flow 8500 | User Guide - Page 146
120 support 113 system requirements Embedded Web Server 39 T TCP/IP parameters, manual configuration 29, 30 TCP/IP settings 23 temperature specifications 116 toner cartridges recycling 120 touch screen, clean 72 troubleshoot basic tips 103 check power 105 cut-off images 108 feeding problems 107
-
 1
1 -
 2
2 -
 3
3 -
 4
4 -
 5
5 -
 6
6 -
 7
7 -
8
-
9
-
10
-
11
-
12
-
13
-
14
-
15
-
16
-
17
-
18
-
19
-
20
-
21
-
22
-
23
-
24
-
25
-
26
-
27
-
28
-
29
-
30
-
31
-
32
-
33
-
34
-
35
-
36
-
37
-
38
-
39
-
40
-
41
-
42
-
43
-
44
-
45
-
46
-
47
-
48
-
49
-
50
-
51
-
52
-
53
-
54
-
55
-
56
-
57
-
58
-
59
-
60
-
61
-
62
-
63
-
64
-
65
-
66
-
67
-
68
-
69
-
70
-
71
-
72
-
73
-
74
-
75
-
76
-
77
-
78
-
79
-
80
-
81
-
82
-
83
-
84
-
85
-
86
-
87
-
88
-
89
-
90
-
91
-
92
-
93
-
94
-
95
-
96
-
97
-
98
-
99
-
100
-
101
-
102
-
103
-
104
-
105
-
106
-
107
-
108
-
109
-
110
-
111
-
112
-
113
-
114
-
115
-
116
-
117
-
118
-
119
-
120
-
121
-
122
-
123
-
124
-
125
-
126
-
127
-
128
-
129
-
130
-
131
-
132
-
133
-
134
-
135
-
136
-
137
-
138
-
139
-
140
-
141
-
142
-
143
-
144
-
145
-
146
 |
 |

HP ScanJet Enterprise 8500 fn1
User Guide