HP Digital Sender Flow 8500 User Guide - Page 41
Save to Network Folder Setup, Con save to SharePoint options
 |
View all HP Digital Sender Flow 8500 manuals
Add to My Manuals
Save this manual to your list of manuals |
Page 41 highlights
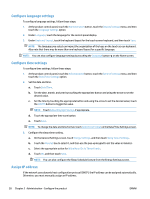
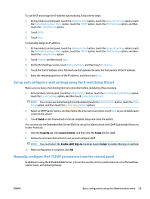
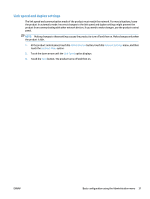
3. In the left navigation pane, click the E-mail Setup entry. 4. Select Enable Send to E-mail and click Add, follow the SMTP wizard to complete the required fields and any additional fields you want, and then click the Apply button. TIP: You must specify an outgoing SMTP server and complete the From: field. See the Embedded Web Server Help for more information. 5. To add addresses to the Address book, click the Address Book entry in the left navigation pane and then follow the onscreen instructions. After you have configured the e-mail settings, send an e-mail to yourself by using the digital-send feature. If you receive the e-mail, you have successfully configured the digital-sending feature. If you do not receive the e-mail, use these actions to resolve issues: ● Check the SMTP and address to make sure that you typed them correctly. ● View the configuration page. Verify that the SMTP gateway address is correct. ● Make sure that the network is operating correctly. Send an e-mail to yourself from a computer. If you receive the e-mail, the network is operating correctly. If you do not receive the e-mail, contact your network administrator or Internet service provider (ISP). Save to Network Folder Setup Before configuring network folders, set up shared folders following the instructions for your network operating system. 1. Open the Embedded Web Server. 2. Click the Scan/Digital Send tab. 3. On the left navigation menu, click the Save to Network Folder Setup entry. 4. Select the Enable Save to Network Folder checkbox. NOTE: If you select Use credentials of user to connect after Sign In at the control panel in the Authentication Settings drop-down list, the logged-in user must have permissions to write to the specified network folder. 5. Set the default settings you want for all folders and then click the Apply button. 6. To specify network folders to which to save documents, click the Add button in the Quick Sets area and follow the onscreen instructions. Configure save to SharePoint options Before you can complete this procedure, the destination folder to which you want to save scanned files must exist on the SharePoint site, and you must have write access to the destination folder. 1. Open the Embedded Web Server. 2. Click the Scan/Digital Send tab. 3. On the left navigation menu, click the Save to SharePoint entry. 4. Select the Enable Scan to SharePoint checkbox, and then click Add. ENWW Basic configuration using the Embedded Web Server 33
-
 1
1 -
2
-
3
-
4
-
5
-
6
-
7
-
8
-
9
-
10
-
11
-
12
-
13
-
14
-
15
-
16
-
17
-
18
-
19
-
20
-
21
-
22
-
23
-
24
-
25
-
26
-
27
-
28
-
29
-
30
-
31
-
32
-
33
-
34
-
35
-
 36
36 -
 37
37 -
 38
38 -
 39
39 -
 40
40 -
 41
41 -
 42
42 -
 43
43 -
 44
44 -
 45
45 -
 46
46 -
47
-
48
-
49
-
50
-
51
-
52
-
53
-
54
-
55
-
56
-
57
-
58
-
59
-
60
-
61
-
62
-
63
-
64
-
65
-
66
-
67
-
68
-
69
-
70
-
71
-
72
-
73
-
74
-
75
-
76
-
77
-
78
-
79
-
80
-
81
-
82
-
83
-
84
-
85
-
86
-
87
-
88
-
89
-
90
-
91
-
92
-
93
-
94
-
95
-
96
-
97
-
98
-
99
-
100
-
101
-
102
-
103
-
104
-
105
-
106
-
107
-
108
-
109
-
110
-
111
-
112
-
113
-
114
-
115
-
116
-
117
-
118
-
119
-
120
-
121
-
122
-
123
-
124
-
125
-
126
-
127
-
128
-
129
-
130
-
131
-
132
-
133
-
134
-
135
-
136
-
137
-
138
-
139
-
140
-
141
-
142
-
143
-
144
-
145
-
146
 |
 |
