HP Digital Sender Flow 8500 User Guide - Page 72
Fax a scanned document, Use the Send Fax screen
 |
View all HP Digital Sender Flow 8500 manuals
Add to My Manuals
Save this manual to your list of manuals |
Page 72 highlights
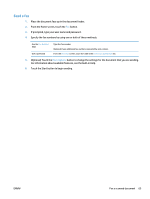
Fax a scanned document Use the Send Fax screen Use the touch screen to navigate through the options on the Send Fax screen. 1 Home button 2 Send Fax button 3 Error/warning button 4 Help button 5 Preview button 6 Speed Dial Code field 7 Search button 8 Speed Dials button 9 Scroll bars 10 One Touch Speed Dials list 11 More Options button 12 Details button 13 Delete button 14 Fax Recipients list 15 Add fax number button 16 Fax Number: field 17 Delete character button Touch this button to open the Home screen. Touch this button to scan the document and send a fax to the provided fax numbers. This button appears only when there is an error or warning in the status line area. Touch it to open a pop-up screen that will help you resolve the error or warning. Touch this button for control-panel Help. Touch this button to display a preview that you can modify before faxing the scanned document. Touch this button to type a speed dial code directly. Touch this button to search for a speed dial code by name. Touch this button to edit the speed dial. Use the scroll bar to view more entries. Touch a button in this area to add the fax number to the Fax Recipients list. Touch this button to change certain fax settings for the current scan job. Touch this button to display more information about the fax number highlighted in the Fax Recipients list. Touch this button to remove the highlighted fax number from the Fax Recipients list. Lists the numbers you have selected to receive the scanned document. Touch this button to add the fax number in the Fax Number: field to the Fax Recipients list. Touch this field and then type a fax number. Touch this button to backspace and delete numbers in the Fax Number: field. 64 Chapter 6 Scan and send documents ENWW
-
 1
1 -
2
-
3
-
4
-
5
-
6
-
7
-
8
-
9
-
10
-
11
-
12
-
13
-
14
-
15
-
16
-
17
-
18
-
19
-
20
-
21
-
22
-
23
-
24
-
25
-
26
-
27
-
28
-
29
-
30
-
31
-
32
-
33
-
34
-
35
-
36
-
37
-
38
-
39
-
40
-
41
-
42
-
43
-
44
-
45
-
46
-
47
-
48
-
49
-
50
-
51
-
52
-
53
-
54
-
55
-
56
-
57
-
58
-
59
-
60
-
61
-
62
-
63
-
64
-
65
-
66
-
 67
67 -
 68
68 -
 69
69 -
 70
70 -
 71
71 -
 72
72 -
 73
73 -
 74
74 -
 75
75 -
 76
76 -
 77
77 -
78
-
79
-
80
-
81
-
82
-
83
-
84
-
85
-
86
-
87
-
88
-
89
-
90
-
91
-
92
-
93
-
94
-
95
-
96
-
97
-
98
-
99
-
100
-
101
-
102
-
103
-
104
-
105
-
106
-
107
-
108
-
109
-
110
-
111
-
112
-
113
-
114
-
115
-
116
-
117
-
118
-
119
-
120
-
121
-
122
-
123
-
124
-
125
-
126
-
127
-
128
-
129
-
130
-
131
-
132
-
133
-
134
-
135
-
136
-
137
-
138
-
139
-
140
-
141
-
142
-
143
-
144
-
145
-
146
 |
 |
