HP Elite 8300 HP Compaq Business PC Maintenance and Service Guide Elite 8300 S - Page 244
WLAN Module,
 |
View all HP Elite 8300 manuals
Add to My Manuals
Save this manual to your list of manuals |
Page 244 highlights
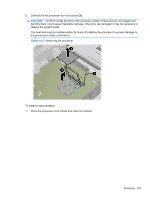
WLAN Module Description Intel Centrino Advanced-N 6205 (802.11a/b/g/n Wi-Fi wireless adapter) Spare part number 652165-001 1. Prepare the computer for disassembly (Preparation for Disassembly on page 204). 2. Remove the computer access panel (Access Panel on page 205). 3. Remove the optical drive (Removing the Optical Drive on page 216). 4. Remove the hard drive (Hard Drive on page 219). 5. Remove the optical drive rail (Optical Drive Rail on page 224). 6. Remove the heat sink (Heat sink on page 228). 7. Disconnect the two antenna cables from the connectors on the module (1). 8. Remove the two Torx T5 screws (2) that secure the module to the system board. Figure 9-29 Removing the WLAN module WLAN Module 233
-
 1
1 -
2
-
3
-
4
-
5
-
6
-
7
-
8
-
9
-
10
-
11
-
12
-
13
-
14
-
15
-
16
-
17
-
18
-
19
-
20
-
21
-
22
-
23
-
24
-
25
-
26
-
27
-
28
-
29
-
30
-
31
-
32
-
33
-
34
-
35
-
36
-
37
-
38
-
39
-
40
-
41
-
42
-
43
-
44
-
45
-
46
-
47
-
48
-
49
-
50
-
51
-
52
-
53
-
54
-
55
-
56
-
57
-
58
-
59
-
60
-
61
-
62
-
63
-
64
-
65
-
66
-
67
-
68
-
69
-
70
-
71
-
72
-
73
-
74
-
75
-
76
-
77
-
78
-
79
-
80
-
81
-
82
-
83
-
84
-
85
-
86
-
87
-
88
-
89
-
90
-
91
-
92
-
93
-
94
-
95
-
96
-
97
-
98
-
99
-
100
-
101
-
102
-
103
-
104
-
105
-
106
-
107
-
108
-
109
-
110
-
111
-
112
-
113
-
114
-
115
-
116
-
117
-
118
-
119
-
120
-
121
-
122
-
123
-
124
-
125
-
126
-
127
-
128
-
129
-
130
-
131
-
132
-
133
-
134
-
135
-
136
-
137
-
138
-
139
-
140
-
141
-
142
-
143
-
144
-
145
-
146
-
147
-
148
-
149
-
150
-
151
-
152
-
153
-
154
-
155
-
156
-
157
-
158
-
159
-
160
-
161
-
162
-
163
-
164
-
165
-
166
-
167
-
168
-
169
-
170
-
171
-
172
-
173
-
174
-
175
-
176
-
177
-
178
-
179
-
180
-
181
-
182
-
183
-
184
-
185
-
186
-
187
-
188
-
189
-
190
-
191
-
192
-
193
-
194
-
195
-
196
-
197
-
198
-
199
-
200
-
201
-
202
-
203
-
204
-
205
-
206
-
207
-
208
-
209
-
210
-
211
-
212
-
213
-
214
-
215
-
216
-
217
-
218
-
219
-
220
-
221
-
222
-
223
-
224
-
225
-
226
-
227
-
228
-
229
-
230
-
231
-
232
-
233
-
234
-
235
-
236
-
237
-
238
-
 239
239 -
 240
240 -
 241
241 -
 242
242 -
 243
243 -
 244
244 -
 245
245 -
 246
246 -
 247
247 -
 248
248 -
 249
249 -
250
-
251
-
252
-
253
-
254
-
255
-
256
-
257
-
258
-
259
-
260
-
261
-
262
-
263
-
264
-
265
-
266
-
267
-
268
-
269
-
270
-
271
-
272
-
273
-
274
-
275
-
276
-
277
-
278
-
279
-
280
-
281
-
282
-
283
-
284
-
285
-
286
-
287
-
288
-
289
-
290
-
291
-
292
-
293
-
294
-
295
-
296
-
297
-
298
-
299
-
300
-
301
-
302
-
303
-
304
-
305
-
306
-
307
-
308
-
309
-
310
-
311
-
312
-
313
-
314
-
315
-
316
-
317
-
318
-
319
-
320
-
321
-
322
-
323
-
324
-
325
-
326
-
327
-
328
-
329
-
330
-
331
-
332
-
333
-
334
-
335
-
336
-
337
-
338
-
339
-
340
-
341
-
342
-
343
-
344
-
345
-
346
-
347
-
348
-
349
 |
 |

WLAN Module
Description
Spare part number
Intel Centrino Advanced-N 6205 (802.11a/b/g/n Wi-Fi wireless adapter)
652165-001
1.
Prepare the computer for disassembly (
Preparation for Disassembly
on page
204
).
2.
Remove the computer access panel (
Access Panel
on page
205
).
3.
Remove the optical drive (
Removing the Optical Drive
on page
216
).
4.
Remove the hard drive (
Hard Drive
on page
219
).
5.
Remove the optical drive rail (
Optical Drive Rail
on page
224
).
6.
Remove the heat sink (
Heat sink
on page
228
).
7.
Disconnect the two antenna cables from the connectors on the module
(1)
.
8.
Remove the two Torx T5 screws
(2)
that secure the module to the system board.
Figure 9-29
Removing the WLAN module
WLAN Module
233