HP LaserJet Pro P1102 HP LaserJet Professional P1100 Printer series - User Gui - Page 100
Solve performance problems
 |
View all HP LaserJet Pro P1102 manuals
Add to My Manuals
Save this manual to your list of manuals |
Page 100 highlights
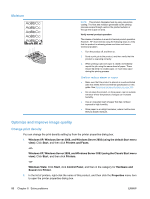
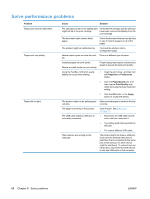
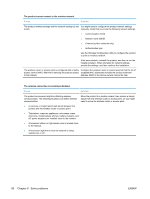
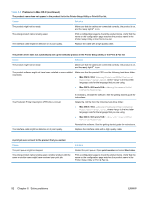
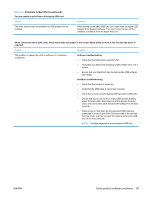
Solve performance problems Problem Pages print but are totally blank. Pages print very slowly. Pages did not print. Cause Solution The cartridge pull tab or the sealing tape Verify that the cartridge pull tab and tape might still be in the print cartridge. have been removed completely from the print cartridge. The document might contain blank pages. Check the document that you are printing to see if content appears on all of the pages. The product might be malfunctioning. To check the product, print a Configuration page. Heavier paper types can slow the print Print on a different type of paper. job. Complex pages can print slowly. Proper fusing may require a slower print speed to ensure the best print quality. Narrow or small media can print slowly. Using the FastRes 1200 print quality setting can cause slow printing. 1. Open the print driver, and then click the Properties or Preferences button. 2. Click the Paper/Quality tab, and then use the Print Quality dropdown list to select a lower resolution setting. 3. Click the OK button or the Apply button to accept the setting. The product might not be pulling paper Make sure that paper is loaded in the tray correctly. correctly. The paper is jamming in the product. The USB cable might be defective or incorrectly connected. Clear the jam. See Clear jams on page 73. ● Disconnect the USB cable at both ends, and then reconnect it. ● Try printing a job that has printed in the past. ● Try using a different USB cable. Other devices are running on the computer. The product might not share a USB port. If you have an external hard drive or switchbox that is connected to the same port as the product, the other device might be interfering. To connect and use the product, disconnect the other device, or use two USB ports on the computer. 88 Chapter 8 Solve problems ENWW
-
 1
1 -
2
-
3
-
4
-
5
-
6
-
7
-
8
-
9
-
10
-
11
-
12
-
13
-
14
-
15
-
16
-
17
-
18
-
19
-
20
-
21
-
22
-
23
-
24
-
25
-
26
-
27
-
28
-
29
-
30
-
31
-
32
-
33
-
34
-
35
-
36
-
37
-
38
-
39
-
40
-
41
-
42
-
43
-
44
-
45
-
46
-
47
-
48
-
49
-
50
-
51
-
52
-
53
-
54
-
55
-
56
-
57
-
58
-
59
-
60
-
61
-
62
-
63
-
64
-
65
-
66
-
67
-
68
-
69
-
70
-
71
-
72
-
73
-
74
-
75
-
76
-
77
-
78
-
79
-
80
-
81
-
82
-
83
-
84
-
85
-
86
-
87
-
88
-
89
-
90
-
91
-
92
-
93
-
94
-
 95
95 -
 96
96 -
 97
97 -
 98
98 -
 99
99 -
 100
100 -
 101
101 -
 102
102 -
 103
103 -
 104
104 -
 105
105 -
106
-
107
-
108
-
109
-
110
-
111
-
112
-
113
-
114
-
115
-
116
-
117
-
118
-
119
-
120
-
121
-
122
-
123
-
124
-
125
-
126
-
127
-
128
-
129
-
130
-
131
-
132
-
133
-
134
-
135
-
136
 |
 |