HP NetServer LXr Pro8 HP Netserver E 60, LC 3, LH 3/3r, and LPr Processor Upgr - Page 21
Removing the Terminator Board
 |
View all HP NetServer LXr Pro8 manuals
Add to My Manuals
Save this manual to your list of manuals |
Page 21 highlights
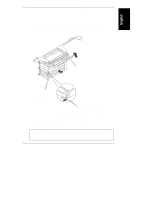
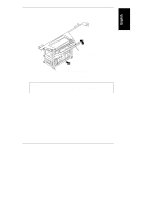
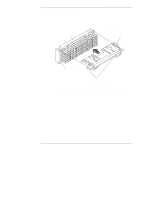
Chapter 3 Installation in LC 3 and LH 3/3r Removing the Terminator Board If your system has one processor, a terminator board is installed in the upper (secondary) processor position. You must remove the terminator board before installing a processor module into this position. (See Figure 3-3). 1. Squeeze together the two retaining latches on the terminator board. 2. Pull the terminator board out of the slot. 3. Save the terminator board for future use. Terminator Board Terminator Board Retaining Latches Figure 3-3. Removing Terminator Board from HP NetServer LC 3 and LH 3/3r (Details of the Pre-existing Processor Module May Vary.) 17
-
 1
1 -
2
-
3
-
4
-
5
-
6
-
7
-
8
-
9
-
10
-
11
-
12
-
13
-
14
-
15
-
 16
16 -
 17
17 -
 18
18 -
 19
19 -
 20
20 -
 21
21 -
 22
22 -
 23
23 -
 24
24 -
 25
25 -
 26
26 -
27
-
28
-
29
-
30
-
31
-
32
-
33
-
34
-
35
-
36
-
37
-
38
-
39
-
40
-
41
-
42
-
43
-
44
-
45
-
46
-
47
-
48
-
49
-
50
-
51
-
52
-
53
-
54
-
55
-
56
-
57
-
58
-
59
-
60
-
61
-
62
-
63
-
64
-
65
 |
 |

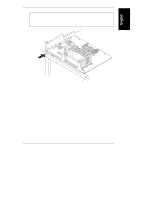
Chapter 3
Installation in LC 3 and LH 3/3r
17
Removing the Terminator Board
If your system has one processor, a terminator board is installed in the upper
(secondary) processor position. You must remove the terminator board before
installing a processor module into this position. (See Figure 3-3).
1.
Squeeze together the two retaining latches on the terminator board.
2.
Pull the terminator board out of the slot.
3.
Save the terminator board for future use.
Terminator Board
Terminator Board
Retaining Latches
Figure 3-3.
Removing Terminator Board from HP NetServer
LC 3 and LH 3/3r
(Details of the Pre-existing Processor Module May Vary.)