HP NetServer LXr Pro8 HP Netserver E 60, LC 3, LH 3/3r, and LPr Processor Upgr - Page 37
Reinstall the System Board, Replace Covers and Front Bezel
 |
View all HP NetServer LXr Pro8 manuals
Add to My Manuals
Save this manual to your list of manuals |
Page 37 highlights
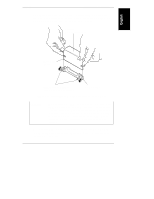
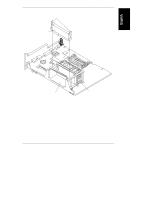
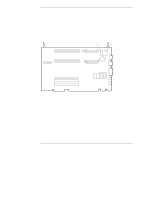
Chapter 3 Installation in LC 3 and LH 3/3r CAUTION Processor modules are designed to operate at only one speed. This speed is printed on the module. Do not set the system switches to any speed other than that speed labeled on the module. Setting the processor speed to another speed may result in unreliable or intermittent performance. Data integrity may also be placed at risk if processors are operated at speeds other than the speed specified on the processor module. Reinstall the System Board Reinstall the system board as described in your NetServer documentation. Replace Covers and Front Bezel Do the following: • Replace the covers and front bezel. If the NetServer was mounted in a rack enclosure, also replace the NetServer in the rack. • If you upgraded to Pentium III processor modules, attach the Pentium III label to a corner of the front bezel. • Connect the AC power cord and all cables. Refer to your NetServer documentation for instruction. For a NetServer in a rack, also refer to the rack documentation. CAUTION Never operate the NetServer, even for a short time, without first installing all covers and the front bezel. Operating the system without all covers in place reduces critical cooling airflow over some components, such as hard disk drives, circuit boards, and processor modules. Operating the system without all covers in place may result in failure of these components. Next, go to Chapter 5, "Verification," to ensure that the processor upgrade was completed successfully. 33
-
 1
1 -
2
-
3
-
4
-
5
-
6
-
7
-
8
-
9
-
10
-
11
-
12
-
13
-
14
-
15
-
16
-
17
-
18
-
19
-
20
-
21
-
22
-
23
-
24
-
25
-
26
-
27
-
28
-
29
-
30
-
31
-
 32
32 -
 33
33 -
 34
34 -
 35
35 -
 36
36 -
 37
37 -
 38
38 -
 39
39 -
 40
40 -
 41
41 -
 42
42 -
43
-
44
-
45
-
46
-
47
-
48
-
49
-
50
-
51
-
52
-
53
-
54
-
55
-
56
-
57
-
58
-
59
-
60
-
61
-
62
-
63
-
64
-
65
 |
 |