HP OmniBook xt6200 HP Omnibook xt6200 & vt6200 Notebook PCs - Reference Gu - Page 73
Left-click the Unplug or Eject Hardware or Safely Remove Hardware icon on
 |
View all HP OmniBook xt6200 manuals
Add to My Manuals
Save this manual to your list of manuals |
Page 73 highlights
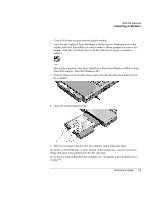
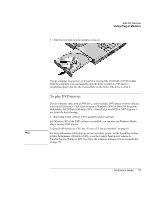
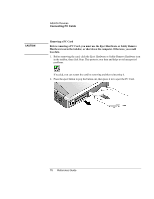
Add-On Devices Using Plug-In Modules 1. Close all files that are open from the plug-in module. 2. Left-click the Unplug or Eject Hardware or Safely Remove Hardware icon on the taskbar, and select the module you want to remove. When prompted to remove the module, click OK. (You don't have to do this if the bay is empty or contains a battery.) -or- Shut off the computer. Click Start, Shut Down, Shut down (Windows 2000) or Start, Turn Off Computer, Turn Off (Windows XP). 3. Press the button on the module release latch, and slide the latch toward the front of the computer. 4. Grasp the module and pull it out. 5. Slide the new plug-in module into the computer until it clicks into place. If you have a CD-ROM drive or other module in the module bay, you can connect the floppy disk drive to the parallel port. See the next topic. If you need to format a hard disk drive module, see "To prepare a new hard disk drive" on page 94. Reference Guide 73
-
 1
1 -
2
-
3
-
4
-
5
-
6
-
7
-
8
-
9
-
10
-
11
-
12
-
13
-
14
-
15
-
16
-
17
-
18
-
19
-
20
-
21
-
22
-
23
-
24
-
25
-
26
-
27
-
28
-
29
-
30
-
31
-
32
-
33
-
34
-
35
-
36
-
37
-
38
-
39
-
40
-
41
-
42
-
43
-
44
-
45
-
46
-
47
-
48
-
49
-
50
-
51
-
52
-
53
-
54
-
55
-
56
-
57
-
58
-
59
-
60
-
61
-
62
-
63
-
64
-
65
-
66
-
67
-
 68
68 -
 69
69 -
 70
70 -
 71
71 -
 72
72 -
 73
73 -
 74
74 -
 75
75 -
 76
76 -
 77
77 -
 78
78 -
79
-
80
-
81
-
82
-
83
-
84
-
85
-
86
-
87
-
88
-
89
-
90
-
91
-
92
-
93
-
94
-
95
-
96
-
97
-
98
-
99
-
100
-
101
-
102
-
103
-
104
-
105
-
106
-
107
-
108
-
109
-
110
-
111
-
112
-
113
-
114
-
115
-
116
-
117
-
118
-
119
-
120
-
121
-
122
-
123
-
124
-
125
-
126
-
127
-
128
-
129
-
130
-
131
-
132
-
133
-
134
-
135
-
136
-
137
-
138
-
139
-
140
-
141
-
142
-
143
-
144
-
145
-
146
-
147
-
148
-
149
-
150
-
151
-
152
-
153
-
154
-
155
-
156
-
157
-
158
-
159
-
160
-
161
 |
 |
