HP PSC 2350 Users Guide - Page 24
Install, If you are using Windows XP or 2000, HP All-in-One Setup Assistant, TCP/IP Network - driver windows 7
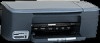 |
View all HP PSC 2350 manuals
Add to My Manuals
Save this manual to your list of manuals |
Page 24 highlights
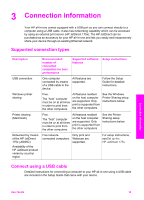
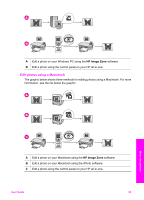
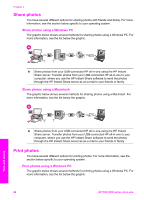
3 Insert the installation CD that was supplied with the HP JetDirect into your computer's CD-ROM drive. You will use this CD to locate the HP JetDirect on the network. 4 Select Install to run the HP JetDirect installer. 5 When prompted, insert the HP all-in-one installation CD. Note If you are performing an initial installation of your HP all-in-one and HP JetDirect 175x, do not run the HP all-in-one setup wizard. Just install the drivers following the instructions below. If you decide at some later date to connect your HP all-in-one using a USB cable, then insert the HP all-in-one installation CD and run the setup wizard. 6 Follow the steps appropriate for your operating system: If you are using Windows XP or 2000: a Browse to the root directory of the CD and select the correct driver .inf for your HP all-in-one. The printer driver file, located in the root directory, is hpoprn08.inf. If you are using Windows 98 or ME: a Browse the CD for the "Drivers" folder and find the correct language subfolder. For example, for English speaking customers, navigate to the \enu\drivers \win9x_me directory, where enu is the English language directory and win9x_me is for Windows ME. The printer driver file is hpoupdrx.inf. b Repeat for each of the drivers required. 7 Complete the installation. To network connect your HP all-in-one using the HP JetDirect 175x (Macintosh) 1 Follow the HP JetDirect 175x setup instructions to connect the print server to a LAN. 2 Connect the HP JetDirect to the USB port on the rear of your HP all-in-one. 3 Do one of the following: - If you are performing an initial installation of your HP all-in-one, make sure you insert the HP all-in-one installation CD into the CD-ROM drive on your computer and run the HP all-in-one setup wizard. The network support software for your computer is installed at this time. When the installation is finished, the HP All-in-One Setup Assistant appears on your computer. - From the Disk Drive, open the HP All-in-One Setup Assistant from the following location: Applications:Hewlett-Packard:HP Photo & Imaging Software:HP AiO Software The HP All-in-One Setup Assistant appears on your computer. 4 Follow the onscreen prompts and provide the information requested. Note Make sure you click TCP/IP Network on the connection screen. Connection information User Guide 21
-
 1
1 -
2
-
3
-
4
-
5
-
6
-
7
-
8
-
9
-
10
-
11
-
12
-
13
-
14
-
15
-
16
-
17
-
18
-
 19
19 -
 20
20 -
 21
21 -
 22
22 -
 23
23 -
 24
24 -
 25
25 -
 26
26 -
 27
27 -
 28
28 -
 29
29 -
30
-
31
-
32
-
33
-
34
-
35
-
36
-
37
-
38
-
39
-
40
-
41
-
42
-
43
-
44
-
45
-
46
-
47
-
48
-
49
-
50
-
51
-
52
-
53
-
54
-
55
-
56
-
57
-
58
-
59
-
60
-
61
-
62
-
63
-
64
-
65
-
66
-
67
-
68
-
69
-
70
-
71
-
72
-
73
-
74
-
75
-
76
-
77
-
78
-
79
-
80
-
81
-
82
-
83
-
84
-
85
-
86
-
87
-
88
-
89
-
90
-
91
-
92
-
93
-
94
-
95
-
96
-
97
-
98
-
99
-
100
-
101
-
102
-
103
-
104
-
105
-
106
-
107
-
108
-
109
-
110
-
111
-
112
-
113
-
114
-
115
-
116
-
117
-
118
-
119
-
120
-
121
-
122
-
123
-
124
-
125
-
126
-
127
-
128
-
129
-
130
-
131
-
132
-
133
-
134
-
135
-
136
 |
 |