HP Pavilion a400 HP Pavilion Desktop PC - (English) Users Guide PAV SEA/ANZ/IN - Page 119
removing the 7-in-1 memory card reader or the, diskette floppy drive
 |
View all HP Pavilion a400 manuals
Add to My Manuals
Save this manual to your list of manuals |
Page 119 highlights
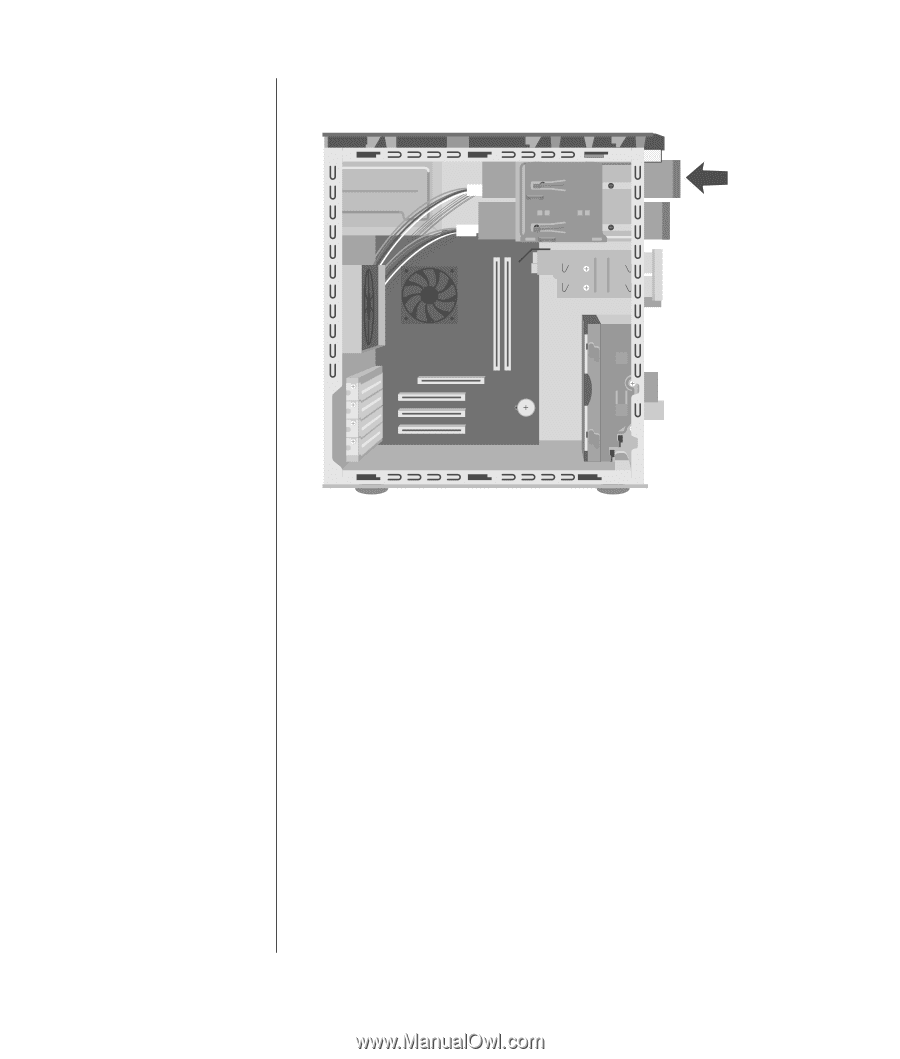
7 Push the optical drive all the way in through the front of the PC until it snaps into place (D). D 8 Replace the front panel. See page 108. 9 Replace the side panel. See page 106. removing the 7-in-1 memory card reader or the diskette (floppy) drive The PC has a removable drive cage that holds the 7-In-1 memory card reader and the diskette drive. You can remove and replace either of these drives if they are included with your model. To ensure that the drive fits properly into the PC, be sure to purchase the replacement diskette drive from HP. Refer to the Warranty & Support Guide for contact information. To remove the 7-In-1 memory card reader drive or the diskette drive: 1 Remove the side panel that has thumbscrews. See page 105. 2 Gently lay the PC on its side. 3 Make a note of each cable attached to the drive you want to replace. 4 Push down on the drive cage release tab (E). upgrading and servicing the pc (1) 111
-
 1
1 -
2
-
3
-
4
-
5
-
6
-
7
-
8
-
9
-
10
-
11
-
12
-
13
-
14
-
15
-
16
-
17
-
18
-
19
-
20
-
21
-
22
-
23
-
24
-
25
-
26
-
27
-
28
-
29
-
30
-
31
-
32
-
33
-
34
-
35
-
36
-
37
-
38
-
39
-
40
-
41
-
42
-
43
-
44
-
45
-
46
-
47
-
48
-
49
-
50
-
51
-
52
-
53
-
54
-
55
-
56
-
57
-
58
-
59
-
60
-
61
-
62
-
63
-
64
-
65
-
66
-
67
-
68
-
69
-
70
-
71
-
72
-
73
-
74
-
75
-
76
-
77
-
78
-
79
-
80
-
81
-
82
-
83
-
84
-
85
-
86
-
87
-
88
-
89
-
90
-
91
-
92
-
93
-
94
-
95
-
96
-
97
-
98
-
99
-
100
-
101
-
102
-
103
-
104
-
105
-
106
-
107
-
108
-
109
-
110
-
111
-
112
-
113
-
 114
114 -
 115
115 -
 116
116 -
 117
117 -
 118
118 -
 119
119 -
 120
120 -
 121
121 -
 122
122 -
 123
123 -
 124
124 -
125
-
126
-
127
-
128
-
129
-
130
-
131
-
132
-
133
-
134
-
135
-
136
-
137
-
138
-
139
-
140
-
141
-
142
-
143
-
144
-
145
-
146
-
147
-
148
-
149
-
150
-
151
-
152
-
153
-
154
-
155
-
156
-
157
-
158
-
159
-
160
-
161
-
162
-
163
-
164
-
165
-
166
-
167
-
168
 |
 |