HP Pavilion a400 HP Pavilion Desktop PC - (English) Users Guide PAV SEA/ANZ/IN - Page 148
what is plug and play?
 |
View all HP Pavilion a400 manuals
Add to My Manuals
Save this manual to your list of manuals |
Page 148 highlights
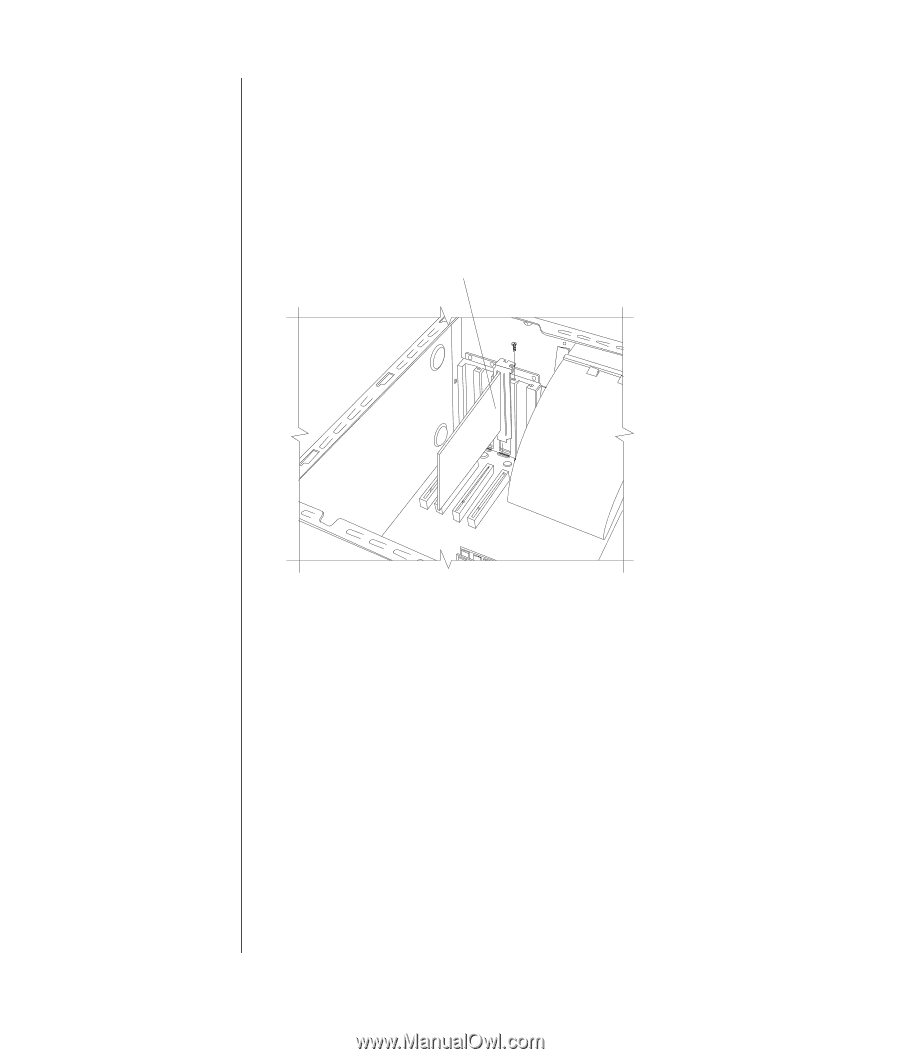
7 If you are replacing a card, disconnect any external and/or internal cables attached to the card. 8 Loosen the screw on the bracket of the card you are replacing (F). 9 Hold the metal bracket and the far top corner of the card. Carefully remove the card by pulling the card straight out of the expansion slot. 10 Insert the new card into the slot and push straight down. Make sure the card is properly seated. 11 Attach the screw to secure the card you have replaced (F). F To reassemble the computer: 1 Replace the side panel (see "replacing the side panel" on page 154). 2 Reconnect the power cord and all other cables. 3 Reconnect the modem/telephone cable. 4 Turn on the computer and all peripherals. 5 Install any software drivers supplied by the card manufacturer. what is plug and play? "Plug and Play" describes the ability to add and remove add-in cards, memory, and peripherals without any special procedures (such as resetting jumpers and testing for system conflicts). The system BIOS (basic input/output system) finds these components and adds them to the system. You do not have to run the BIOS setup program. 140 user's guide
-
 1
1 -
2
-
3
-
4
-
5
-
6
-
7
-
8
-
9
-
10
-
11
-
12
-
13
-
14
-
15
-
16
-
17
-
18
-
19
-
20
-
21
-
22
-
23
-
24
-
25
-
26
-
27
-
28
-
29
-
30
-
31
-
32
-
33
-
34
-
35
-
36
-
37
-
38
-
39
-
40
-
41
-
42
-
43
-
44
-
45
-
46
-
47
-
48
-
49
-
50
-
51
-
52
-
53
-
54
-
55
-
56
-
57
-
58
-
59
-
60
-
61
-
62
-
63
-
64
-
65
-
66
-
67
-
68
-
69
-
70
-
71
-
72
-
73
-
74
-
75
-
76
-
77
-
78
-
79
-
80
-
81
-
82
-
83
-
84
-
85
-
86
-
87
-
88
-
89
-
90
-
91
-
92
-
93
-
94
-
95
-
96
-
97
-
98
-
99
-
100
-
101
-
102
-
103
-
104
-
105
-
106
-
107
-
108
-
109
-
110
-
111
-
112
-
113
-
114
-
115
-
116
-
117
-
118
-
119
-
120
-
121
-
122
-
123
-
124
-
125
-
126
-
127
-
128
-
129
-
130
-
131
-
132
-
133
-
134
-
135
-
136
-
137
-
138
-
139
-
140
-
141
-
142
-
 143
143 -
 144
144 -
 145
145 -
 146
146 -
 147
147 -
 148
148 -
 149
149 -
 150
150 -
 151
151 -
 152
152 -
 153
153 -
154
-
155
-
156
-
157
-
158
-
159
-
160
-
161
-
162
-
163
-
164
-
165
-
166
-
167
-
168
 |
 |