HP Pavilion a400 HP Pavilion Desktop PC - (English) Users Guide PAV SEA/ANZ/IN - Page 130
NO ON PP
 |
View all HP Pavilion a400 manuals
Add to My Manuals
Save this manual to your list of manuals |
Page 130 highlights
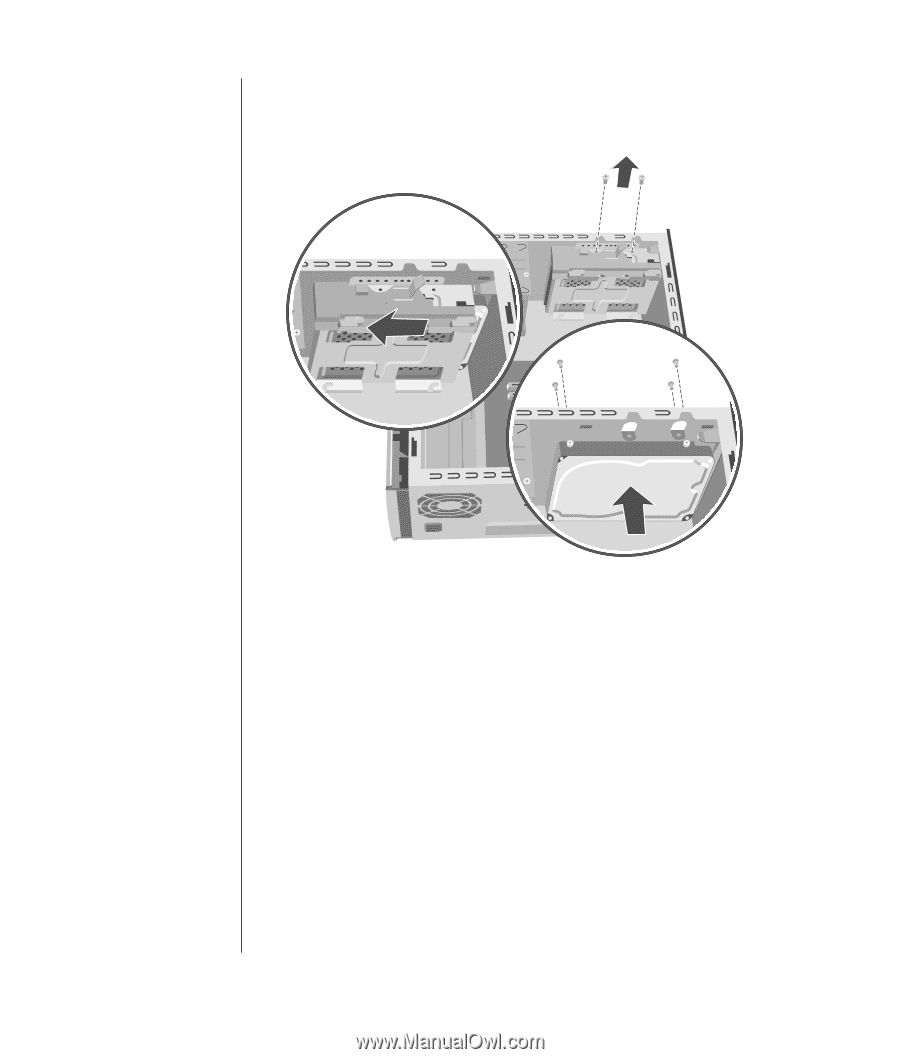
5 Remove the two screws on the hard drive bracket (N). N O P 6 Slide the bracket away from the bottom of the chassis (O), and then pull it up and out of the chassis. 7 Remove the four screws on the front of the chassis to release the hard drive from the front of the chassis (P). Pull the hard drive out of the chassis. 8 Make a note of each cable attached to the second hard drive before removing the cables. Remove the IDE and power cables from the back of the second hard drive. 122 user's guide
-
 1
1 -
2
-
3
-
4
-
5
-
6
-
7
-
8
-
9
-
10
-
11
-
12
-
13
-
14
-
15
-
16
-
17
-
18
-
19
-
20
-
21
-
22
-
23
-
24
-
25
-
26
-
27
-
28
-
29
-
30
-
31
-
32
-
33
-
34
-
35
-
36
-
37
-
38
-
39
-
40
-
41
-
42
-
43
-
44
-
45
-
46
-
47
-
48
-
49
-
50
-
51
-
52
-
53
-
54
-
55
-
56
-
57
-
58
-
59
-
60
-
61
-
62
-
63
-
64
-
65
-
66
-
67
-
68
-
69
-
70
-
71
-
72
-
73
-
74
-
75
-
76
-
77
-
78
-
79
-
80
-
81
-
82
-
83
-
84
-
85
-
86
-
87
-
88
-
89
-
90
-
91
-
92
-
93
-
94
-
95
-
96
-
97
-
98
-
99
-
100
-
101
-
102
-
103
-
104
-
105
-
106
-
107
-
108
-
109
-
110
-
111
-
112
-
113
-
114
-
115
-
116
-
117
-
118
-
119
-
120
-
121
-
122
-
123
-
124
-
 125
125 -
 126
126 -
 127
127 -
 128
128 -
 129
129 -
 130
130 -
 131
131 -
 132
132 -
 133
133 -
 134
134 -
 135
135 -
136
-
137
-
138
-
139
-
140
-
141
-
142
-
143
-
144
-
145
-
146
-
147
-
148
-
149
-
150
-
151
-
152
-
153
-
154
-
155
-
156
-
157
-
158
-
159
-
160
-
161
-
162
-
163
-
164
-
165
-
166
-
167
-
168
 |
 |
122
user’s guide
5
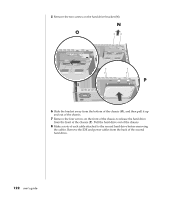
Remove the two screws on the hard drive bracket (
N
).
O
N
P
6
Slide the bracket away from the bottom of the chassis (
O
), and then pull it up
and out of the chassis.
7
Remove the four screws on the front of the chassis to release the hard drive
from the front of the chassis (
P
). Pull the hard drive out of the chassis.
8
Make a note of each cable attached to the second hard drive before removing
the cables. Remove the IDE and power cables from the back of the second
hard drive.