HP Surestore Tape Library Model 20/700 HP Surestore Bridge FC 2/1 LV and FC 4/ - Page 118
Trace History, Get a Copy of Trace Buffer
 |
View all HP Surestore Tape Library Model 20/700 manuals
Add to My Manuals
Save this manual to your list of manuals |
Page 118 highlights
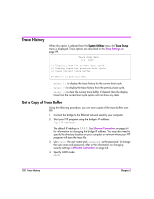
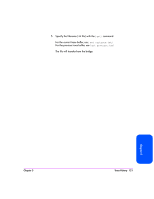
Trace History When this option is selected from the System Utilities menu, the Trace Dump menu is displayed. Trace options are described in the Trace Settings on page 99. Trace Dump Menu X.X XXXX 1) Display trace for current boot cycle 2) Display trace for previous boot cycle 3) Clear current trace buffer X) Return to previous menu ■ Select 1) to display the trace history for the current boot cycle. ■ Select 2) to display the trace history from the previous boot cycle. ■ Select 3) to clear the current trace buffer. If cleared, then the display trace from the current boot cycle option will not show any data. Get a Copy of Trace Buffer Using the following procedure, you can save copies of the trace buffers over FTP. 1. Connect the bridge to the Ethernet network used by your computer. 2. Start your FTP program using the bridge's IP address: ftp The default IP address is 1.1.1.1. See Ethernet Connection on page 64 for information on changing the bridge IP address. You may also need to specify the directory location on your computer or network where your FTP program will store the trace file. 3. Use [root] the user name and [password] as the password. To change the user name and password, refer to the information on changing security settings in Ethernet Connection on page 64. 4. Specify ASCII mode: ASCII 120 Trace History Chapter 5
-
 1
1 -
2
-
3
-
4
-
5
-
6
-
7
-
8
-
9
-
10
-
11
-
12
-
13
-
14
-
15
-
16
-
17
-
18
-
19
-
20
-
21
-
22
-
23
-
24
-
25
-
26
-
27
-
28
-
29
-
30
-
31
-
32
-
33
-
34
-
35
-
36
-
37
-
38
-
39
-
40
-
41
-
42
-
43
-
44
-
45
-
46
-
47
-
48
-
49
-
50
-
51
-
52
-
53
-
54
-
55
-
56
-
57
-
58
-
59
-
60
-
61
-
62
-
63
-
64
-
65
-
66
-
67
-
68
-
69
-
70
-
71
-
72
-
73
-
74
-
75
-
76
-
77
-
78
-
79
-
80
-
81
-
82
-
83
-
84
-
85
-
86
-
87
-
88
-
89
-
90
-
91
-
92
-
93
-
94
-
95
-
96
-
97
-
98
-
99
-
100
-
101
-
102
-
103
-
104
-
105
-
106
-
107
-
108
-
109
-
110
-
111
-
112
-
 113
113 -
 114
114 -
 115
115 -
 116
116 -
 117
117 -
 118
118 -
 119
119 -
 120
120 -
 121
121 -
 122
122 -
 123
123 -
124
-
125
-
126
-
127
-
128
-
129
-
130
-
131
-
132
-
133
-
134
-
135
-
136
-
137
-
138
-
139
-
140
-
141
-
142
-
143
-
144
-
145
-
146
-
147
-
148
-
149
-
150
-
151
-
152
-
153
-
154
-
155
-
156
-
157
-
158
-
159
-
160
-
161
-
162
-
163
-
164
-
165
-
166
-
167
-
168
-
169
-
170
-
171
-
172
-
173
-
174
-
175
-
176
-
177
-
178
-
179
-
180
-
181
-
182
-
183
-
184
-
185
-
186
-
187
-
188
-
189
-
190
-
191
-
192
-
193
-
194
-
195
-
196
-
197
-
198
-
199
-
200
-
201
-
202
-
203
-
204
-
205
-
206
-
207
-
208
-
209
-
210
-
211
-
212
-
213
-
214
-
215
-
216
-
217
-
218
-
219
-
220
-
221
-
222
-
223
-
224
-
225
-
226
-
227
-
228
-
229
-
230
-
231
-
232
-
233
-
234
-
235
-
236
-
237
-
238
-
239
-
240
-
241
-
242
-
243
-
244
-
245
-
246
-
247
-
248
-
249
-
250
-
251
-
252
-
253
-
254
-
255
-
256
-
257
-
258
-
259
-
260
 |
 |
