HP T5125 Administrator's Guide: HP Compaq t5125/t5135 Thin Clients, build S1ST - Page 19
Add ICA Drives, Drive, Enable, Write, Delete
 |
UPC - 082960980097
View all HP T5125 manuals
Add to My Manuals
Save this manual to your list of manuals |
Page 19 highlights
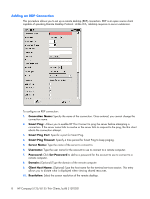
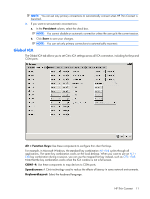
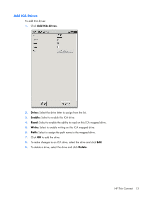
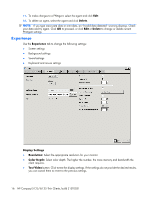
Add ICA Drives To add ICA drives: 1. Click Add ICA drives. 2. Drive: Select the drive letter to assign from the list. 3. Enable: Select to enable this ICA drive. 4. Read: Select to enable the ability to read on this ICA mapped drive. 5. Write: Select to enable writing on this ICA mapped drive. 6. Path: Select to assign the path name to the mapped drive. 7. Click OK to add the drive. 8. To make changes to an ICA drive, select the drive and click Edit. 9. To delete a drive, select the drive and click Delete. HP Thin Connect 13
-
 1
1 -
2
-
3
-
4
-
5
-
6
-
7
-
8
-
9
-
10
-
11
-
12
-
13
-
 14
14 -
 15
15 -
 16
16 -
 17
17 -
 18
18 -
 19
19 -
 20
20 -
 21
21 -
 22
22 -
 23
23 -
 24
24 -
25
-
26
-
27
-
28
-
29
-
30
-
31
-
32
-
33
-
34
-
35
-
36
-
37
-
38
-
39
-
40
-
41
-
42
-
43
-
44
-
45
-
46
-
47
-
48
-
49
 |
 |
Add ICA Drives
To add ICA drives:
1
.
Click
Add ICA drives
.
2
.
Drive:
Select the drive letter to assign from the list.
3
.
Enable:
Select to enable this ICA drive.
4
.
Read:
Select to enable the ability to read on this ICA mapped drive.
5
.
Write:
Select to enable writing on this ICA mapped drive.
6
.
Path:
Select to assign the path name to the mapped drive.
7
.
Click
OK
to add the drive.
8
.
To make changes to an ICA drive, select the drive and click
Edit
.
9
.
To delete a drive, select the drive and click
Delete
.
HP Thin Connect
13