HP Workstation zx2000 HP Workstation zx2000 Getting Started Guide - Page 10
rear panel
 |
View all HP Workstation zx2000 manuals
Add to My Manuals
Save this manual to your list of manuals |
Page 10 highlights
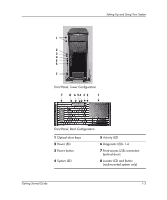
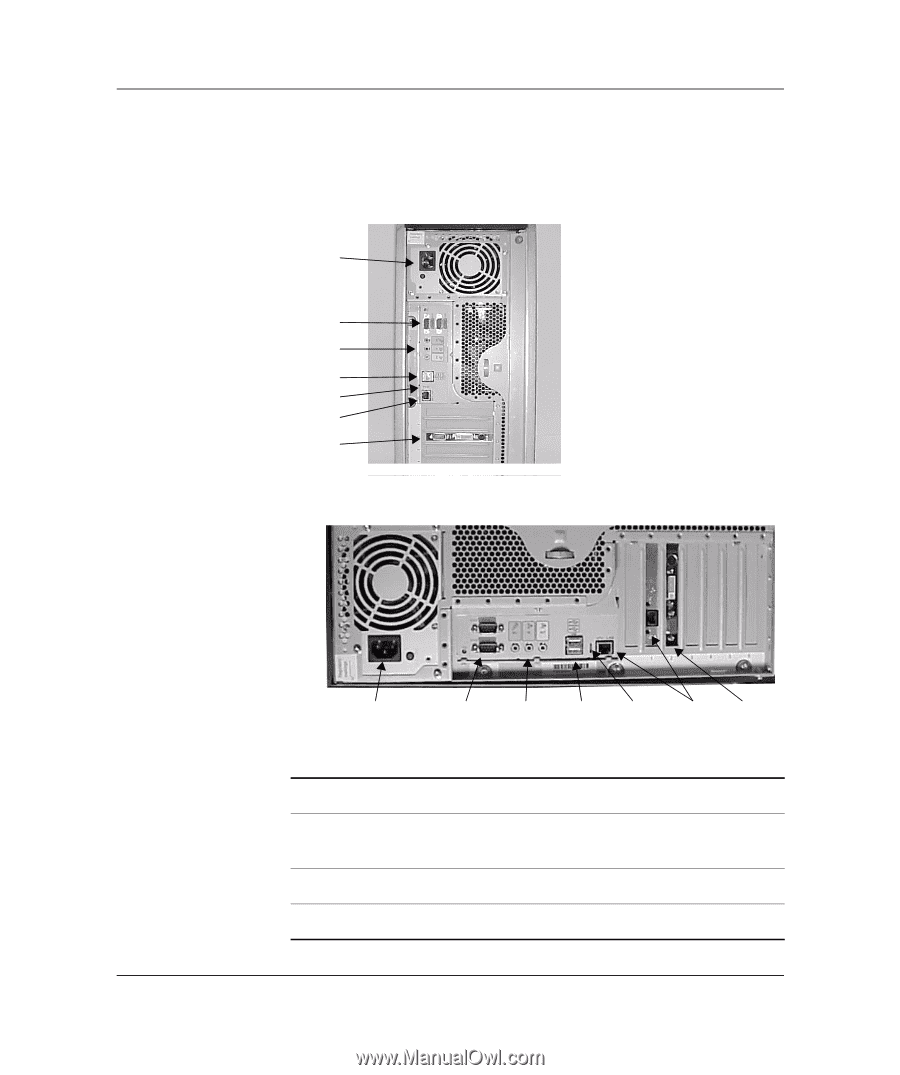
Setting Up and Using Your System rear panel The connectors are shaped to go in one way only. Refer to the label on the back of the workstation. 1 2 3 4 5 6 7 Rear Panel Connectors, Tower Configuration 1 2 3 4 5 67 Rear Panel Connectors, Rack-mounted Configuration 1 Power 5 LAN LEDs 2 Serial ports 6 Built-in LAN and optional second LAN ports 3 Audio (headphone, microphone) 7 Monitor port(s) on graphics card 4 USB 1-4 Getting Started Guide
-
 1
1 -
2
-
3
-
4
-
 5
5 -
 6
6 -
 7
7 -
 8
8 -
 9
9 -
 10
10 -
 11
11 -
 12
12 -
 13
13 -
 14
14 -
 15
15 -
16
-
17
-
18
-
19
-
20
-
21
-
22
-
23
-
24
-
25
-
26
-
27
-
28
-
29
-
30
-
31
-
32
-
33
-
34
-
35
-
36
-
37
-
38
-
39
-
40
-
41
-
42
-
43
-
44
-
45
-
46
-
47
-
48
-
49
-
50
-
51
-
52
-
53
-
54
 |
 |
1–4
Getting Started Guide
Setting Up and Using Your System
rear panel
The connectors are shaped to go in one way only
. Refer to the label on
the back of the workstation.
Rear Panel Connectors, Tower Configuration
Rear Panel Connectors, Rack-mounted Configuration
1
2
4
6
3
7
5
1
2
4
6
3
7
5
1
Power
5
LAN LEDs
2
Serial ports
6
Built-in LAN and optional
second LAN ports
3
Audio
(headphone, microphone)
7
Monitor port(s) on graphics card
4
USB