HP Workstation zx2000 HP Workstation zx2000 Getting Started Guide - Page 19
hp zx2000 Technical Reference Guide
 |
View all HP Workstation zx2000 manuals
Add to My Manuals
Save this manual to your list of manuals |
Page 19 highlights
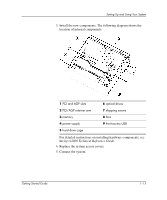
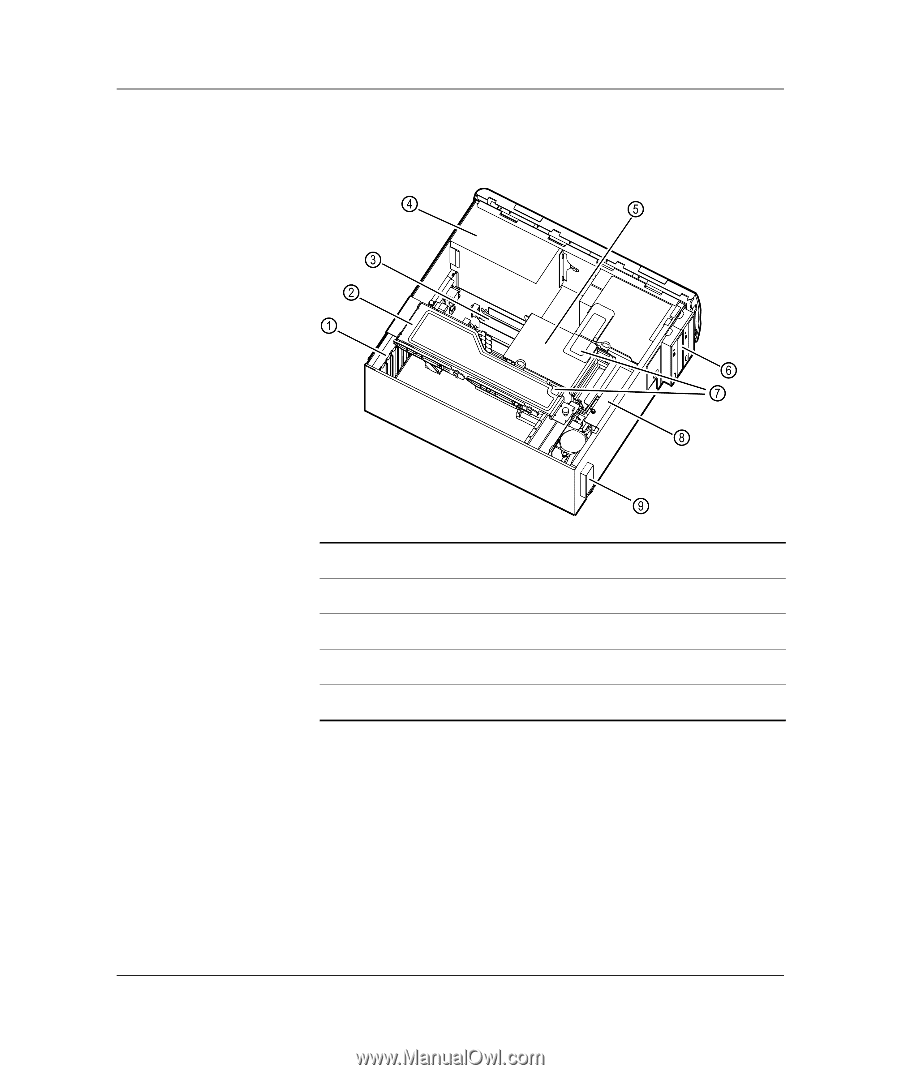
Setting Up and Using Your System 3. Install the new components. The following diagram shows the location of internal components. 1 PCI and AGP slots 6 optical drives 2 PCI/AGP retainer arm 7 shipping screws 3 memory 8 fans 4 power supply 9 front-access USB 5 hard drive cage For detailed instructions on installing hardware components, see the hp zx2000 Technical Reference Guide. 4. Replace the system access covers. 5. Connect the system. Getting Started Guide 1-13
-
 1
1 -
2
-
3
-
4
-
5
-
6
-
7
-
8
-
9
-
10
-
11
-
12
-
13
-
 14
14 -
 15
15 -
 16
16 -
 17
17 -
 18
18 -
 19
19 -
 20
20 -
 21
21 -
 22
22 -
 23
23 -
 24
24 -
25
-
26
-
27
-
28
-
29
-
30
-
31
-
32
-
33
-
34
-
35
-
36
-
37
-
38
-
39
-
40
-
41
-
42
-
43
-
44
-
45
-
46
-
47
-
48
-
49
-
50
-
51
-
52
-
53
-
54
 |
 |
Getting Started Guide
1–13
Setting Up and Using Your System
3. Install the new components. The following diagram shows the
location of internal components.
For detailed instructions on installing hardware components, see
the
hp zx2000 Technical Reference Guide
.
4. Replace the system access covers.
5. Connect the system.
1
PCI and AGP slots
6
optical drives
2
PCI/AGP retainer arm
7
shipping screws
3
memory
8
fans
4
power supply
9
front-access USB
5
hard drive cage