HP Z3200ps HP Designjet Z3200ps Photo Printer Series - User Guide [English] - Page 44
Sheet, with skew check, The recommended option is
 |
UPC - 884420403401
View all HP Z3200ps manuals
Add to My Manuals
Save this manual to your list of manuals |
Page 44 highlights
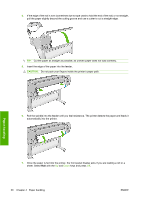
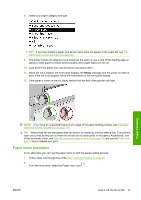
2. Insert the sheet into the feeder. Load your sheet aligned with the load line and insert until the paper cannot continue, with thicker sheets you feel resistance. The printer detects the sheet in three seconds. A countdown begins on the front-panel display. CAUTION: Do not push your fingers inside the printer's paper path. 3. After the countdown, the paper feeds into the printer. Guide the sheet into the printer; this is especially important with thicker papers. 4. The front-panel display asks whether you are loading a roll, a sheet with skew check, or a sheet without skew check. Select Sheet, with skew check or Sheet, without skew check with the Up and Down keys. NOTE: The recommended option is Sheet, with skew check. NOTE: If you load without a skew check, print previews may not work properly. See Preview a print on page 51. 5. Select your paper category and type. TIP: If you have loaded a paper type whose name does not appear in the paper list, see The paper type is not in the driver on page 143. Paper handling 34 Chapter 4 Paper handling ENWW
-
 1
1 -
2
-
3
-
4
-
5
-
6
-
7
-
8
-
9
-
10
-
11
-
12
-
13
-
14
-
15
-
16
-
17
-
18
-
19
-
20
-
21
-
22
-
23
-
24
-
25
-
26
-
27
-
28
-
29
-
30
-
31
-
32
-
33
-
34
-
35
-
36
-
37
-
38
-
 39
39 -
 40
40 -
 41
41 -
 42
42 -
 43
43 -
 44
44 -
 45
45 -
 46
46 -
 47
47 -
 48
48 -
 49
49 -
50
-
51
-
52
-
53
-
54
-
55
-
56
-
57
-
58
-
59
-
60
-
61
-
62
-
63
-
64
-
65
-
66
-
67
-
68
-
69
-
70
-
71
-
72
-
73
-
74
-
75
-
76
-
77
-
78
-
79
-
80
-
81
-
82
-
83
-
84
-
85
-
86
-
87
-
88
-
89
-
90
-
91
-
92
-
93
-
94
-
95
-
96
-
97
-
98
-
99
-
100
-
101
-
102
-
103
-
104
-
105
-
106
-
107
-
108
-
109
-
110
-
111
-
112
-
113
-
114
-
115
-
116
-
117
-
118
-
119
-
120
-
121
-
122
-
123
-
124
-
125
-
126
-
127
-
128
-
129
-
130
-
131
-
132
-
133
-
134
-
135
-
136
-
137
-
138
-
139
-
140
-
141
-
142
-
143
-
144
-
145
-
146
-
147
-
148
-
149
-
150
-
151
-
152
-
153
-
154
-
155
-
156
-
157
-
158
-
159
-
160
-
161
-
162
-
163
-
164
-
165
-
166
-
167
-
168
-
169
-
170
-
171
-
172
-
173
-
174
-
175
-
176
-
177
-
178
-
179
-
180
-
181
-
182
-
183
-
184
-
185
-
186
-
187
-
188
-
189
-
190
-
191
-
192
-
193
-
194
-
195
-
196
-
197
-
198
-
199
-
200
-
201
-
202
-
203
-
204
-
205
 |
 |
