HP Z3200ps HP Designjet Z3200ps Photo Printer Series - User Guide [English] - Page 57
Printing stored jobs, Select print quality
 |
UPC - 884420403401
View all HP Z3200ps manuals
Add to My Manuals
Save this manual to your list of manuals |
Page 57 highlights
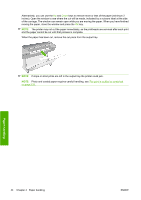
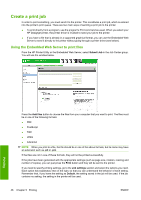
Printing stored jobs When you print a file with the Embedded Web Server, you can mark the job to be stored permanently in the printer. If you select Stored jobs in printer in the Main tab of the Embedded Web Server, you will see a list of the stored jobs. The information displayed for each job includes: ● The name of the job ● The size of the job ● The date and time when the job was received by the printer ● The name given by the person who submitted the job You can click on the title of any column to sort the list by the information in that column. You can select one or more jobs in the list and perform the following operations on them by using the buttons at the top of the list. ● Print: The selected jobs are printed with the original settings. You will be able to see the progress of your jobs on the Job queue page. ● Advanced print: The settings of the selected jobs are displayed, and you can modify them. You can save the new settings by pressing the Save button, and print the jobs by pressing the Print button. The value of a setting is shown only if it has the same value in all of the selected jobs. Otherwise, a hyphen is shown. ● Delete: The selected jobs are permanently deleted from the printer. Select print quality The printer has various print-quality options because best-quality printing requires some loss of speed, while fast printing implies some reduction in print quality. Therefore, the standard print-quality selector is a slider that allows you to choose between quality and speed. Alternatively, you can select from the custom options: Best, Normal and Fast. There are also three supplementary custom options that may have an effect on print quality: Maximum detail, More passes and Gloss enhancer. See High-quality printing on page 54. NOTE: In the Windows driver dialog, the rendering and printing resolutions for your job are displayed in the Paper/Quality tab. In the Mac OS Print dialog, they are displayed in the Summary panel. You can select print-quality options in the following ways: ● In the Windows driver dialog: go to the Paper/Quality tab and look at the Print Quality section. If you select Standard Options, you will see a simple slider with which you can select speed or quality. If you select Custom Options, you will see the more specific options described above. ● In the Mac OS Print dialog (PostScript driver): go to the Image Quality panel. If you select Standard quality options, you will see a simple slider with which you can select speed or quality. If you select Custom quality options, you will see the more specific options described above. ● In the Mac OS Print dialog (PCL3 driver): go to the Paper Type/Quality panel and select Paper. If you select Standard quality options, you will see a simple slider with which you can select speed or quality. If you select Custom quality options, you will see the more specific options described above. Printing ENWW Select print quality 47
-
 1
1 -
2
-
3
-
4
-
5
-
6
-
7
-
8
-
9
-
10
-
11
-
12
-
13
-
14
-
15
-
16
-
17
-
18
-
19
-
20
-
21
-
22
-
23
-
24
-
25
-
26
-
27
-
28
-
29
-
30
-
31
-
32
-
33
-
34
-
35
-
36
-
37
-
38
-
39
-
40
-
41
-
42
-
43
-
44
-
45
-
46
-
47
-
48
-
49
-
50
-
51
-
 52
52 -
 53
53 -
 54
54 -
 55
55 -
 56
56 -
 57
57 -
 58
58 -
 59
59 -
 60
60 -
 61
61 -
 62
62 -
63
-
64
-
65
-
66
-
67
-
68
-
69
-
70
-
71
-
72
-
73
-
74
-
75
-
76
-
77
-
78
-
79
-
80
-
81
-
82
-
83
-
84
-
85
-
86
-
87
-
88
-
89
-
90
-
91
-
92
-
93
-
94
-
95
-
96
-
97
-
98
-
99
-
100
-
101
-
102
-
103
-
104
-
105
-
106
-
107
-
108
-
109
-
110
-
111
-
112
-
113
-
114
-
115
-
116
-
117
-
118
-
119
-
120
-
121
-
122
-
123
-
124
-
125
-
126
-
127
-
128
-
129
-
130
-
131
-
132
-
133
-
134
-
135
-
136
-
137
-
138
-
139
-
140
-
141
-
142
-
143
-
144
-
145
-
146
-
147
-
148
-
149
-
150
-
151
-
152
-
153
-
154
-
155
-
156
-
157
-
158
-
159
-
160
-
161
-
162
-
163
-
164
-
165
-
166
-
167
-
168
-
169
-
170
-
171
-
172
-
173
-
174
-
175
-
176
-
177
-
178
-
179
-
180
-
181
-
182
-
183
-
184
-
185
-
186
-
187
-
188
-
189
-
190
-
191
-
192
-
193
-
194
-
195
-
196
-
197
-
198
-
199
-
200
-
201
-
202
-
203
-
204
-
205
 |
 |
