Kodak 5300 User Guide - Page 55
Set Number of Prints, Set Color, Set Print Quality, Save Settings, Quantity, Photo, Start, Color - not printing black
 |
UPC - 041778804056
View all Kodak 5300 manuals
Add to My Manuals
Save this manual to your list of manuals |
Page 55 highlights
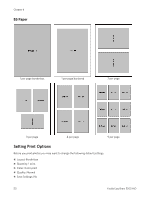
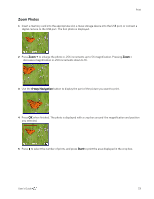
Print The Photo Print menu contains parameters that allow you to specify other options. Set Number of Prints You can increase the number of prints of each photo from the Photo Print menu. The default is 1 print. 1 On the Print menu, select Quantity. 2 Press _ or ` to change the print quantity. 3 Press OK to set the selected layout and continue to set options, press Photo to preview, or Start to print. Set Color You can print in color or black-and-white. Printing in color is the default. 1 On the Print menu, select Color. 2 Press _ or ` to change the print color. 3 Press OK to set the selected layout and continue to set options, press Photo to preview, or Start to print. Set Print Quality The Kodak EasyShare All-in-One provides three options that affect print speed and quality for plain paper. Print quality is automatically set to Kodak Picture Quality when photo paper is detected. Draft Produces the fastest print speed, but the lowest quality. Normal Delivers high-quality output and is the default setting. Normal prints faster than Best. Best Produces the highest quality for all paper and eliminates the banding (striping) effect that sometimes occurs in solid areas. Best is the slowest print speed. 1 On the Print menu, select Quality. 2 Press _ or ` to change the print quality. 3 Press OK to set the selected layout and continue to set options, press Photo to preview, or Start to print. Save Settings When you change print settings from the control panel, the settings apply only to the current print job. To apply print settings to all future print jobs, you can save the changes you make. 1 On the Print menu, select Save Settings. 2 Press _ or ` to set to Yes. 3 Press Photo to preview, or Start to print. User's Guide 51
-
 1
1 -
2
-
3
-
4
-
5
-
6
-
7
-
8
-
9
-
10
-
11
-
12
-
13
-
14
-
15
-
16
-
17
-
18
-
19
-
20
-
21
-
22
-
23
-
24
-
25
-
26
-
27
-
28
-
29
-
30
-
31
-
32
-
33
-
34
-
35
-
36
-
37
-
38
-
39
-
40
-
41
-
42
-
43
-
44
-
45
-
46
-
47
-
48
-
49
-
 50
50 -
 51
51 -
 52
52 -
 53
53 -
 54
54 -
 55
55 -
 56
56 -
 57
57 -
 58
58 -
 59
59 -
 60
60 -
61
-
62
-
63
-
64
-
65
-
66
-
67
-
68
-
69
-
70
-
71
-
72
-
73
-
74
-
75
-
76
-
77
-
78
-
79
-
80
-
81
-
82
-
83
-
84
-
85
-
86
-
87
-
88
-
89
-
90
-
91
-
92
-
93
-
94
-
95
-
96
-
97
-
98
-
99
-
100
-
101
-
102
-
103
-
104
-
105
-
106
 |
 |