Kodak 5300 User Guide - Page 76
Remove the bagged ink cartridge from the box and tear open the bag at the notch and remove the ink - print head
 |
UPC - 041778804056
View all Kodak 5300 manuals
Add to My Manuals
Save this manual to your list of manuals |
Page 76 highlights
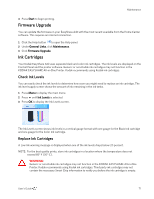
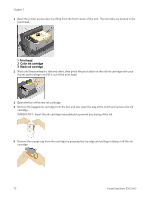
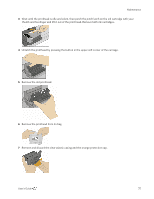
Chapter 7 1 Open the printer access door by lifting from the front center of the unit. The ink tanks are located in the print head. 1 Print head 2 Color ink cartridge 3 Black ink cartridge 2 Wait until the printhead is idle and silent, then pinch the pinch latch on the old ink cartridge with your thumb and forefinger and lift it out of the print head. 3 Open the box of the new ink cartridge. 4 Remove the bagged ink cartridge from the box and tear open the bag at the notch and remove the ink cartridge. IMPORTANT: Insert the ink cartridge immediately to prevent any drying of the ink. 5 Remove the orange cap from the cartridge by grasping the top edge and pulling/rotating it off the ink cartridge. 72 Kodak EasyShare 5300 AiO
-
 1
1 -
2
-
3
-
4
-
5
-
6
-
7
-
8
-
9
-
10
-
11
-
12
-
13
-
14
-
15
-
16
-
17
-
18
-
19
-
20
-
21
-
22
-
23
-
24
-
25
-
26
-
27
-
28
-
29
-
30
-
31
-
32
-
33
-
34
-
35
-
36
-
37
-
38
-
39
-
40
-
41
-
42
-
43
-
44
-
45
-
46
-
47
-
48
-
49
-
50
-
51
-
52
-
53
-
54
-
55
-
56
-
57
-
58
-
59
-
60
-
61
-
62
-
63
-
64
-
65
-
66
-
67
-
68
-
69
-
70
-
 71
71 -
 72
72 -
 73
73 -
 74
74 -
 75
75 -
 76
76 -
 77
77 -
 78
78 -
 79
79 -
 80
80 -
 81
81 -
82
-
83
-
84
-
85
-
86
-
87
-
88
-
89
-
90
-
91
-
92
-
93
-
94
-
95
-
96
-
97
-
98
-
99
-
100
-
101
-
102
-
103
-
104
-
105
-
106
 |
 |

Chapter 7
1
Open the printer access door by lifting from the front center of the unit. The ink tanks are located in the
print head.
1
Print head
2
Color ink cartridge
3
Black ink cartridge
2
Wait until the printhead is idle and silent, then pinch the pinch latch on the old ink cartridge with your
thumb and forefinger and lift it out of the print head.
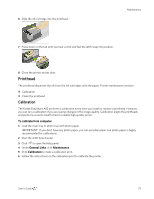
3
Open the box of the new ink cartridge.
4
Remove the bagged ink cartridge from the box and tear open the bag at the notch and remove the ink
cartridge.
IMPORTANT:
Insert the ink cartridge immediately to prevent any drying of the ink.
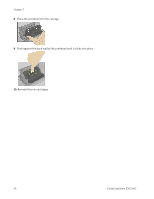
5
Remove the orange cap from the cartridge by grasping the top edge and pulling/rotating it off the ink
cartridge.
72
Kodak EasyShare 5300 AiO