Kodak 5300 User Guide - Page 89
Photo Print Smudged, PictBridge Camera not Detected, Picture Will Not Print, Pictures Cropped - review
 |
UPC - 041778804056
View all Kodak 5300 manuals
Add to My Manuals
Save this manual to your list of manuals |
Page 89 highlights
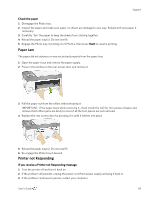
Support Photo Print Smudged Fingerprints may be on glossy side of paper. Handle paper by the edges. PictBridge Camera not Detected 1 Check the USB connections from the PictBridge compatible camera or device to the printer. 2 If disconnected, reconnect the USB cable from the PictBridge compatible camera or device to the printer. 3 Make sure there is at least one picture in the PictBridge compatible camera or device's internal memory or memory card. 4 Make sure the connected camera or device is PictBridge compatible. See your camera or device user's guide for details. Picture Will Not Print A selected picture does not print. „ The image file may be corrupt. Review the picture on the camera or computer and delete if necessary. „ The image file may not be JPEG format. The printer can only print JPEG files in standalone mode. Connect to a computer and use EasyShare software to print BMP and TIFF formats. Pictures Cropped „ Change the picture quality setting (or resolution) on your digital camera to 3:2. See your camera user's guide for details. „ Adjust cropped pictures using Kodak EasyShare software on your computer. „ If you are printing from an application on your computer, select the proper paper size in print options. NOTE: Cropping may vary depending on the selected picture size. Poor Print Quality 1 Clean the printhead. 2 Run a calibration. If the problem persists, repeat as often as necessary. Print Skewed or Slanted Probable Cause 1 The paper is not properly loaded in the tray. 1 Remove the stack of paper from the main paper tray, and slide the paper guides to the outermost position. 2 Remove the paper and check for wrinkles and tears. 3 Straighten the stack of paper against a flat surface, and reload it into the main paper tray. 4 Slide the paper-width and paper-length guides inward until they stop at the edges of the paper. See Also: Load Main Tray User's Guide 85
-
 1
1 -
2
-
3
-
4
-
5
-
6
-
7
-
8
-
9
-
10
-
11
-
12
-
13
-
14
-
15
-
16
-
17
-
18
-
19
-
20
-
21
-
22
-
23
-
24
-
25
-
26
-
27
-
28
-
29
-
30
-
31
-
32
-
33
-
34
-
35
-
36
-
37
-
38
-
39
-
40
-
41
-
42
-
43
-
44
-
45
-
46
-
47
-
48
-
49
-
50
-
51
-
52
-
53
-
54
-
55
-
56
-
57
-
58
-
59
-
60
-
61
-
62
-
63
-
64
-
65
-
66
-
67
-
68
-
69
-
70
-
71
-
72
-
73
-
74
-
75
-
76
-
77
-
78
-
79
-
80
-
81
-
82
-
83
-
 84
84 -
 85
85 -
 86
86 -
 87
87 -
 88
88 -
 89
89 -
 90
90 -
 91
91 -
 92
92 -
 93
93 -
 94
94 -
95
-
96
-
97
-
98
-
99
-
100
-
101
-
102
-
103
-
104
-
105
-
106
 |
 |