Konica Minolta SL1000 Digital Film Scanner SL1000 User Guide - Page 25
Part Identification and Functions, 2.1 Main Unit, Main Unit
 |
View all Konica Minolta SL1000 Digital Film Scanner manuals
Add to My Manuals
Save this manual to your list of manuals |
Page 25 highlights
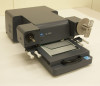
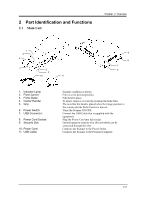
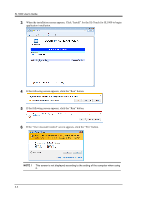
2 Part Identification and Functions 2.1 Main Unit Chapter 2 Overview 1 3 5 4 5 2 10 11 6 8 7 9 1. Indicator Lamp 2. Fiche Carrier: 3. Fiche Glass: 4. Carrier Handle: 5. Grip: 6. Power Switch: 7. USB Connector: 8. Power Cord Socket: 9. Security Slot: 10. Power Cord: 11. USB Cable: Scanner condition is shown. Film is set to desired position. Film held in place. To insert, remove or correctly position the fiche film. The area that the hand is placed when the image position is fine-tuned, and the Fiche Carrier is moved. Turns the Scanner ON/OFF. Connect the USB Cable that is supplied with the equipment. Plug the Power Cord into this socket. General-purpose security wire (for anti-theft) can be connected through this slot. Connects the Scanner to the Power Outlet. Connects the Scanner to the Personal Computer. 2-3
-
 1
1 -
2
-
3
-
4
-
5
-
6
-
7
-
8
-
9
-
10
-
11
-
12
-
13
-
14
-
15
-
16
-
17
-
18
-
19
-
 20
20 -
 21
21 -
 22
22 -
 23
23 -
 24
24 -
 25
25 -
 26
26 -
 27
27 -
 28
28 -
 29
29 -
 30
30 -
31
-
32
-
33
-
34
-
35
-
36
-
37
-
38
-
39
-
40
-
41
-
42
-
43
-
44
-
45
-
46
-
47
-
48
-
49
-
50
-
51
-
52
-
53
-
54
-
55
-
56
-
57
-
58
-
59
-
60
-
61
-
62
-
63
-
64
-
65
-
66
-
67
-
68
-
69
-
70
-
71
-
72
-
73
-
74
-
75
-
76
-
77
-
78
-
79
-
80
-
81
-
82
-
83
-
84
-
85
-
86
-
87
-
88
-
89
-
90
-
91
-
92
-
93
-
94
-
95
-
96
-
97
-
98
-
99
-
100
-
101
-
102
-
103
-
104
-
105
-
106
 |
 |
