Konica Minolta SL1000 Digital Film Scanner SL1000 User Guide - Page 57
Turn OFF the, Ask Before Output
 |
View all Konica Minolta SL1000 Digital Film Scanner manuals
Add to My Manuals
Save this manual to your list of manuals |
Page 57 highlights
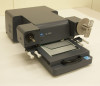
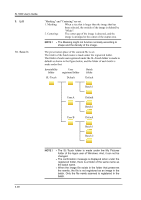
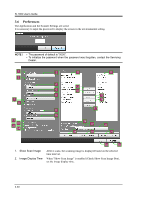
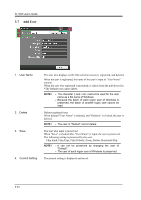
Chapter 3 SL-Touch for SL1000 3. Ask Before Output It displays on the confirmation screen before the scan image is output when "The scan image is displayed" is "ON". For Scan to File Scan to Print 4. White Balance 5. Color Correction 6. ICC Profile 7. Auto Contrast 8. Digital GEM 9. Put the Scanner to Sleep 10. Turn OFF the Scanner 11. Non-display button 12. Toolbar 13. Add 14. Remove The correction of the white balance is set. There are two selections available (Manual, Auto). The correction of the color reproduction for the color image is set. There are three selections available (Non, Standard, Color Management). The ICC Profile is selected. When the monochrome film is set, the image contrast is automatically corrected. The graininess of the film is decreased. It is effective for the image quality reproduction of negative film. The time that should elapse when no operation is performed before the device enters Sleep Mode. It can be selected according to 7 selections (5 Minutes, 15 Minutes, 30 Minutes, 60 Minutes, 2 Hours, 3 Hours, 4 Hours). The time that should elapse when no operation is performed in Sleep Mode before the Power Supply is turned OFF. It can be selected according to 4 selections (60 Minutes, 2 Hours, 3 Hours, 4 Hours). The buttons not displayed on the toolbar is displayed in the list. The button displayed on the toolbar is displayed in the list. The list is displayed, queuing up in order from the left of the toolbar to the lower right. The button displayed on the toolbar is added. "Non-display button" is selected, and "Addition" is clicked, and the oriented button is added onto the "Toolbar" list. The button displayed on the toolbar is deleted. The oriented button on the "Toolbar" is selected, and the button is deleted when "Remove" is clicked. 3-31
-
 1
1 -
2
-
3
-
4
-
5
-
6
-
7
-
8
-
9
-
10
-
11
-
12
-
13
-
14
-
15
-
16
-
17
-
18
-
19
-
20
-
21
-
22
-
23
-
24
-
25
-
26
-
27
-
28
-
29
-
30
-
31
-
32
-
33
-
34
-
35
-
36
-
37
-
38
-
39
-
40
-
41
-
42
-
43
-
44
-
45
-
46
-
47
-
48
-
49
-
50
-
51
-
 52
52 -
 53
53 -
 54
54 -
 55
55 -
 56
56 -
 57
57 -
 58
58 -
 59
59 -
 60
60 -
 61
61 -
 62
62 -
63
-
64
-
65
-
66
-
67
-
68
-
69
-
70
-
71
-
72
-
73
-
74
-
75
-
76
-
77
-
78
-
79
-
80
-
81
-
82
-
83
-
84
-
85
-
86
-
87
-
88
-
89
-
90
-
91
-
92
-
93
-
94
-
95
-
96
-
97
-
98
-
99
-
100
-
101
-
102
-
103
-
104
-
105
-
106
 |
 |