LG KF750 User Guide - Page 41
Choosing a colour tone, Viewing your saved photos, Setting a photo as a wallpaper, or contact image
 |
UPC - 411378092618
View all LG KF750 manuals
Add to My Manuals
Save this manual to your list of manuals |
Page 41 highlights
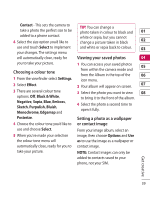
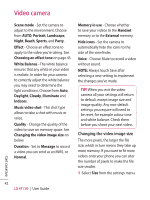
Contact - This sets the camera to TIP! You can change a take a photo the perfect size to be photo taken in colour to black and 01 added to a phone contact. 4 Select the size option you'd like to white or sepia, but you cannot change a picture taken in black 02 use and touch Select to implement and white or sepia back to colour. 03 your changes. The settings menu will automatically close, ready for Viewing your saved photos 04 you to take your picture. 1 You can access your saved photos 05 Choosing a colour tone from within the camera mode and from the Album in the top of the 06 1 From the viewfinder select Settings. icon menu. 2 Select Effect. 2 Your album will appear on screen. 07 3 There are several colour tone 3 Select the photo you want to view 08 options: Off, Black & White, to bring it to the front of the album. Negative, Sepia, Blue, Emboss, Sketch, Purpulish, Bluish, Monochrome, Edgemap and 4 Select the photo a second time to open it fully. Posterize. Setting a photo as a wallpaper 4 Choose the colour tone you'd like to or contact image use and choose Select. From your image album, select an 5 When you've made your selection image, then choose Options and Use the colour tone menu will as to use the image as a wallpaper or automatically close, ready for you to contact image. take your picture. NOTE: Contact images can only be added to contacts saved to your phone, not your SIM. Get creative 39
-
 1
1 -
2
-
3
-
4
-
5
-
6
-
7
-
8
-
9
-
10
-
11
-
12
-
13
-
14
-
15
-
16
-
17
-
18
-
19
-
20
-
21
-
22
-
23
-
24
-
25
-
26
-
27
-
28
-
29
-
30
-
31
-
32
-
33
-
34
-
35
-
 36
36 -
 37
37 -
 38
38 -
 39
39 -
 40
40 -
 41
41 -
 42
42 -
 43
43 -
 44
44 -
 45
45 -
 46
46 -
47
-
48
-
49
-
50
-
51
-
52
-
53
-
54
-
55
-
56
-
57
-
58
-
59
-
60
-
61
-
62
-
63
-
64
-
65
-
66
-
67
-
68
-
69
-
70
-
71
-
72
-
73
-
74
-
75
-
76
-
77
-
78
-
79
-
80
-
81
-
82
-
83
-
84
-
85
-
86
-
87
-
88
-
89
-
90
-
91
-
92
-
93
-
94
-
95
-
96
-
97
-
98
 |
 |
