Lenovo ThinkCentre M90z (English) User Guide - Page 21
Installing or replacing hardware, Installing external options - weight
 |
View all Lenovo ThinkCentre M90z manuals
Add to My Manuals
Save this manual to your list of manuals |
Page 21 highlights
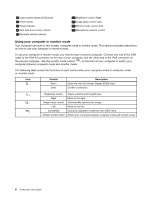
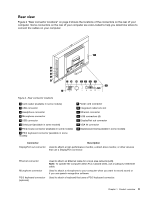
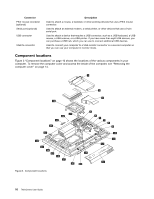
Chapter 2. Installing or replacing hardware This chapter provides instructions on how to install or replace hardware for your computer. This chapter contains the following topics: • "Installing or replacing hardware" on page 13 • "Obtaining device drivers" on page 51 • "Basic security features" on page 51 Installing or replacing hardware This section provides instructions on how to install or replace hardware for your computer. You can maintain your computer or expand the capabilities of your computer by installing or replacing hardware. Notes: 1. Use only computer parts provided by Lenovo. 2. When installing or replacing an option, use the appropriate instructions in this section along with the instructions that come with the option. Installing external options You can install external options to your computer, such as external speakers, a printer, or a scanner. For some external options, you must install additional software in addition to making the physical connection. When you install an external option, see "Locating computer controls, connectors, and parts" on page 7 to identify the required connector. Then, use the instructions that come with the option to help you make the connection and install any software or device drivers that are required for the option. Installing a computer wall mount CAUTION: If you wish to perform a self installation of a wall mounting unit for this product, Lenovo recommends that you select a wall mount product that is certified by Underwriters Laboratories (UL), Intertek (ETL), the Canadian Standards Association (CSA NRTL), TUV Rheinland of North America (TUV US), or any other safety test laboratory that is recognized by the United States Occupational Safety and Health Administration (OSHA). To avoid the risk of personal injury or damage to equipment, self installers should ensure that the weight bearing capacity of the wall mount product is rated above 12 kg (26. 5 lbs), so that it can support the machine for long time operation safely. Your computer supports VESA standard 100 mm × 100 mm (3.94 inches × 3.94 inches) wall mounts. For proper mounting, use four screws of the following specifications: Diameter × Pitch × Length: 4 mm × 0.7 mm × 10 mm (0.16 inch × 0.03 inch × 0.39 inch) Note: When installing a computer wall mount, make sure that you leave at least a 60 mm (2.36 inches) space between the wall and your computer for easy access to the connectors on the rear of your computer. © Copyright Lenovo 2010, 2012 13
-
 1
1 -
2
-
3
-
4
-
5
-
6
-
7
-
8
-
9
-
10
-
11
-
12
-
13
-
14
-
15
-
 16
16 -
 17
17 -
 18
18 -
 19
19 -
 20
20 -
 21
21 -
 22
22 -
 23
23 -
 24
24 -
 25
25 -
 26
26 -
27
-
28
-
29
-
30
-
31
-
32
-
33
-
34
-
35
-
36
-
37
-
38
-
39
-
40
-
41
-
42
-
43
-
44
-
45
-
46
-
47
-
48
-
49
-
50
-
51
-
52
-
53
-
54
-
55
-
56
-
57
-
58
-
59
-
60
-
61
-
62
-
63
-
64
-
65
-
66
-
67
-
68
-
69
-
70
-
71
-
72
-
73
-
74
-
75
-
76
-
77
-
78
-
79
-
80
-
81
-
82
-
83
-
84
-
85
-
86
-
87
-
88
-
89
-
90
-
91
-
92
-
93
-
94
-
95
-
96
-
97
-
98
 |
 |