Lenovo ThinkStation P300 (English) User Guide - Tower Form Factor - Page 105
Replacing the primary hard disk drive
 |
View all Lenovo ThinkStation P300 manuals
Add to My Manuals
Save this manual to your list of manuals |
Page 105 highlights
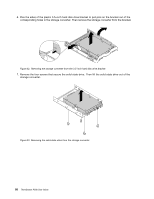
10. Install the two screws to secure the mSATA solid-state drive to the storage converter. Figure 43. Installing the screws to secure the mSATA solid-state drive 11. Slide the storage converter with the new mSATA solid-state drive into the mSATA solid-state drive bay until it snaps into position. Then install the screw to secure the storage converter to the chassis. Figure 44. Installing the mSATA solid-state drive 12. Connect the signal cable and the power cable to the new mSATA solid-state drive. What to do next: • To work with another piece of hardware, go to the appropriate section. • To complete the installation or replacement, go to "Completing the parts replacement" on page 111. Replacing the primary hard disk drive Attention: Do not open your computer or attempt any repair before reading and understanding the "Read this first: Important safety information" on page v. To replace the primary hard disk drive, do the following: 1. Remove all media from the drives and turn off all attached devices and the computer. Then, disconnect all power cords from electrical outlets and disconnect all cables that are connected to the computer. 2. Remove the computer cover. See "Removing the computer cover" on page 71. 3. Locate the primary hard disk drive. See "Locating components" on page 5. 4. Disconnect the signal cable and the power cable from the hard disk drive. Chapter 9. Installing or replacing hardware 93
-
 1
1 -
2
-
3
-
4
-
5
-
6
-
7
-
8
-
9
-
10
-
11
-
12
-
13
-
14
-
15
-
16
-
17
-
18
-
19
-
20
-
21
-
22
-
23
-
24
-
25
-
26
-
27
-
28
-
29
-
30
-
31
-
32
-
33
-
34
-
35
-
36
-
37
-
38
-
39
-
40
-
41
-
42
-
43
-
44
-
45
-
46
-
47
-
48
-
49
-
50
-
51
-
52
-
53
-
54
-
55
-
56
-
57
-
58
-
59
-
60
-
61
-
62
-
63
-
64
-
65
-
66
-
67
-
68
-
69
-
70
-
71
-
72
-
73
-
74
-
75
-
76
-
77
-
78
-
79
-
80
-
81
-
82
-
83
-
84
-
85
-
86
-
87
-
88
-
89
-
90
-
91
-
92
-
93
-
94
-
95
-
96
-
97
-
98
-
99
-
 100
100 -
 101
101 -
 102
102 -
 103
103 -
 104
104 -
 105
105 -
 106
106 -
 107
107 -
 108
108 -
 109
109 -
 110
110 -
111
-
112
-
113
-
114
-
115
-
116
-
117
-
118
-
119
-
120
-
121
-
122
-
123
-
124
-
125
-
126
-
127
-
128
-
129
-
130
-
131
-
132
-
133
-
134
-
135
-
136
-
137
-
138
-
139
-
140
-
141
-
142
-
143
-
144
-
145
-
146
-
147
-
148
-
149
-
150
 |
 |
