Lenovo ThinkStation P300 (English) User Guide - Tower Form Factor - Page 90
Installing or replacing a device in the optical drive bay
 |
View all Lenovo ThinkStation P300 manuals
Add to My Manuals
Save this manual to your list of manuals |
Page 90 highlights
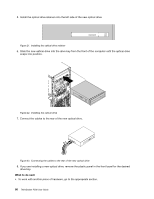
7. Position the new memory module over the memory slot. Ensure that the notch 1 on the memory module aligns correctly with the slot key 2 on the system board. Push the memory module straight down into the slot until the retaining clips close. Figure 18. Installing a memory module 8. Reinstall the PCI Express x16 graphics card if you have removed it. What to do next: • To work with another piece of hardware, go to the appropriate section. • To complete the installation or replacement, go to "Completing the parts replacement" on page 111. Installing or replacing a device in the optical drive bay Attention: Do not open your computer or attempt any repair before reading and understanding the "Read this first: Important safety information" on page v. The optical drive bays support the following two devices. Depending on your computer model, one or both of them might be installed: • Optical drive • 5.25-inch flex module equipped with some or all of the following components: - Slim optical drive - Card reader - eSATA connector - IEEE 1394 connector This section provides instructions on how to install or replace an optical drive. Note: The following instructions also apply to a flex module. To install or replace an optical drive, do the following: 1. Remove all media from the drives and turn off all attached devices and the computer. Then, disconnect all power cords from electrical outlets and disconnect all cables that are connected to the computer. 2. Remove the computer cover. See "Removing the computer cover" on page 71. 3. Remove the front bezel. See "Removing and reinstalling the front bezel" on page 72. 4. If you are installing an optical drive, do the following: a. Remove the metal static shield from the desired drive bay. 78 ThinkStation P300 User Guide
-
 1
1 -
2
-
3
-
4
-
5
-
6
-
7
-
8
-
9
-
10
-
11
-
12
-
13
-
14
-
15
-
16
-
17
-
18
-
19
-
20
-
21
-
22
-
23
-
24
-
25
-
26
-
27
-
28
-
29
-
30
-
31
-
32
-
33
-
34
-
35
-
36
-
37
-
38
-
39
-
40
-
41
-
42
-
43
-
44
-
45
-
46
-
47
-
48
-
49
-
50
-
51
-
52
-
53
-
54
-
55
-
56
-
57
-
58
-
59
-
60
-
61
-
62
-
63
-
64
-
65
-
66
-
67
-
68
-
69
-
70
-
71
-
72
-
73
-
74
-
75
-
76
-
77
-
78
-
79
-
80
-
81
-
82
-
83
-
84
-
 85
85 -
 86
86 -
 87
87 -
 88
88 -
 89
89 -
 90
90 -
 91
91 -
 92
92 -
 93
93 -
 94
94 -
 95
95 -
96
-
97
-
98
-
99
-
100
-
101
-
102
-
103
-
104
-
105
-
106
-
107
-
108
-
109
-
110
-
111
-
112
-
113
-
114
-
115
-
116
-
117
-
118
-
119
-
120
-
121
-
122
-
123
-
124
-
125
-
126
-
127
-
128
-
129
-
130
-
131
-
132
-
133
-
134
-
135
-
136
-
137
-
138
-
139
-
140
-
141
-
142
-
143
-
144
-
145
-
146
-
147
-
148
-
149
-
150
 |
 |
