Lenovo ThinkStation P300 (English) User Guide - Tower Form Factor - Page 121
Installing or removing the front Wi-Fi antenna
 |
View all Lenovo ThinkStation P300 manuals
Add to My Manuals
Save this manual to your list of manuals |
Page 121 highlights
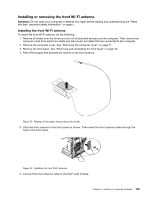
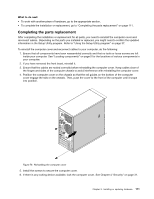
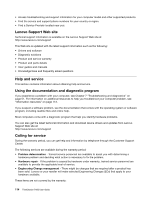
Installing or removing the front Wi-Fi antenna Attention: Do not open your computer or attempt any repair before reading and understanding the "Read this first: Important safety information" on page v. Installing the front Wi-Fi antenna To install the front Wi-Fi antenna, do the following: 1. Remove all media from the drives and turn off all attached devices and the computer. Then, disconnect all power cords from electrical outlets and disconnect all cables that are connected to the computer. 2. Remove the computer cover. See "Removing the computer cover" on page 71. 3. Remove the front bezel. See "Removing and reinstalling the front bezel" on page 72. 4. Peel off the paper that protects the sticker on the front antenna. Figure 72. Peeling off the paper that protects the sticker 5. Stick the front antenna to the front panel as shown. Then insert the front antenna cable through the hole in the front panel. Figure 73. Installing the front Wi-Fi antenna 6. Connect the front antenna cable to the Wi-Fi card module. Chapter 9. Installing or replacing hardware 109
-
 1
1 -
2
-
3
-
4
-
5
-
6
-
7
-
8
-
9
-
10
-
11
-
12
-
13
-
14
-
15
-
16
-
17
-
18
-
19
-
20
-
21
-
22
-
23
-
24
-
25
-
26
-
27
-
28
-
29
-
30
-
31
-
32
-
33
-
34
-
35
-
36
-
37
-
38
-
39
-
40
-
41
-
42
-
43
-
44
-
45
-
46
-
47
-
48
-
49
-
50
-
51
-
52
-
53
-
54
-
55
-
56
-
57
-
58
-
59
-
60
-
61
-
62
-
63
-
64
-
65
-
66
-
67
-
68
-
69
-
70
-
71
-
72
-
73
-
74
-
75
-
76
-
77
-
78
-
79
-
80
-
81
-
82
-
83
-
84
-
85
-
86
-
87
-
88
-
89
-
90
-
91
-
92
-
93
-
94
-
95
-
96
-
97
-
98
-
99
-
100
-
101
-
102
-
103
-
104
-
105
-
106
-
107
-
108
-
109
-
110
-
111
-
112
-
113
-
114
-
115
-
 116
116 -
 117
117 -
 118
118 -
 119
119 -
 120
120 -
 121
121 -
 122
122 -
 123
123 -
 124
124 -
 125
125 -
 126
126 -
127
-
128
-
129
-
130
-
131
-
132
-
133
-
134
-
135
-
136
-
137
-
138
-
139
-
140
-
141
-
142
-
143
-
144
-
145
-
146
-
147
-
148
-
149
-
150
 |
 |
