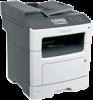
Lexmark MX417 User Guide - Page 113
Sending a fax, Sending a fax using the printer control panel, Sending a fax using the computer
 |
View all Lexmark MX417 manuals
Add to My Manuals
Save this manual to your list of manuals |
Page 113 highlights
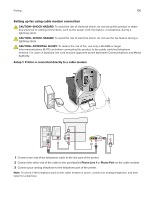
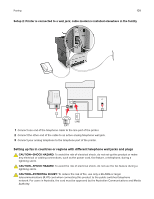
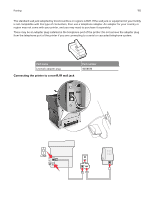
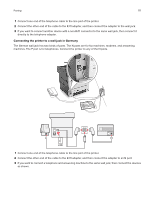
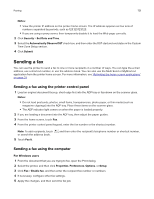
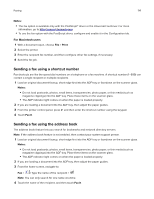
Faxing 113 Notes: • View the printer IP address on the printer home screen. The IP address appears as four sets of numbers separated by periods, such as 123.123.123.123. • If you are using a proxy server, then temporarily disable it to load the Web page correctly. 2 Click Security > Set Date and Time. 3 Select the Automatically Observe DST check box, and then enter the DST start and end dates in the Custom Time Zone Setup section. 4 Click Submit. Sending a fax You can use the printer to send a fax to one or more recipients in a number of ways. You can type the e‑mail address, use a shortcut number, or use the address book. You can also use the Multi Send or MyShortcut application from the printer home screen. For more information, see "Activating the home screen applications" on page 21. Sending a fax using the printer control panel 1 Load an original document faceup, short edge first into the ADF tray or facedown on the scanner glass. Notes: • Do not load postcards, photos, small items, transparencies, photo paper, or thin media (such as magazine clippings) into the ADF tray. Place these items on the scanner glass. • The ADF indicator light comes on when the paper is loaded properly. 2 If you are loading a document into the ADF tray, then adjust the paper guides. 3 From the home screen, touch Fax. 4 From the printer control panel keypad, enter the fax number or the shortcut number. Note: To add recipients, touch or search the address book. 5 Touch Fax It. , and then enter the recipient's telephone number or shortcut number, Sending a fax using the computer For Windows users 1 From the document that you are trying to fax, open the Print dialog. 2 Select the printer, and then click Properties, Preferences, Options, or Setup. 3 Click Fax > Enable fax, and then enter the recipient fax number or numbers. 4 If necessary, configure other fax settings. 5 Apply the changes, and then send the fax job.
-
 1
1 -
2
-
3
-
4
-
5
-
6
-
7
-
8
-
9
-
10
-
11
-
12
-
13
-
14
-
15
-
16
-
17
-
18
-
19
-
20
-
21
-
22
-
23
-
24
-
25
-
26
-
27
-
28
-
29
-
30
-
31
-
32
-
33
-
34
-
35
-
36
-
37
-
38
-
39
-
40
-
41
-
42
-
43
-
44
-
45
-
46
-
47
-
48
-
49
-
50
-
51
-
52
-
53
-
54
-
55
-
56
-
57
-
58
-
59
-
60
-
61
-
62
-
63
-
64
-
65
-
66
-
67
-
68
-
69
-
70
-
71
-
72
-
73
-
74
-
75
-
76
-
77
-
78
-
79
-
80
-
81
-
82
-
83
-
84
-
85
-
86
-
87
-
88
-
89
-
90
-
91
-
92
-
93
-
94
-
95
-
96
-
97
-
98
-
99
-
100
-
101
-
102
-
103
-
104
-
105
-
106
-
107
-
 108
108 -
 109
109 -
 110
110 -
 111
111 -
 112
112 -
 113
113 -
 114
114 -
 115
115 -
 116
116 -
 117
117 -
 118
118 -
119
-
120
-
121
-
122
-
123
-
124
-
125
-
126
-
127
-
128
-
129
-
130
-
131
-
132
-
133
-
134
-
135
-
136
-
137
-
138
-
139
-
140
-
141
-
142
-
143
-
144
-
145
-
146
-
147
-
148
-
149
-
150
-
151
-
152
-
153
-
154
-
155
-
156
-
157
-
158
-
159
-
160
-
161
-
162
-
163
-
164
-
165
-
166
-
167
-
168
-
169
-
170
-
171
-
172
-
173
-
174
-
175
-
176
-
177
-
178
-
179
-
180
-
181
-
182
-
183
-
184
-
185
-
186
-
187
-
188
-
189
-
190
-
191
-
192
-
193
-
194
-
195
-
196
-
197
-
198
-
199
-
200
-
201
-
202
-
203
-
204
-
205
-
206
-
207
-
208
-
209
-
210
-
211
-
212
-
213
-
214
-
215
-
216
-
217
-
218
-
219
-
220
-
221
-
222
-
223
-
224
-
225
-
226
-
227
-
228
-
229
-
230
-
231
-
232
-
233
-
234
-
235
-
236
-
237
-
238
-
239
-
240
-
241
-
242
-
243
-
244
-
245
-
246
-
247
-
248
-
249
-
250
-
251
-
252
-
253
-
254
-
255
-
256
-
257
-
258
-
259
-
260
-
261
-
262
-
263
-
264
-
265
-
266
-
267
-
268
-
269
-
270
-
271
-
272
-
273
-
274
-
275
-
276
-
277
-
278
-
279
-
280
-
281
-
282
-
283
-
284
-
285
-
286
-
287
-
288
-
289
-
290
-
291
-
292
-
293
-
294
-
295
-
296
-
297
-
298
-
299
-
300
-
301
-
302
-
303
-
304
-
305
-
306
-
307
-
308
-
309
-
310
-
311
-
312
-
313
-
314
-
315
-
316
-
317
-
318
-
319
-
320
-
321
 |
 |
