NEC N343i User Guide - Page 78
Java™ application - phone software
 |
View all NEC N343i manuals
Add to My Manuals
Save this manual to your list of manuals |
Page 78 highlights
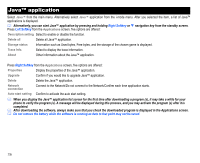
Java™ application Select Java™ from the main menu. Alternatively select Java™ application from the i-mode menu. After you selected the item, a list of Java™ applications is displayed. Alternatively, you can start Java™ application by pressing and holding Right Softkey or navigation key from the standby screen. Press Left Softkey from the Applications screen, five options are offered: Description setting Select to enable or disable the function. Delete all Delete all Java™ application. Storage status Information such as Used bytes, Free bytes, and the storage of the chosen game is displayed. Trace Info. Select to display the trace information. About Other information about the Java™ application. Press Right Softkey from the Applications screen, five options are offered: Properties Display the properties of the Java™ application. Upgrade Confirm if you would like to upgrade Java™ application. Delete Delete the Java™ application. Network connection Connect to the Network/Do not connect to the Network/Confirm each time application starts. Auto start setting Confirm to activate the auto start setting. When you display the Java™ application list screen for the first time after downloading a program (s), it may take a while for your phone to verify the program (s). A message will be displayed during this process, and you may activate the program (s) after it is completed. After downloading the software, always make sure that you check the downloaded program is displayed in the Applications screen. Do not remove the battery while the software is running as data to that point may not be saved. 76
-
 1
1 -
2
-
3
-
4
-
5
-
6
-
7
-
8
-
9
-
10
-
11
-
12
-
13
-
14
-
15
-
16
-
17
-
18
-
19
-
20
-
21
-
22
-
23
-
24
-
25
-
26
-
27
-
28
-
29
-
30
-
31
-
32
-
33
-
34
-
35
-
36
-
37
-
38
-
39
-
40
-
41
-
42
-
43
-
44
-
45
-
46
-
47
-
48
-
49
-
50
-
51
-
52
-
53
-
54
-
55
-
56
-
57
-
58
-
59
-
60
-
61
-
62
-
63
-
64
-
65
-
66
-
67
-
68
-
69
-
70
-
71
-
72
-
 73
73 -
 74
74 -
 75
75 -
 76
76 -
 77
77 -
 78
78 -
 79
79 -
 80
80 -
 81
81 -
 82
82 -
 83
83 -
84
-
85
-
86
-
87
-
88
 |
 |
