Netgear EX7000 User Manual - Page 34
Deny Access to a Computer or WiFi Device
 |
View all Netgear EX7000 manuals
Add to My Manuals
Save this manual to your list of manuals |
Page 34 highlights
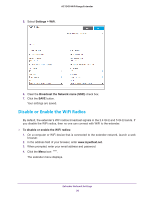
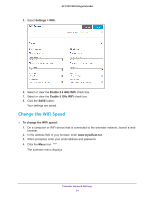
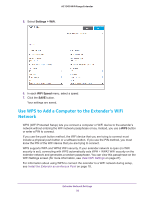
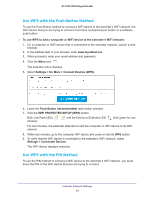
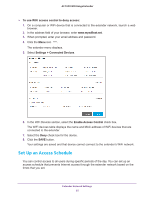
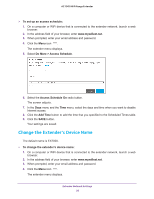
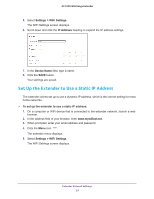
AC1900 WiFi Range Extender To add a computer or WiFi device to the extender's WiFi network: 1. On a computer or WiFi device that is connected to the extender network, launch a web browser. 2. In the address field of your browser, enter www.mywifiext.net. 3. When prompted, enter your email address and password. 4. Click the Menu icon . The extender menu displays. 5. Select Settings > Do More > Connect Devices (WPS). The Connect Devices (WPS) screen displays. 6. Select the PIN Number radio button. 7. Type the PIN of the WiFi device in the field. 8. Click the NEXT button. For four minutes, the extender attempts to find the computer or WiFi device. 9. Within four minutes, go to the WiFi device and use its WPS software to join the WiFi network. 10. To verify that the WiFi device is connected to the extender's WiFi network, select Settings > Connected Devices. The WiFi device displays onscreen. Deny Access to a Computer or WiFi Device By default, access control is disabled so that it is easy for you to connect to the extender's WiFi networks. You can deny network access to specific computers and WiFi devices based on their MAC addresses. Each network device is assigned a MAC address, which is a unique 12-character physical address, containing the hexadecimal characters 0-9, a-f, or A-F only, and separated by colons (for example, 00:09:AB:CD:EF:01). Typically, the MAC address is on the label of the WiFi device. If you cannot access the label, you can display the MAC address using the network configuration utilities of the computer. You might also find the MAC addresses on the Connected Devices screen (see View Connected Devices on page 27). Extender Network Settings 34
-
 1
1 -
2
-
3
-
4
-
5
-
6
-
7
-
8
-
9
-
10
-
11
-
12
-
13
-
14
-
15
-
16
-
17
-
18
-
19
-
20
-
21
-
22
-
23
-
24
-
25
-
26
-
27
-
28
-
 29
29 -
 30
30 -
 31
31 -
 32
32 -
 33
33 -
 34
34 -
 35
35 -
 36
36 -
 37
37 -
 38
38 -
 39
39 -
40
-
41
-
42
-
43
-
44
-
45
-
46
-
47
-
48
-
49
-
50
-
51
-
52
-
53
-
54
-
55
-
56
-
57
-
58
-
59
-
60
-
61
-
62
-
63
-
64
-
65
-
66
-
67
-
68
-
69
-
70
-
71
-
72
-
73
-
74
-
75
-
76
 |
 |