Netgear EX7000 User Manual - Page 63
Use the Shared Printer, View or Change the Status of a Printer, NETGEAR USB Control Center
 |
View all Netgear EX7000 manuals
Add to My Manuals
Save this manual to your list of manuals |
Page 63 highlights
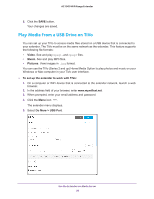
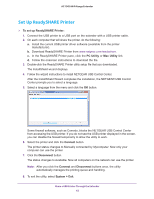
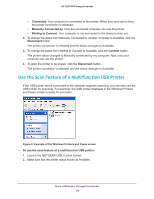
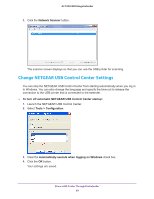
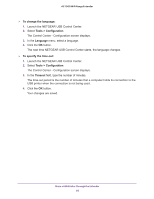
AC1900 WiFi Range Extender Use the Shared Printer After you install the ReadySHARE Printer utility, by default, when you log on to Windows, the utility starts automatically and runs in the background. To manually connect and print from the printer that is connected to the extender: 1. On your computer, click the NETGEAR USB Control Center icon . The main screen displays. 2. Click the Connect button. The printer status changes to Manually connected by Mycomputer. Now, only the computer you are using can use this printer. 3. Use the print feature in your application to print your document. 4. To release the printer connection so that all computers on the network can use it, click the Disconnect button. To print and release the connection to the printer that is connected to the extender: 1. To print your document from your computer, use the print feature in your application. The NETGEAR USB Control Center automatically connects your computer to the USB printer and prints the document. If another computer is already connected to the printer, your print job goes into a queue to wait to be printed. 2. If your document does not print, use the NETGEAR USB Control Center to check the status. View or Change the Status of a Printer The NETGEAR USB Control Center displays the status of the USB printer that is connected to the extender. You can view the status or change the status manually. To view or change the status: 1. On your computer, click the NETGEAR USB Control Center icon . The Status column shows the status for each device: • Available. No print jobs are in process. You can use the USB printer from any computer in the network. Share a USB Printer Through the Extender 63
-
 1
1 -
2
-
3
-
4
-
5
-
6
-
7
-
8
-
9
-
10
-
11
-
12
-
13
-
14
-
15
-
16
-
17
-
18
-
19
-
20
-
21
-
22
-
23
-
24
-
25
-
26
-
27
-
28
-
29
-
30
-
31
-
32
-
33
-
34
-
35
-
36
-
37
-
38
-
39
-
40
-
41
-
42
-
43
-
44
-
45
-
46
-
47
-
48
-
49
-
50
-
51
-
52
-
53
-
54
-
55
-
56
-
57
-
 58
58 -
 59
59 -
 60
60 -
 61
61 -
 62
62 -
 63
63 -
 64
64 -
 65
65 -
 66
66 -
 67
67 -
 68
68 -
69
-
70
-
71
-
72
-
73
-
74
-
75
-
76
 |
 |