Netgear M5300-28G3 Web Management User Guide - Page 338
Interface, Queue ID, Drop Precedence Level, WRED Minimum Threshold, WRED Drop Probability, APPLY
 |
View all Netgear M5300-28G3 manuals
Add to My Manuals
Save this manual to your list of manuals |
Page 338 highlights
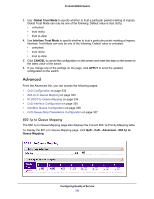
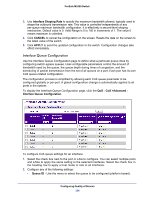
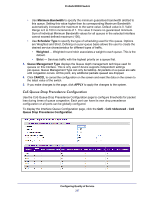
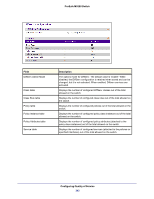
ProSafe M5300 Switch To configure CoS Queue Drop Precedence Configuration settings: 1. From the Interface menu, select the interface to configure. 2. In the Queue ID field, select a queue to associate with the selected interface. 3. From the Drop Precedence Level field, select a drop precedence level. 4. In the WRED Minimum Threshold field, specify the weighted RED minimum queue threshold below which no packets are dropped for the current drop precedence level. Default values are: • 40/30/20/100 for Drop Precedence Levels 1/2/3/4 on QueueID 0 • 40/30/20/100 for Drop Precedence Levels 1/2/3/4 on QueueID 1 • 40/30/20/100 for Drop Precedence Levels 1/2/3/4 on QueueID 2 • 40/30/20/100 for Drop Precedence Levels 1/2/3/4 on QueueID 3 • 40/30/20/100 for Drop Precedence Levels 1/2/3/4 on QueueID 4 • 40/30/20/100 for Drop Precedence Levels 1/2/3/4 on QueueID 5 • 40/30/20/100 for Drop Precedence Levels 1/2/3/4 on QueueID 6 Valid Range is (0 to 100) in sixteenths of the overall device queue size. 5. In the WRED Maximum Threshold field, specify the weighted RED maximum queue threshold above which all packets are dropped for the current drop precedence level. Default values are: • 100/90/80/100 for Drop Precedence Levels 1/2/3/4 on QueueID 0 • 100/90/80/100 for Drop Precedence Levels 1/2/3/4 on QueueID 1 • 100/90/80/100 for Drop Precedence Levels 1/2/3/4 on QueueID 2 • 100/90/80/100 for Drop Precedence Levels 1/2/3/4 on QueueID 3 • 100/90/80/100 for Drop Precedence Levels 1/2/3/4 on QueueID 4 • 100/90/80/100 for Drop Precedence Levels 1/2/3/4 on QueueID 5 • 100/90/80/100 for Drop Precedence Levels 1/2/3/4 on QueueID 6 Valid Range is (0 to 100) in sixteenths of the overall device queue size. 6. In the WRED Drop Probability field, specify the packet drop probability for the current drop precedence level. Default value is 10. Valid Range is (0 to 100). 7. Click APPLY to update the switch with the configured values. 8. Click CANCEL to abandon the changes. Configuring Quality of Service 338
-
 1
1 -
2
-
3
-
4
-
5
-
6
-
7
-
8
-
9
-
10
-
11
-
12
-
13
-
14
-
15
-
16
-
17
-
18
-
19
-
20
-
21
-
22
-
23
-
24
-
25
-
26
-
27
-
28
-
29
-
30
-
31
-
32
-
33
-
34
-
35
-
36
-
37
-
38
-
39
-
40
-
41
-
42
-
43
-
44
-
45
-
46
-
47
-
48
-
49
-
50
-
51
-
52
-
53
-
54
-
55
-
56
-
57
-
58
-
59
-
60
-
61
-
62
-
63
-
64
-
65
-
66
-
67
-
68
-
69
-
70
-
71
-
72
-
73
-
74
-
75
-
76
-
77
-
78
-
79
-
80
-
81
-
82
-
83
-
84
-
85
-
86
-
87
-
88
-
89
-
90
-
91
-
92
-
93
-
94
-
95
-
96
-
97
-
98
-
99
-
100
-
101
-
102
-
103
-
104
-
105
-
106
-
107
-
108
-
109
-
110
-
111
-
112
-
113
-
114
-
115
-
116
-
117
-
118
-
119
-
120
-
121
-
122
-
123
-
124
-
125
-
126
-
127
-
128
-
129
-
130
-
131
-
132
-
133
-
134
-
135
-
136
-
137
-
138
-
139
-
140
-
141
-
142
-
143
-
144
-
145
-
146
-
147
-
148
-
149
-
150
-
151
-
152
-
153
-
154
-
155
-
156
-
157
-
158
-
159
-
160
-
161
-
162
-
163
-
164
-
165
-
166
-
167
-
168
-
169
-
170
-
171
-
172
-
173
-
174
-
175
-
176
-
177
-
178
-
179
-
180
-
181
-
182
-
183
-
184
-
185
-
186
-
187
-
188
-
189
-
190
-
191
-
192
-
193
-
194
-
195
-
196
-
197
-
198
-
199
-
200
-
201
-
202
-
203
-
204
-
205
-
206
-
207
-
208
-
209
-
210
-
211
-
212
-
213
-
214
-
215
-
216
-
217
-
218
-
219
-
220
-
221
-
222
-
223
-
224
-
225
-
226
-
227
-
228
-
229
-
230
-
231
-
232
-
233
-
234
-
235
-
236
-
237
-
238
-
239
-
240
-
241
-
242
-
243
-
244
-
245
-
246
-
247
-
248
-
249
-
250
-
251
-
252
-
253
-
254
-
255
-
256
-
257
-
258
-
259
-
260
-
261
-
262
-
263
-
264
-
265
-
266
-
267
-
268
-
269
-
270
-
271
-
272
-
273
-
274
-
275
-
276
-
277
-
278
-
279
-
280
-
281
-
282
-
283
-
284
-
285
-
286
-
287
-
288
-
289
-
290
-
291
-
292
-
293
-
294
-
295
-
296
-
297
-
298
-
299
-
300
-
301
-
302
-
303
-
304
-
305
-
306
-
307
-
308
-
309
-
310
-
311
-
312
-
313
-
314
-
315
-
316
-
317
-
318
-
319
-
320
-
321
-
322
-
323
-
324
-
325
-
326
-
327
-
328
-
329
-
330
-
331
-
332
-
 333
333 -
 334
334 -
 335
335 -
 336
336 -
 337
337 -
 338
338 -
 339
339 -
 340
340 -
 341
341 -
 342
342 -
 343
343 -
344
-
345
-
346
-
347
-
348
-
349
-
350
-
351
-
352
-
353
-
354
-
355
-
356
-
357
-
358
-
359
-
360
-
361
-
362
-
363
-
364
-
365
-
366
-
367
-
368
-
369
-
370
-
371
-
372
-
373
-
374
-
375
-
376
-
377
-
378
-
379
-
380
-
381
-
382
-
383
-
384
-
385
-
386
-
387
-
388
-
389
-
390
-
391
-
392
-
393
-
394
-
395
-
396
-
397
-
398
-
399
-
400
-
401
-
402
-
403
-
404
-
405
-
406
-
407
-
408
-
409
-
410
-
411
-
412
-
413
-
414
-
415
-
416
-
417
-
418
-
419
-
420
-
421
-
422
-
423
-
424
-
425
-
426
-
427
-
428
-
429
-
430
-
431
-
432
-
433
-
434
-
435
-
436
-
437
-
438
-
439
-
440
-
441
-
442
-
443
-
444
-
445
-
446
-
447
-
448
-
449
-
450
-
451
-
452
-
453
-
454
-
455
-
456
-
457
-
458
-
459
-
460
-
461
-
462
-
463
-
464
-
465
-
466
-
467
-
468
-
469
-
470
-
471
-
472
-
473
-
474
-
475
-
476
-
477
-
478
-
479
-
480
-
481
-
482
-
483
-
484
-
485
-
486
-
487
-
488
-
489
-
490
-
491
-
492
-
493
-
494
-
495
-
496
-
497
-
498
-
499
-
500
-
501
-
502
-
503
-
504
-
505
-
506
-
507
-
508
-
509
-
510
-
511
-
512
-
513
-
514
-
515
-
516
-
517
-
518
-
519
-
520
-
521
-
522
-
523
-
524
-
525
-
526
-
527
-
528
-
529
-
530
 |
 |