Nokia 3285 Nokia 3285 User Guide in English - Page 126
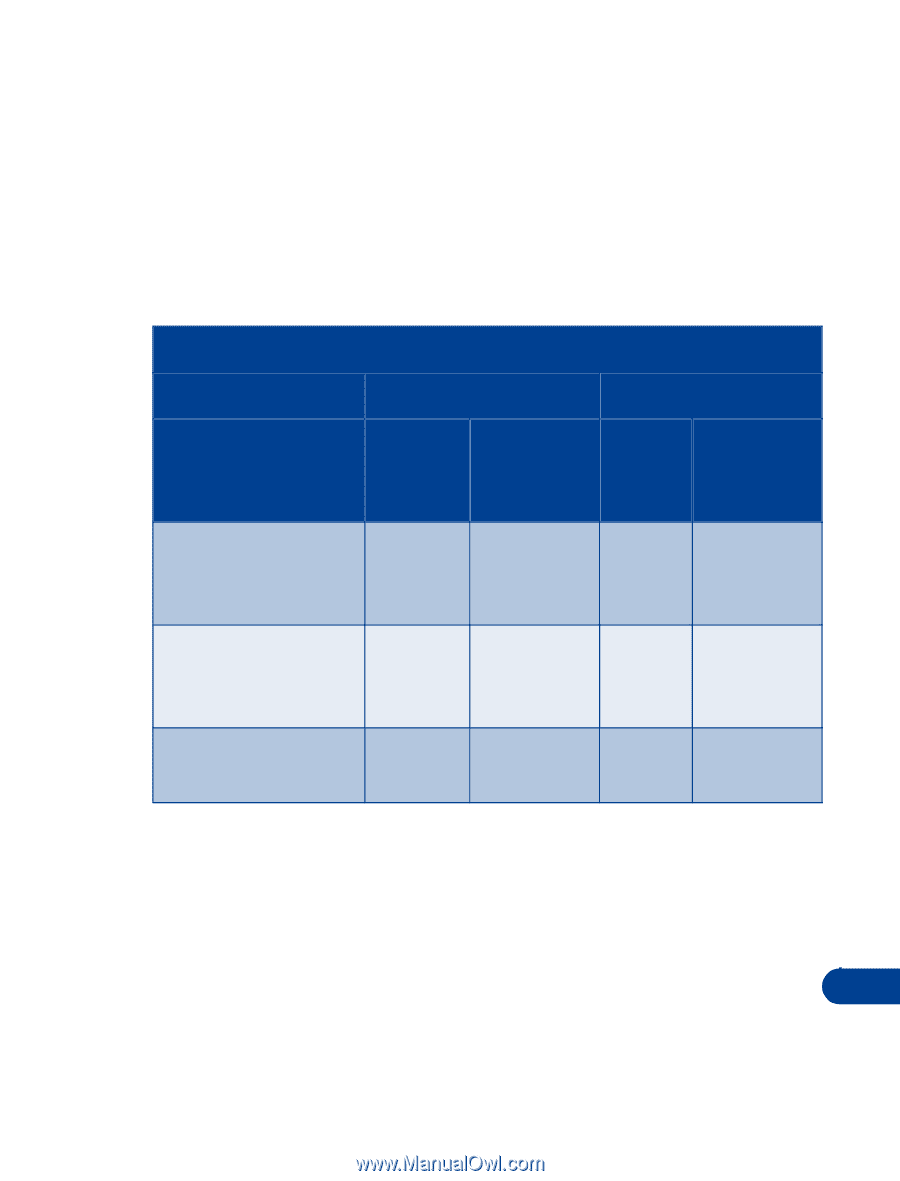
DCH-9 Rear Slot Charging Times, Using ACP-7U, Battery Option, Back slot, Both slots, BPS-2 Ultra Slim
 |
View all Nokia 3285 manuals
Add to My Manuals
Save this manual to your list of manuals |
Page 126 highlights
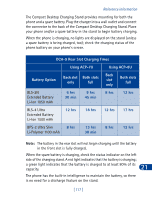
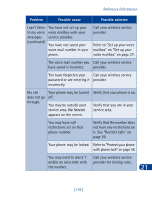
Reference information The Compact Desktop Charging Stand provides mounting for both the phone and a spare battery. Plug the charger into a wall outlet and connect the connector to the back of the Compact Desktop Charging Stand. Place your phone and/or a spare battery in the stand to begin battery charging. When the phone is charging, no lights are displayed on the stand (unless a spare battery is being charged, too); check the charging status of the phone battery on your phone's screen. DCH-9 Rear Slot Charging Times Using ACP-7U Using ACP-8U Battery Option Back slot Both slots only full Back slot only Both slots full BLS-2N Extended Battery Li-Ion 1050 mAh 6 hrs 30 min 9 hrs 45 min 8 hrs 12 hrs BLS-4 Ultra Extended Battery Li-Ion 1500 mAh 12 hrs 18 hrs 12 hrs 17 hrs BPS-2 Ultra Slim 8 hrs Li-Polymer 1100 mAh 13 hrs 30 min 8 hrs 12 hrs Note: The battery in the rear slot will not begin charging until the battery in the front slot is fully charged. When the spare battery is charging, check the status indicator on the left side of the charging stand. A red light indicates that the battery is charging; 21 a green light indicates that the battery is charged to at least 80% of its capacity. The phone has the built-in intelligence to maintain the battery, so there is no need for a discharge feature on the stand. [ 117 ]
-
 1
1 -
2
-
3
-
4
-
5
-
6
-
7
-
8
-
9
-
10
-
11
-
12
-
13
-
14
-
15
-
16
-
17
-
18
-
19
-
20
-
21
-
22
-
23
-
24
-
25
-
26
-
27
-
28
-
29
-
30
-
31
-
32
-
33
-
34
-
35
-
36
-
37
-
38
-
39
-
40
-
41
-
42
-
43
-
44
-
45
-
46
-
47
-
48
-
49
-
50
-
51
-
52
-
53
-
54
-
55
-
56
-
57
-
58
-
59
-
60
-
61
-
62
-
63
-
64
-
65
-
66
-
67
-
68
-
69
-
70
-
71
-
72
-
73
-
74
-
75
-
76
-
77
-
78
-
79
-
80
-
81
-
82
-
83
-
84
-
85
-
86
-
87
-
88
-
89
-
90
-
91
-
92
-
93
-
94
-
95
-
96
-
97
-
98
-
99
-
100
-
101
-
102
-
103
-
104
-
105
-
106
-
107
-
108
-
109
-
110
-
111
-
112
-
113
-
114
-
115
-
116
-
117
-
118
-
119
-
120
-
 121
121 -
 122
122 -
 123
123 -
 124
124 -
 125
125 -
 126
126 -
 127
127 -
 128
128 -
 129
129 -
 130
130 -
 131
131 -
132
-
133
-
134
-
135
-
136
-
137
-
138
-
139
-
140
-
141
-
142
-
143
-
144
-
145
 |
 |