Optoma ZU1100 Manual - Page 16
SETUP AND INSTALLATION, Installing the projection lens
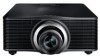 |
View all Optoma ZU1100 manuals
Add to My Manuals
Save this manual to your list of manuals |
Page 16 highlights
SETUP AND INSTALLATION Installing the projection lens Before setting up the projector, install the projection lens in to the projector. IMPORTANT! ‡ Before installing or replacing the lens, make sure the projector's power switch is turned off. ‡ During lens installation, do not adjust the lens shift, zoom, or focus either using the remote control or the projector keypad. ‡ To prevent damage to the lens and avoid personal injury, do not clean the lens when the projector is turned on. Any damage resulting from doing so will void the warranty. Procedure: 1. Rotate the lens cap counterclockwise. Then remove the lens cap. 2. Install the lens into the projector. 16 English
-
 1
1 -
2
-
3
-
4
-
5
-
6
-
7
-
8
-
9
-
10
-
 11
11 -
 12
12 -
 13
13 -
 14
14 -
 15
15 -
 16
16 -
 17
17 -
 18
18 -
 19
19 -
 20
20 -
 21
21 -
22
-
23
-
24
-
25
-
26
-
27
-
28
-
29
-
30
-
31
-
32
-
33
-
34
-
35
-
36
-
37
-
38
-
39
-
40
-
41
-
42
-
43
-
44
-
45
-
46
-
47
-
48
-
49
-
50
-
51
-
52
-
53
-
54
-
55
-
56
-
57
-
58
-
59
-
60
-
61
-
62
-
63
-
64
-
65
-
66
-
67
-
68
-
69
-
70
-
71
-
72
-
73
-
74
-
75
-
76
-
77
-
78
-
79
-
80
-
81
-
82
-
83
-
84
-
85
-
86
-
87
-
88
-
89
-
90
-
91
-
92
-
93
-
94
-
95
-
96
-
97
-
98
-
99
-
100
-
101
 |
 |

English
16
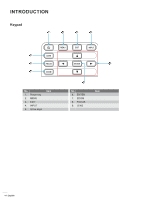
SETUP AND INSTALLATION
Installing the projection lens
Before setting up the projector, install the projection lens in to the projector.
IMPORTANT!
±
Before installing or replacing the lens, make sure the projector’s power switch is turned off.
±
During lens installation, do not adjust the lens shift, zoom, or focus either using the remote control or
the projector keypad.
±
To prevent damage to the lens and avoid personal injury, do not clean the lens when the projector is
turned on. Any damage resulting from doing so will void the warranty.
Procedure:
1.
Rotate the lens cap counterclockwise. Then remove the lens cap.
2.
Install the lens into the projector.