Optoma ZU1100 Manual - Page 69
Logo Setup, Backlight, High Altitude, User Data, System Update (FOTA), Reset
 |
View all Optoma ZU1100 manuals
Add to My Manuals
Save this manual to your list of manuals |
Page 69 highlights
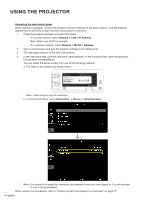
USING THE PROJECTOR Logo Setup Set up the logo for the startup screen. Change Logo Change the logo for the startup screen. Apart from the Default logo, user can select from Neutral, User Logo, and Captured Logo. ‡ Default: The projector default logo. ‡ Neutral: The logo is not displayed on the startup screen. ‡ User Logo: User customized logo. ‡ Captured Logo: The logo saved via the Logo Capture function. Note: The supported logo format is PNG and size is 1920 x 1200 pixels. Logo Capture Capture part of the projected image and save it as a customized logo. Delete Logo Delete the saved customized logo, including the Captured Logo and User Logo. Backlight Set up the projector backlight options. Keypad Enable or disable the keypad backlight. Power Key Enable or disable the backlight for the power key. High Altitude Select On to increase the fan speed. To ensure the image quality and prevent damage to the projector, enable High Altitude mode in high temperature, high humidity, or high altitude environment. User Data User can save the projector settings as user data and reload the settings later. ‡ Save all settings: Save all of the projector settings as user data. User can save up to 5 records. ‡ Load all settings: Load the previously saved user data. System Update (FOTA) Update the system automatically or manually. ‡ Auto: System checks for new updates automatically every time it is connected to the Internet. ‡ Auto Download: System will download the firmware upgrade file in the background and starts the upgrade process when you power off the projector. When the upgrade is done, the projector will power off. ‡ Update: Manually update the system firmware. Reset Reset the settings to factory default values. ‡ Reset OSD: Reset OSD settings to default values. ‡ Reset to Default: Reset all projector settings to default values. ‡ Reset Selective: Reset the settings of one of the main menus. User can choose from Image, Display, Advanced, Input, Communication, and Setup. English 69
-
 1
1 -
2
-
3
-
4
-
5
-
6
-
7
-
8
-
9
-
10
-
11
-
12
-
13
-
14
-
15
-
16
-
17
-
18
-
19
-
20
-
21
-
22
-
23
-
24
-
25
-
26
-
27
-
28
-
29
-
30
-
31
-
32
-
33
-
34
-
35
-
36
-
37
-
38
-
39
-
40
-
41
-
42
-
43
-
44
-
45
-
46
-
47
-
48
-
49
-
50
-
51
-
52
-
53
-
54
-
55
-
56
-
57
-
58
-
59
-
60
-
61
-
62
-
63
-
 64
64 -
 65
65 -
 66
66 -
 67
67 -
 68
68 -
 69
69 -
 70
70 -
 71
71 -
 72
72 -
 73
73 -
 74
74 -
75
-
76
-
77
-
78
-
79
-
80
-
81
-
82
-
83
-
84
-
85
-
86
-
87
-
88
-
89
-
90
-
91
-
92
-
93
-
94
-
95
-
96
-
97
-
98
-
99
-
100
-
101
 |
 |
