Optoma ZU1100 Manual - Page 27
Remote setup, Installing / replacing the batteries, Remote control ID setup
 |
View all Optoma ZU1100 manuals
Add to My Manuals
Save this manual to your list of manuals |
Page 27 highlights
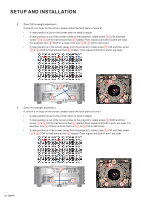
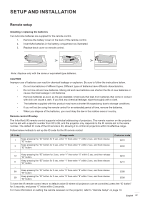
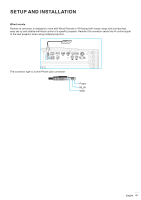
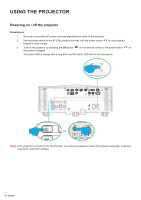
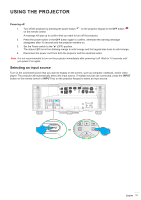
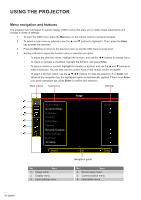
SETUP AND INSTALLATION Remote setup Installing / replacing the batteries Two AAA size batteries are supplied for the remote control. 1. Remove the battery cover on the back of the remote control. 2. Insert AAA batteries in the battery compartment as illustrated. 3. Replace back cover on remote control. Note: Replace only with the same or equivalent type batteries. CAUTION Improper use of batteries can result in chemical leakage or explosion. Be sure to follow the instructions below. ‡ Do not mix batteries of different types. Different types of batteries have different characteristics. ‡ Do not mix old and new batteries. Mixing old and new batteries can shorten the life of new batteries or cause chemical leakage in old batteries. ‡ Remove batteries as soon as the are depleted. Chemicals that leak from batteries that come in contact with skin can cause a rash. If you find any chemical leakage, wipe thoroughly with a cloth. ‡ The batteries supplied with this product may have a shorter life expectancy due to storage conditions. ‡ If you will not be using the remote control for an extended period of time, remove the batteries. ‡ When you dispose of the batteries, you must obey the law in the relative area or country. Remote control ID setup The Infra-Red (IR) remote control supports individual addressing of projectors. The remote receiver on the projector can be set with a specific number from 00 to 99, and the projector only responds to the IR remote set to the same number. The default ID code of the IR remote is 00, allowing it to control all projectors within its effective range. Follow below methods to set up the ID code for the IR remote control: ID Code Change mode 1 Keep pressing the "ID" button for 3 sec, enter "0" then enter "1" within 2 sec, and then release "ID" button. 2 Keep pressing the "ID" button for 3 sec, enter "0" then enter "2" within 2 sec, and then release "ID" button. ... ... 10 Keep pressing the "ID" bottom for 3 sec, enter "1" then enter "0" within 2 sec, and then release "ID" button. 11 Keep pressing the "ID" button for 3 sec, enter "1" then enter "1" within 2 sec, and then release "ID" button. ... ... 98 Keep pressing the "ID" button for 3 sec, enter "9" then enter "8" within 2 sec, and then release "ID" button. 99 Keep pressing the "ID" button for 3 sec, enter "9" then enter "9" within 2 sec, and then release "ID" button. Customer code 3201 3202 3210 3211 3298 3299 To have the IR remote control return to default value 00 where all projectors can be controlled, press the "ID button" for 3 seconds, and press "0" twice within 2 seconds. For more information on setting the remote receivers on the projector, refer to "Remote Setup" on page 70. English 27
-
 1
1 -
2
-
3
-
4
-
5
-
6
-
7
-
8
-
9
-
10
-
11
-
12
-
13
-
14
-
15
-
16
-
17
-
18
-
19
-
20
-
21
-
 22
22 -
 23
23 -
 24
24 -
 25
25 -
 26
26 -
 27
27 -
 28
28 -
 29
29 -
 30
30 -
 31
31 -
 32
32 -
33
-
34
-
35
-
36
-
37
-
38
-
39
-
40
-
41
-
42
-
43
-
44
-
45
-
46
-
47
-
48
-
49
-
50
-
51
-
52
-
53
-
54
-
55
-
56
-
57
-
58
-
59
-
60
-
61
-
62
-
63
-
64
-
65
-
66
-
67
-
68
-
69
-
70
-
71
-
72
-
73
-
74
-
75
-
76
-
77
-
78
-
79
-
80
-
81
-
82
-
83
-
84
-
85
-
86
-
87
-
88
-
89
-
90
-
91
-
92
-
93
-
94
-
95
-
96
-
97
-
98
-
99
-
100
-
101
 |
 |