Optoma ZU1100 Manual - Page 64
Active Image Setup, Schedule, Active Focus, Active Color Uniformity, Calibration, Target Selection
 |
View all Optoma ZU1100 manuals
Add to My Manuals
Save this manual to your list of manuals |
Page 64 highlights
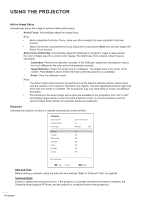
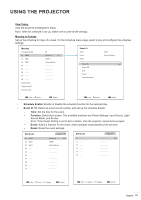
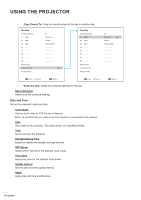
USING THE PROJECTOR Active Image Setup Automatically adjust the image to achieve better performance. ‡ Active Focus: Automatically adjust the image focus. Note: ‡ Before adjusting the Active Focus, make sure the boresight has been adjusted to the best position. ‡ When the remote control performs focus adjustment, pressing the Enter key can also trigger the Active Focus function. ‡ Active Color Uniformity: Automatically adjust the RGB gain of projection image to approximate the color of target area for a uniform color display. The brightness of the original content may be decreased. ± Calibration: Perform the calibration process. If the RGB gain adjustment of projection area is too much difference, the color will not be projected correctly. ± Target Selection: Select the target area for calibration. The default area is the center of the content. Press Enter to return to the OSD menu after the selection is completed. ± Reset: Clear the calibration result. Note: ‡ The Active Image Setup functions are performed via the external optional camera. Please make sure the camera is not covered or blocked by any objects. The auto adjustment process might take more than one minute to complete. The accessories may vary depending on model, specification and region. ‡ The functions in the Active Image Setup menu are available for the projections from 100" to 300" and imaging range needs to cover the entire projection screen. It is recommended to use the Optoma Visual Suite software for seamless setups and calibration. Schedule Schedule the projector functions to operate automatically at the set time. Schedule Date and Time Schedule Mode View Today 2019/11/06 14:00 On Monday Monday On Tuesday Wednesday Thursday Friday Saturday Sunday Reset Schedule Enter Enter Select Exit Return Date and Time Before setting a schedule, setup the date and time settings. Refer to "Date and Time" on page 66. Schedule Mode Enable or disable the schedule function. If the projector is controlled via external devices or software, the Schedule Mode displays AP Mode, and the projector's schedule functions are grayed out. 64 English
-
 1
1 -
2
-
3
-
4
-
5
-
6
-
7
-
8
-
9
-
10
-
11
-
12
-
13
-
14
-
15
-
16
-
17
-
18
-
19
-
20
-
21
-
22
-
23
-
24
-
25
-
26
-
27
-
28
-
29
-
30
-
31
-
32
-
33
-
34
-
35
-
36
-
37
-
38
-
39
-
40
-
41
-
42
-
43
-
44
-
45
-
46
-
47
-
48
-
49
-
50
-
51
-
52
-
53
-
54
-
55
-
56
-
57
-
58
-
 59
59 -
 60
60 -
 61
61 -
 62
62 -
 63
63 -
 64
64 -
 65
65 -
 66
66 -
 67
67 -
 68
68 -
 69
69 -
70
-
71
-
72
-
73
-
74
-
75
-
76
-
77
-
78
-
79
-
80
-
81
-
82
-
83
-
84
-
85
-
86
-
87
-
88
-
89
-
90
-
91
-
92
-
93
-
94
-
95
-
96
-
97
-
98
-
99
-
100
-
101
 |
 |
