Optoma ZU1100 Manual - Page 67
Power Settings, Light Source Settings, Active, Communication, Signal Power On, Sleep Timer
 |
View all Optoma ZU1100 manuals
Add to My Manuals
Save this manual to your list of manuals |
Page 67 highlights
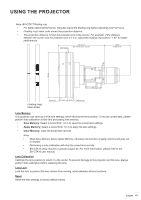
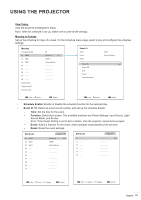
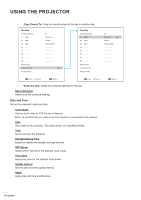
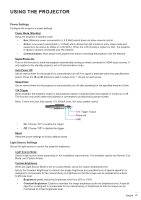
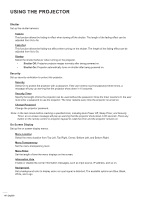
USING THE PROJECTOR Power Settings Configure the projector's power settings. Power Mode (Standby) Setup the projector's standby mode. ‡ Eco: Minimum power consumption (< 0.5 Watt) which does not allow network control. ‡ Active: Low power consumption (< 2 Watt) which allows the LAN module to enter sleep mode and supports to be woken by Wake on LAN (WoL). When the LAN module is woken by WoL, the projector is ready to receive commands over the network. ‡ Communication: More power consumption that allows controlling the projector over the network. Signal Power On Turn on this function to have the projector automatically turning on when connected to HDMI input sources. It only applies to the standby projector set to Communication mode. Auto Power Off Set an interval timer for the projector to automatically turn off if no signal is detected within the specified time period. Press the t and u buttons to add or reduce time, 1 minute for each press. Sleep Timer Set an interval timer for the projector to automatically turn off after operating for the specified amount of time. 12V Trigger When enabled, the projector screen is automatically raised or lowered when the projector is turned on or off. This function only works when the projector is connected to an electrical projector screen. Note: 3.5mm mini jack that outputs 12V 500mA (max.) for relay system control. ‡ On: Choose "On" to enable the trigger. ‡ Off: Choose "Off" to disable the trigger. Reset Reset the power settings to factory default values. 12V Trigger Output Reserved GND Light Source Settings Set up the light source to control the projector brightness. Light Source Mode Select a light source mode depending on the installation requirements. The available options are Normal, Eco Mode, and Custom Power. Custom Brightness When the Light Source Mode is set to Custom Mode, set up the custom brightness level. Set up the Constant Brightness to maintain the image brightness at a specified level. A special algorithm is designed to compensate for the natural decay of brightness so that the image can be maintained at a fixed brightness level. ‡ Brightness Level: Adjust the brightness level from 30% to 100%. ‡ Constant Brightness: Enable to maintain the image brightness at the set brightness level. A special algorithm is designed to compensate for the natural decay of brightness so that the image can be maintained at a fixed brightness level. English 67
-
 1
1 -
2
-
3
-
4
-
5
-
6
-
7
-
8
-
9
-
10
-
11
-
12
-
13
-
14
-
15
-
16
-
17
-
18
-
19
-
20
-
21
-
22
-
23
-
24
-
25
-
26
-
27
-
28
-
29
-
30
-
31
-
32
-
33
-
34
-
35
-
36
-
37
-
38
-
39
-
40
-
41
-
42
-
43
-
44
-
45
-
46
-
47
-
48
-
49
-
50
-
51
-
52
-
53
-
54
-
55
-
56
-
57
-
58
-
59
-
60
-
61
-
 62
62 -
 63
63 -
 64
64 -
 65
65 -
 66
66 -
 67
67 -
 68
68 -
 69
69 -
 70
70 -
 71
71 -
 72
72 -
73
-
74
-
75
-
76
-
77
-
78
-
79
-
80
-
81
-
82
-
83
-
84
-
85
-
86
-
87
-
88
-
89
-
90
-
91
-
92
-
93
-
94
-
95
-
96
-
97
-
98
-
99
-
100
-
101
 |
 |