Optoma ZU1100 Manual - Page 51
Wall Color, 3D Setup, Red / Green / Blue / Cyan / Magenta / Yellow
 |
View all Optoma ZU1100 manuals
Add to My Manuals
Save this manual to your list of manuals |
Page 51 highlights
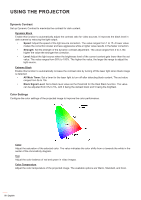
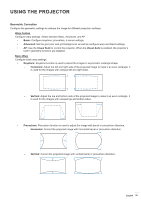
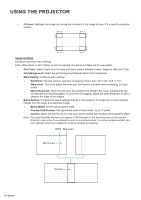
USING THE PROJECTOR White Balance Adjust the white balance of the projected image via gain and offset. Gain and offset are individual controls for each RGB channels used to set greyscale. The Gains calibrate the color of the dark parts and Bias calibrate the white parts. ‡ Red / Green / Blue Gain: Adjust the color of the image's bright areas. ‡ Red / Green / Blue Offset: Adjust the color of the image's dark areas. White Enhancement Adjust the image color brightness while providing more vibrant colors, in increments from 0 to 10. Color Space Select a color space that has been specifically tuned for the input signal. The available options are Auto, RGB (0~255), RGB (16~235), REC709, and REC601. Note: The Color Space function is grayed out if the Picture Mode is sRGB or without any source input. Color Matching Change the color of a projected image by adjusting each color component in the image. The adjustable color includes Red, Green, Blue, Cyan, Yellow, and Magenta (R / G / B / C / Y / M). ‡ Auto Test Pattern: Enable the function to view a specific color pattern while adjusting. ‡ Red / Green / Blue / Cyan / Magenta / Yellow: Select a color for further adjustment. ± Hue: Adjust the hue of the selected color. The value reflects the number of degrees of rotation around the chromaticity diagram from the original color. Increasing value indicates counterclockwise rotation, and decreasing value, clockwise rotation. ± Saturation: Adjust the saturation of the selected color. The value reflects the color shifts from or towards the white in the center of the chromaticity diagram. ± Luminance: Adjust the luminance of the selected color. Increase the value to brighten the image (add white to a color) or decrease the value to darken the image (add black to a color). ‡ White: Adjust the white color performance via setting the Red, Green, and Blue values. ± Red / Green / Blue: Adjust the red, green, and blue colors to optimize the white color performance. ‡ Reset: Reset the function settings to factory default values. Wall Color Set the wall color of the projector to achieve best color performance for a specific wall. The available options are Off, Blackboard, Light Yellow, Light Green, Light Blue, Pink, and Gray. 3D Setup 3D video file combines two slightly different images (frames) of the same scene representing the different views that the left and right eyes see. When these frames are displayed fast enough and viewed with 3D glasses synchronized with the left and right frames, the viewer's brain then assemble the separate images into a single 3D image. 3D Menu provides options to set up the 3D functions to correctly display 3D videos. 3D Mode Enable or disable the 3D function. 3D Format Select a proper 3D format for the 3D input signal. The available options are Auto, Frame Packing, Side by Side, Top and Bottom, and Frame Sequential. English 51
-
 1
1 -
2
-
3
-
4
-
5
-
6
-
7
-
8
-
9
-
10
-
11
-
12
-
13
-
14
-
15
-
16
-
17
-
18
-
19
-
20
-
21
-
22
-
23
-
24
-
25
-
26
-
27
-
28
-
29
-
30
-
31
-
32
-
33
-
34
-
35
-
36
-
37
-
38
-
39
-
40
-
41
-
42
-
43
-
44
-
45
-
 46
46 -
 47
47 -
 48
48 -
 49
49 -
 50
50 -
 51
51 -
 52
52 -
 53
53 -
 54
54 -
 55
55 -
 56
56 -
57
-
58
-
59
-
60
-
61
-
62
-
63
-
64
-
65
-
66
-
67
-
68
-
69
-
70
-
71
-
72
-
73
-
74
-
75
-
76
-
77
-
78
-
79
-
80
-
81
-
82
-
83
-
84
-
85
-
86
-
87
-
88
-
89
-
90
-
91
-
92
-
93
-
94
-
95
-
96
-
97
-
98
-
99
-
100
-
101
 |
 |
