Optoma ZU1100 Manual - Page 57
Edge Mask, Freeze Screen, Test Pattern, Black Level, Enable, Edit Area, Add Point, Remove Point
 |
View all Optoma ZU1100 manuals
Add to My Manuals
Save this manual to your list of manuals |
Page 57 highlights
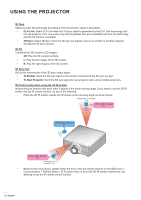
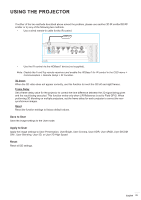
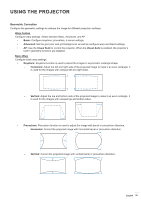
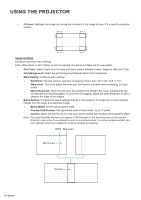
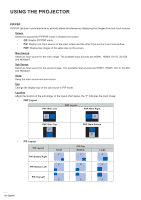
USING THE PROJECTOR ‡ Black Level: Manually adjust the black level of the projected image. ± Area: Support two layers black level adjustment, top and bottom. Please avoid overlapping areas of the two layers, only top black level value displayed in overlapping area. ± Enable: Enable or disable the black level adjustment in the selected area. ± Edit Area: The area adjustment of black level. When entering the area adjustment view, user can press "INFO" button on remote control to get the hot key for add and remove points. ± Add Point: Add up to 32 area control points for black level adjustment. ± Remove Point: Remove at least 4 control points from the selected area. Note: ‡ Enter the Edit Area: a) Use the "INPUT" hotkey of the remote control to enable or disable the Add Point function. b) Use the "AUTO" hotkey of the remote control to enable or disable the Remove Point function. c) Use the "INFO" hotkey of the remote control to show the Edit Area's hotkey help dialog, and use "MENU" or "Exit" to hide help dialog. ‡ After adding or removing a control point, press Enter to move to the next point counterclockwise. ± Brightness: Adjust Red / Green / Blue values of selected black level area simultaneously. ± Red/Green/Blue: Adjust each color of selected black level area individually. ± Reset: Reset the black level to factory default values either on the Bottom or on the Top area or on both areas. Memory The projector allows the user to save up to five geometry memories, including the ones set directly on the projector and the ones configured via external software tools. The available options are Save Memory, Apply Memory, and Clear Memory. Reset Reset geometric settings to factory default values. Edge Mask The edge blending function allows you to hide one or multiple edges of the projected image. You can use this function to remove the video encoding noise on the edges of the video images. Freeze Screen Select to pause the display screen despite any change in the source device. Test Pattern Select a test pattern. The available options are Off, Green Grid, Magenta Grid, White Grid, White, Black, Red, Green, Blue, Yellow, Magenta, Cyan, ANSI Contrast 4x4, Color bar, and Full screen. English 57
-
 1
1 -
2
-
3
-
4
-
5
-
6
-
7
-
8
-
9
-
10
-
11
-
12
-
13
-
14
-
15
-
16
-
17
-
18
-
19
-
20
-
21
-
22
-
23
-
24
-
25
-
26
-
27
-
28
-
29
-
30
-
31
-
32
-
33
-
34
-
35
-
36
-
37
-
38
-
39
-
40
-
41
-
42
-
43
-
44
-
45
-
46
-
47
-
48
-
49
-
50
-
51
-
 52
52 -
 53
53 -
 54
54 -
 55
55 -
 56
56 -
 57
57 -
 58
58 -
 59
59 -
 60
60 -
 61
61 -
 62
62 -
63
-
64
-
65
-
66
-
67
-
68
-
69
-
70
-
71
-
72
-
73
-
74
-
75
-
76
-
77
-
78
-
79
-
80
-
81
-
82
-
83
-
84
-
85
-
86
-
87
-
88
-
89
-
90
-
91
-
92
-
93
-
94
-
95
-
96
-
97
-
98
-
99
-
100
-
101
 |
 |
