Panasonic AJHD1400 AJHD1400 User Guide - Page 28
Setting the user defaults, The mode for this unit will change to the default setting
 |
View all Panasonic AJHD1400 manuals
Add to My Manuals
Save this manual to your list of manuals |
Page 28 highlights
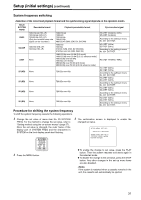
Setup (initial settings) (continued) 3 Incline the joystick up and down to adjust the cursor in the default settings screen to the "LOAD" position and press the joystick. The mode for this unit changes to the LOAD mode, the LOAD screen is displayed on the video monitor, and the item name is displayed in the counter display. SET-UP MENU ¢ NO FACTORY USER1(ALL) USER2(ALL) USER3(ALL) USER1(NOT SYSTEM) USER2(NOT SYSTEM) USER3(NOT SYSTEM) Setting the user defaults 1 Press the MENU button. A select screen for major menu items is displayed on the video monitor, and the names are displayed in the counter display. 2 Follow the procedure described in "Setting method using the on-screen menus" (page 27) 2-6 and adjust the desired settings. 3 Press the RESET button. The mode for this unit will change to the default setting mode, and the default setting screen will be displayed on the video monitor. 4 Incline the joystick up and down to adjust the cursor in the LOAD screen to the "FACTORY" position and press the joystick. z If this operation is made after moving the cursor to "FACTORY," values for all menus except the SYSTEM menu will return to the factory settings. z When the cursor is moved to "NO" and this operation is performed, the display returns to the menu screen without restoring the factory settings. 5 The confirmation screen is displayed on the video monitor. z When the PLAY button is pressed, the unit returns to the factory settings and the display of the menu screen disappears. z When the STOP button is pressed, the display returns to the menu screen without changing the settings. SETUP-MENU FACTORY OK? YES/NO SELECT MODE ¢ 0 ESCAPE 1 LOAD 2 SAVE 3 PROTECT 4 Incline the joystick up and down to adjust the cursor in the default settings screen to the "SAVE" position and press the joystick. The mode for this unit changes to the SAVE mode, the SAVE screen is displayed on the video monitor, and the item name is displayed in the counter display. SET-UP MENU ¢ NO USER1(ALL) USER2(ALL) USER3(ALL) USER1(NOT SYSTEM) USER2(NOT SYSTEM) USER3(NOT SYSTEM) 5 Incline the joystick up and down to adjust the cursor on the SAVE screen to the "USER ¢ (ALL)" position (¢ each value from 1 to 3.) and press the joystick. z When storing a set value other than SYSTEM menu in memory, move the cursor to "USER ¢ (NOT SYSTEM)" (¢ each value from 1 to 3.) and press the joystick. z To cancel the operation, move the cursor to "NO" and press the joystick. 28
-
 1
1 -
2
-
3
-
4
-
5
-
6
-
7
-
8
-
9
-
10
-
11
-
12
-
13
-
14
-
15
-
16
-
17
-
18
-
19
-
20
-
21
-
22
-
 23
23 -
 24
24 -
 25
25 -
 26
26 -
 27
27 -
 28
28 -
 29
29 -
 30
30 -
 31
31 -
 32
32 -
 33
33 -
34
-
35
-
36
-
37
-
38
-
39
-
40
-
41
-
42
-
43
-
44
-
45
-
46
-
47
-
48
-
49
-
50
-
51
-
52
-
53
-
54
-
55
-
56
-
57
-
58
-
59
-
60
-
61
-
62
-
63
-
64
-
65
-
66
-
67
-
68
 |
 |
