Panasonic AV-HS410 Operating Instructions Advanced - Page 106
Setting the date and time, 3-5. Network settings, Setting the date, Setting the IP address
 |
View all Panasonic AV-HS410 manuals
Add to My Manuals
Save this manual to your list of manuals |
Page 106 highlights
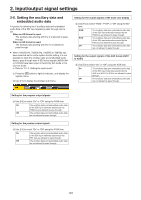
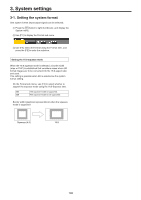
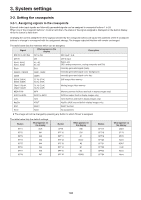
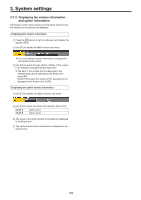
3. System settings 3-4. Setting the date and time The user can set the date and time to be used as the memory card's time stamp. Be absolutely sure to set them when an memory card is to be used. Setting the date 1 Press the s button to light its indicator, and display the System menu. 2 Use [F1] to display the Date sub menu. 3 Use [F2] to set the year using the Year item. 4 Use [F3] to set the month using the Month item. 5 Use [F4] to set the day using the Date item. 6 Press the [F5] to enter the year/month/day. 3-5. Network settings Proceed with the network settings to perform such tasks as updating the software version via LAN. The network initial setup is: IP address: 192.168.0.8, subnet mask: 255.255.255.0. When using the host computer with settings matching the initial setup, it is not necessary to setup via the menu. For the setting to take effect, the system must be rebooted. Turn the system's power off and then back on. Setting the IP address 1 Press the s button to light its indicator, and display the System menu. 2 Use [F1] to display the Network1 sub menu. 3 Use [F2] to [F5] to set the IP address, and press the [F5] (Save) to enter the address. Setting the time 1 On the System menu, use [F1] to display the Time sub menu. Setting the subnet mask 1 On the System menu, use [F1] to display the Network2 sub menu. 2 Use [F2] to set the hour using the Hour item. 3 Use [F3] to set the minutes using the Minute item. 4 Use [F4] to set the seconds using the Second item. 5 Press the [F5] to enter the hour/minutes/seconds. 2 Use [F2] to [F5] to set the subnet mask, and press the [F5] (Save) to enter the mask. Setting the gateway 1 On the System menu, use [F1] to display the Network3 sub menu. 2 Use [F2] to [F5] to set the gateway, and then press [F5] (Save) to enter the setting. Display the MAC address 1 On the System menu, use [F1] to display the Network4 sub menu. The MAC address now appears. 106
-
 1
1 -
2
-
3
-
4
-
5
-
6
-
7
-
8
-
9
-
10
-
11
-
12
-
13
-
14
-
15
-
16
-
17
-
18
-
19
-
20
-
21
-
22
-
23
-
24
-
25
-
26
-
27
-
28
-
29
-
30
-
31
-
32
-
33
-
34
-
35
-
36
-
37
-
38
-
39
-
40
-
41
-
42
-
43
-
44
-
45
-
46
-
47
-
48
-
49
-
50
-
51
-
52
-
53
-
54
-
55
-
56
-
57
-
58
-
59
-
60
-
61
-
62
-
63
-
64
-
65
-
66
-
67
-
68
-
69
-
70
-
71
-
72
-
73
-
74
-
75
-
76
-
77
-
78
-
79
-
80
-
81
-
82
-
83
-
84
-
85
-
86
-
87
-
88
-
89
-
90
-
91
-
92
-
93
-
94
-
95
-
96
-
97
-
98
-
99
-
100
-
 101
101 -
 102
102 -
 103
103 -
 104
104 -
 105
105 -
 106
106 -
 107
107 -
 108
108 -
 109
109 -
 110
110 -
 111
111 -
112
-
113
-
114
-
115
-
116
-
117
-
118
-
119
-
120
-
121
-
122
-
123
-
124
-
125
-
126
-
127
-
128
-
129
-
130
-
131
-
132
-
133
-
134
-
135
-
136
-
137
-
138
-
139
-
140
-
141
-
142
-
143
-
144
-
145
-
146
 |
 |
