Panasonic AV-HS410 Operating Instructions Advanced - Page 8
Selecting the bus mode, Single SHIFT, Allocating the SHIFT function
 |
View all Panasonic AV-HS410 manuals
Add to My Manuals
Save this manual to your list of manuals |
Page 8 highlights
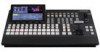
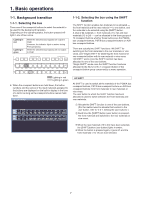
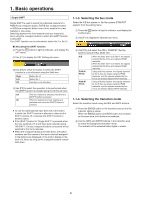
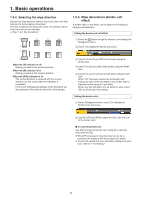
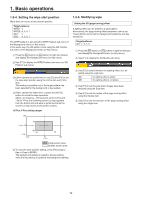
1. Basic operations Single SHIFT Single SHIFT is used to switch the individual material of a PGM/A bus crosspoint button, PST/B bus crosspoint button or AUX bus crosspoint button from a front material to a rear material or vice versa. Switching between the front material and rear material is done using the crosspoint button in which the SHIFT function is allocated. The SHIFT function can be allocated to button No.1 or No.12. ww Allocating the SHIFT function 1 Press the x button to light its indicator, and display the XPT menu. 2 Use [F1] to display the XPT Setting sub menu. 3 Use [F2] to select the button to which the SHIFT function is to be allocated using the Shift item. Right Left Off Button No.12 Button No.1 Function is not allocated. 4 Use [F3] to select the operation to be performed when the [SHIFT] button is pressed using the Shift-Lock item. Off The rear material is selected only while the [SHIFT] button is pressed. On The front material and rear material are switched each time the [SHIFT] button is pressed. ppTo use the materials that have been set in the button to which the SHIFT function is allocated, either set the SHIFT function off or allocate the SHIFT function to another button. ppIf the [SHIFT] button for "Single SHIFT" is pressed when the rear materials (13 to 24) have been selected using "All SHIFT", the bus crosspoint buttons concerned will be switched to the front materials. ppWhen the crosspoint buttons are held down, the button numbers and the names of the input materials assigned to the buttons are displayed on the built-in display in the form of a list for as long as the crosspoint buttons remain held down. 1-1-3. Selecting the bus mode Select the A/B bus system or flip-flop system (PGM/PST system) from the setting menu. 1 Press the s button to light its indicator, and display the Config menu. 2 Use [F1] to display the Operate sub menu. 3 Use [F2], and select the A/B or PGM/PST (flip-flop system) using the Bus Mode item. A/B PGM-A/ PST-B PGM-B/ PST-A When the fader lever is at side A, the signals selected by the A bus are replaced PGM materials. When the fader lever is at side B, the signals selected by the B bus are replaced PGM materials. Using a flip-flop system, the signals selected by the A bus are always replaced PGM materials, and the signals selected by the B bus are always replaced PST materials. Using a flip-flop system, the signals selected by the B bus are always replaced PGM materials, and the signals selected by the A bus are always replaced PST materials. 1-1-4. Selecting the transition mode Select the transition mode using the MIX and WIPE buttons. 1 Press the [BKGD] button in the transition area so that its indicator lights in amber. When the [BKGD] button and [KEY] button are pressed at the same time, both buttons are selected. 2 Use the [MIX] and [WIPE] buttons in the transition area to select the background transition mode. The indicator of the selected button lights in amber. 8
-
 1
1 -
2
-
 3
3 -
 4
4 -
 5
5 -
 6
6 -
 7
7 -
 8
8 -
 9
9 -
 10
10 -
 11
11 -
 12
12 -
 13
13 -
14
-
15
-
16
-
17
-
18
-
19
-
20
-
21
-
22
-
23
-
24
-
25
-
26
-
27
-
28
-
29
-
30
-
31
-
32
-
33
-
34
-
35
-
36
-
37
-
38
-
39
-
40
-
41
-
42
-
43
-
44
-
45
-
46
-
47
-
48
-
49
-
50
-
51
-
52
-
53
-
54
-
55
-
56
-
57
-
58
-
59
-
60
-
61
-
62
-
63
-
64
-
65
-
66
-
67
-
68
-
69
-
70
-
71
-
72
-
73
-
74
-
75
-
76
-
77
-
78
-
79
-
80
-
81
-
82
-
83
-
84
-
85
-
86
-
87
-
88
-
89
-
90
-
91
-
92
-
93
-
94
-
95
-
96
-
97
-
98
-
99
-
100
-
101
-
102
-
103
-
104
-
105
-
106
-
107
-
108
-
109
-
110
-
111
-
112
-
113
-
114
-
115
-
116
-
117
-
118
-
119
-
120
-
121
-
122
-
123
-
124
-
125
-
126
-
127
-
128
-
129
-
130
-
131
-
132
-
133
-
134
-
135
-
136
-
137
-
138
-
139
-
140
-
141
-
142
-
143
-
144
-
145
-
146
 |
 |
