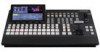
Panasonic AV-HS410 Operating Instructions Advanced - Page 79
Setting the up-converter, Fine-tuning of image positions, Setting the gamut limiter
 |
View all Panasonic AV-HS410 manuals
Add to My Manuals
Save this manual to your list of manuals |
Page 79 highlights
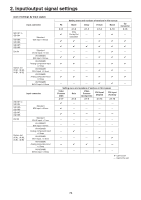
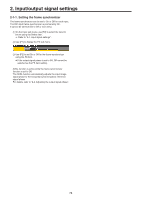
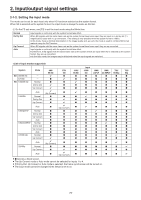
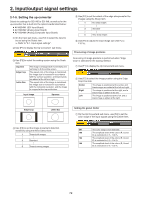
2. Input/output signal settings 2-1-6. Setting the up-converter Select the settings for SDI IN5 to SDI IN8, as well as for the up-converter that is built into the option boards listed below: ppAV-HS04M1 (SDI Input Board) ppAV-HS04M2 (Analog Input Board) ppAV-HS04M6 (Analog Composite Input Board) 1 On the Input sub menu, use [F2] to select the input to be set using the Select item. Refer to "2-1. Input signal settings". 2 Use [F1] to display the Up Converter1 sub menu. 3 Use [F2] to select the scaling system using the Scale item. Squeeze Edge Crop Letter Box The image is enlarged both horizontally and vertically to fill the entire screen. The aspect ratio of the image is maintained, the image size is increased in accordance with the vertical resolution, and black bands are added at the left and right. The aspect ratio of the image is maintained, the image size is increased in accordance with the horizontal resolution, and the image is cropped at the top and bottom. Input image Squeeze 5 Use [F4] to set the extent of the edge sharpness for the images using the Sharp item. 1 Not sharp edges 3 Standard 5 Very sharp edges 6 Use [F5] to adjust the input image size (100 % to 110 %). Fine-tuning of image positions Fine-tuning of image positions is performed when "Edge Crop" is selected for the scaling method. 1 Use [F1] to display the Up Converter2 sub menu. 2 Use [F2] to select the image position using the Edge Crop Pos item. Center Right Left The image is positioned at the center, and black images are added at the left and right. The image is positioned at the right, and a black image is added at the left. The image is positioned at the left, and a black image is added at the right. Edge Crop Letter Box Setting the gamut limiter 1 On the Up Converter2 sub menu, use [F4] to set the color range of the input signals using the Limiter item. 4 Use [F3] to set the image movement detection sensitivity using the Move Detect item. 1 Toward still images 3 Standard 5 Toward moving images Off The color range is not restricted. 108 The amplitude level of the colors (R, G and B) is restricted to 0 % - 108 %. 104 The amplitude level of the colors (R, G and B) is restricted to 0 % - 104 %. 100 The amplitude level of the colors (R, G and B) is restricted to 0 % - 100 %. 79
-
 1
1 -
2
-
3
-
4
-
5
-
6
-
7
-
8
-
9
-
10
-
11
-
12
-
13
-
14
-
15
-
16
-
17
-
18
-
19
-
20
-
21
-
22
-
23
-
24
-
25
-
26
-
27
-
28
-
29
-
30
-
31
-
32
-
33
-
34
-
35
-
36
-
37
-
38
-
39
-
40
-
41
-
42
-
43
-
44
-
45
-
46
-
47
-
48
-
49
-
50
-
51
-
52
-
53
-
54
-
55
-
56
-
57
-
58
-
59
-
60
-
61
-
62
-
63
-
64
-
65
-
66
-
67
-
68
-
69
-
70
-
71
-
72
-
73
-
 74
74 -
 75
75 -
 76
76 -
 77
77 -
 78
78 -
 79
79 -
 80
80 -
 81
81 -
 82
82 -
 83
83 -
 84
84 -
85
-
86
-
87
-
88
-
89
-
90
-
91
-
92
-
93
-
94
-
95
-
96
-
97
-
98
-
99
-
100
-
101
-
102
-
103
-
104
-
105
-
106
-
107
-
108
-
109
-
110
-
111
-
112
-
113
-
114
-
115
-
116
-
117
-
118
-
119
-
120
-
121
-
122
-
123
-
124
-
125
-
126
-
127
-
128
-
129
-
130
-
131
-
132
-
133
-
134
-
135
-
136
-
137
-
138
-
139
-
140
-
141
-
142
-
143
-
144
-
145
-
146
 |
 |
