Panasonic WJHD200 WJHD200 User Guide - Page 71
Mail Setup, Network Video Setup, Live & Playback Image Setup LIVE & PLAY
 |
View all Panasonic WJHD200 manuals
Add to My Manuals
Save this manual to your list of manuals |
Page 71 highlights
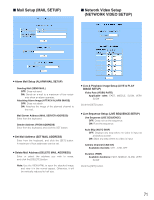
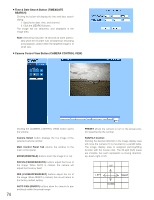
I Mail Setup (MAIL SETUP) I Network Video Setup (NETWORK VIDEO SETUP) 8 Alarm Mail Setup (ALARM MAIL SETUP) Sending Mail (SEND MAIL) OFF: Does not send. ON: Sends an e-mail to a maximum of four recipients when an alarm operates. Attaching Alarm Image (ATTACH ALARM IMAGE) OFF: Does not attach. ON: Attaches the image of the alarmed channel to the mail. Mail Server Address (MAIL SERVER ADDRESS) Enter from the keyboard. Sender Address (FROM ADDRESS) Enter from the keyboard, and click the SET button. 8 Set Mail Address (SET MAIL ADDRESS) Enter from the keyboard, and click the [SET] button. A maximum of four addresses can be set. 8 Delete Mail Address (DELETE MAIL ADDRESS) Enter or select the address you wish to erase, and click the [DELETE] button. Note: Use the VIEW.HTML to open the attached image and view it in the normal aspect. Otherwise, it will be vertically reduced to half size. 8 Live & Playback Image Setup (LIVE & PLAY IMAGE SETUP) Video Rate (VIDEO RATE) Applicable rates: FAST, MIDDLE, SLOW, VERY SLOW Click the [SET] button. 8 Live Sequence Setup (LIVE SEQUENCE SETUP) Use Sequence (USE SEQUENCE) OFF: Does not run the sequence. ON: Runs the sequence. Auto Skip (AUTO SKIP) OFF: Displays any step where no video is input as a blackout screen. ON: Skips any step where no video is input. Camera Channel (CAM CH) Available channels: CH1 - CH8, OFF Duration (TIME) Available durations: FAST, MIDDLE, SLOW, VERY SLOW Click the [SET] button. 71
-
 1
1 -
2
-
3
-
4
-
5
-
6
-
7
-
8
-
9
-
10
-
11
-
12
-
13
-
14
-
15
-
16
-
17
-
18
-
19
-
20
-
21
-
22
-
23
-
24
-
25
-
26
-
27
-
28
-
29
-
30
-
31
-
32
-
33
-
34
-
35
-
36
-
37
-
38
-
39
-
40
-
41
-
42
-
43
-
44
-
45
-
46
-
47
-
48
-
49
-
50
-
51
-
52
-
53
-
54
-
55
-
56
-
57
-
58
-
59
-
60
-
61
-
62
-
63
-
64
-
65
-
 66
66 -
 67
67 -
 68
68 -
 69
69 -
 70
70 -
 71
71 -
 72
72 -
 73
73 -
 74
74 -
 75
75 -
 76
76 -
77
-
78
-
79
-
80
-
81
-
82
-
83
-
84
-
85
-
86
-
87
-
88
-
89
-
90
-
91
-
92
-
93
-
94
 |
 |
