Panasonic WJHD200 WJHD200 User Guide - Page 74
Time & Date Search Button TIME&DATE, SEARCH, Camera Control View Button CAMERA CONTROL VIEW
 |
View all Panasonic WJHD200 manuals
Add to My Manuals
Save this manual to your list of manuals |
Page 74 highlights
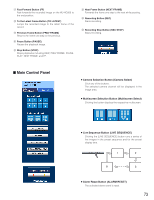
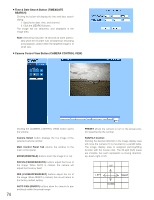
8 Time & Date Search Button (TIME&DATE SEARCH) Clicking the button will display the time and date search dialog. 1. Specify the date, time, and channel. 2. Click the [SEARCH] button. The image will be searched, and displayed in the image area. Note: Searching may take 18 seconds at worst particularly when the recorder runs simultaneous recording and playback, and/or when the targeted image is of small size. 8 Camera Control View Button (CAMERA CONTROL VIEW) Clicking the [CAMERA CONTROL VIEW] button opens the window. Camera Select button displays the live image of the selected camera number. Main Control Panel Tab returns the window to the main control panel. ZOOM (WIDE/TELE) buttons zoom the image in or out. FOCUS (FAR/NEAR/AUTO) buttons adjust the focus of the image. When AUTO is clicked, the camera will adjust the focus by itself. IRIS (CLOSE/OPEN/RESET) buttons adjust the iris of the image. When RESET is clicked, the iris will return to the factory default setting. AUTO PAN (ON/OFF) buttons allow the camera to pan endlessly within the preset range. 74 PRESET allows the camera to turn to the preset position specified by the number. PAN/TILT Control: Clicking the desired direction in the image display area will move the camera if it is mounted on a pan/tilt table. The image display area is assigned panning/tilting function with the mouse click. The 25-split (5x5) areas are invisible, but each represents a moving direction: up, down, right or left. UP LEFT RIGHT DOWN
-
 1
1 -
2
-
3
-
4
-
5
-
6
-
7
-
8
-
9
-
10
-
11
-
12
-
13
-
14
-
15
-
16
-
17
-
18
-
19
-
20
-
21
-
22
-
23
-
24
-
25
-
26
-
27
-
28
-
29
-
30
-
31
-
32
-
33
-
34
-
35
-
36
-
37
-
38
-
39
-
40
-
41
-
42
-
43
-
44
-
45
-
46
-
47
-
48
-
49
-
50
-
51
-
52
-
53
-
54
-
55
-
56
-
57
-
58
-
59
-
60
-
61
-
62
-
63
-
64
-
65
-
66
-
67
-
68
-
 69
69 -
 70
70 -
 71
71 -
 72
72 -
 73
73 -
 74
74 -
 75
75 -
 76
76 -
 77
77 -
 78
78 -
 79
79 -
80
-
81
-
82
-
83
-
84
-
85
-
86
-
87
-
88
-
89
-
90
-
91
-
92
-
93
-
94
 |
 |
